


Annex
9—3
Restart
of
rotor:
‐
Switch
off
power
and
switch
on
power
again
or
‐
Press
the
test
button
inside
the
cabinet
Test
of
motor
by
checking
the
resistance
in
all
3
vindings
Motor
sizes
Ohm
90TYD
‐
S214
‐
M
40
Ω
120TYD
‐
S214
‐
M
18
Ω
120TYD
‐
S214
‐
L
10
Ω
Setting
of
constant
speed:
‐
Set
fourth
DIP
switch
lever
in
position
‐
ON
Test:
‐
Set
fourth
DIP
switch
lever
in
position
–
ON
‐
Press
the
test
button
9.1.3
Copy
of
the
label
with
information
about
connection
of
cables
This
self
‐
adhesive
label
is
always
placed
on
the
cover
of
the
cabinet.
The
text
is
always
in
English.
Summary of Contents for Danvent DV
Page 28: ...Bilag 8 8...
Page 33: ...Annex 9 5...
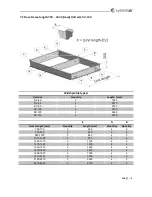
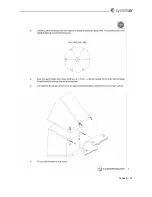
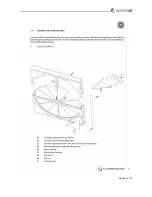
Page 36: ...Annex 9 8 9 3 Assemble divided rotor for DV 60 DV 80 DV 100 DV 120 og DV 150...
Page 37: ...Annex 9 9...
Page 38: ...Annex 9 10...
Page 39: ...Annex 9 11...
Page 40: ...Annex 9 12...
Page 41: ...Annex 9 13...
Page 42: ...Annex 9 14...
Page 43: ...Annex 9 15...
Page 44: ...Annex 9 16...
Page 45: ...Annex 9 17...
Page 46: ...Annex 9 18...
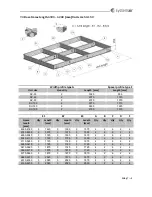
Page 47: ...Annex 9 19 9 4 Assemble divided rotor for DV 190 og DV 240...
Page 48: ...Annex 9 20...
Page 49: ...Annex 9 21...
Page 50: ...Annex 9 22...
Page 51: ...Annex 9 23...
Page 52: ...Annex 9 24...
Page 53: ...Annex 9 25...
Page 54: ...Annex 9 26...
Page 55: ...Annex 9 27...
Page 56: ...Annex 9 28...
Page 57: ...Annex 9 29...
Page 58: ...Annex 9 30...
Page 71: ...Annex 12 3...
Page 75: ...Annex 12 7...