background image

REFERENCE

EN

REFERENCE

51

SwannView Link: Device Settings

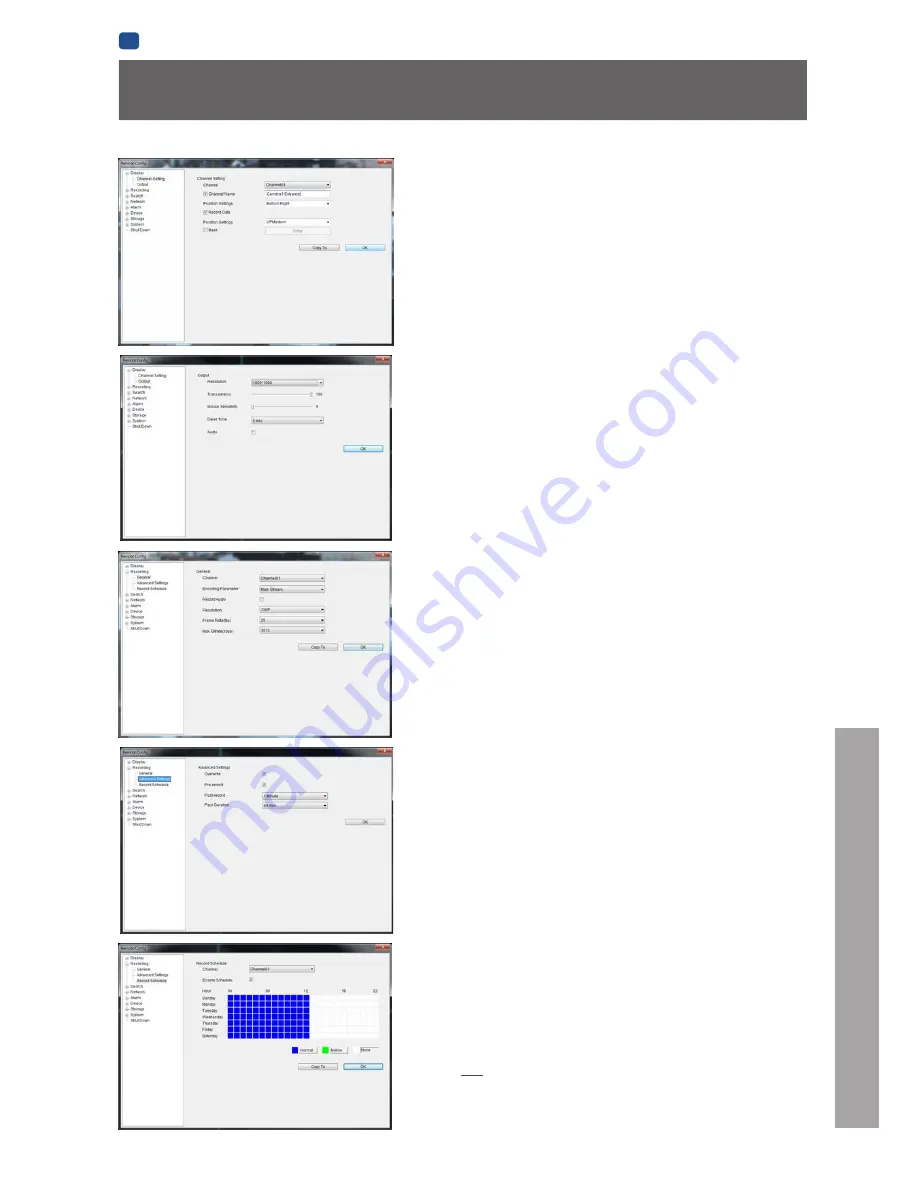
Display: Channel Settings

Channel Name (Check Box):

 Whether the channel’s name will be 

displayed on screen or not. 

Channel Name:

 The title you’d like to give that camera.

Record Data:

 Whether the overlays (Channel Name, Date and so on) will 

be recorded onto the video with your images.

Position Settings:

  Select the position of the channel name and record 

date labels that are overlaid on the screen.

Mask (Check Box):

 Turns the masking function on or off.

Mask (Setup):

 Creates a black privacy overlay which masks part of your 

images.  Will affect recordings.

Display: Output

Resolution:

 Set the screen resolution to output to your monitor.

Transparency:

 How transparent you want the NVR menus to be.

Mouse Sensitivity:

 Adjust the sensitivity of mouse movements.

Dwell Time:

  Select how long channels will be displayed when usingauto-

sequence mode.

Audio:

 This function is not supported by the camera(s) supplied with the 

NVR.

Recording: General

Encoding Parameter:

 Choose from the main-stream or sub-stream to 

configure.

Main Stream:

 The way the NVR will internally process and record video.

Sub Stream:

 The way the NVR will encode and send video to a remote 

device (such as the PC you’re using to access the NVR).

Record Audio (Check Box):

 This function is not supported by the camera(s) 

supplied with the NVR.

Resolution:

 How many pixels (little dots) make up your image. 

Frame Rate:

 How many images per second the NVR will capture. 

“Realtime” is 30fps (NTSC) or 25fps (PAL).

Max. Bitrate:

 The maximum size that your video files will be. The higher 

this is set, the better recordings will look - however, they’ll also fill the 

hard drive faster.

Recording: Advanced Config

Overwrite:

 Whether the NVR will erase old recordings to make room for 

new ones, or not. 

Pre-record:

 Whether the NVR will cache and save footage that occurs 

immediately 

before 

an alarm/motion event.

Delay:

 How long 

after

 an alarm event or motion the NVR will continue to 

record for.

Pack Duration:

 The amount of video that will be stored as a single “pack”. 

Unless you have very specific requirements, leave this at the default value.

Recording: Schedule

Use the 

Copy To

 functions to quickly assign identical schedule layouts to 

multiple channels at once.

Be careful when programming your schedule. It’s one of the most important 

aspects of setting up your NVR, and if it’s wrong in any way, it could lead to 

complications later.

Note: Do NOT select Normal and Motion/Alarm-based recording at the same 

time on the same channel  - this can cause conflicts in the way that the NVR 

interprets footage and event information.

Summary of Contents for NVR-7085 models

Page 1: ...1 INSTRUCTION MANUAL EN 720p High Definition Network Video Recorder NVR 7085 models...

Page 2: ...rsations of others unless such use is authorized by all of the parties engaging in the conversation WARNING Modifications not approved by the party responsible for compliance could void user s authori...

Page 3: ...Search The Playback Interface 30 Specific Incident Backup 31 Search Backup 31 Search Event Log Search 32 Network General 33 Network Advanced 34 Network Advanced DDNS 35 Network Advanced NTP 35 Networ...

Page 4: ...4 Chapter 1 Introduction...

Page 5: ...verything is fixed in place Getting the NVR Setup There are three stages to getting your NVR set up If you want to use the default settings you ll only need to complete steps one and two Stage 1 Conne...

Page 6: ...6 Chapter 2 Basic Setup...

Page 7: ...t or modify any cable for any reason Doing so will void your warranty as well as pose a great risk of fire or electrical shock Do not expose the NVR to sudden bumps or shocks for example being dropped...

Page 8: ...NVR to your router or network switch for Internet connectivity USB 2 0 For connecting the USB mouse or a USB storage device The mouse will work in either port use whichever one works for you POE Came...

Page 9: ...SB port Connect the camera s LAN Video port to any POE Camera port on the NVR using one of the long Ethernet cables provided You can also create or purchase longer LAN cables if required theyarethesam...

Page 10: ...end 1TB maximum for USB compatibility The HDD will need to have been formatted on a PC first before it will be recognised Note Not all HDDs are supported Connecting Additional Devices The spare USB 2...

Page 11: ...menu system specifically for mouse friendly navigation The controls are pretty easy to remember heck there are only two buttons It couldn t be simpler Left click Selects an item or confirms a choice...

Page 12: ...ted black and white or simply not appear at all Resolution How many pixels the NVR will output Typically you ll want to set this to be equal to the native resolution of your monitor television check t...

Page 13: ...smtp live com or smtp mail yahoo com Other Allows for custom definintion of an outgoing email server See Network Advanced Email Settings on page 36 if you want to use an email server other than ones p...

Page 14: ...fferent port If you re using pool ntp org ensure the port is 123 Sync Triggers the NVR to automatically synchronize its internal clock with the time server immediately If your NVR is connected to the...

Page 15: ...unt s password when accessing the main menu Display wizard when booting up checkbox Select this if you want the NVR to automatically run the configuration wizard when it boots up You can also run the...

Page 16: ...g the SwannView Link App After you have downloaded and installed SwannView Link HD on your smartphone or tablet locate the app and tap the icon to run Take your smartphone tablet to your NVR and follo...

Page 17: ...install SwannView Link Insert the included CD into your computer Locate the file called SwannView Link and run this file You may be asked by UAC User Account Control to allow SwannView Link to make ch...

Page 18: ...see your cameras live on your PC Main Viewing Area Playback and Backup Links Viewing Modes Volume Control Image Controls Preview Playback Setup Channel List Need more details Full explanation of the...

Page 19: ...ording This icon will be the same whether the recording was scheduled initiated manually or triggered by motion though the motion icon will also be present if there s motion detected The motion icon i...

Page 20: ...ontrol panel Click to zoom in to zoom out to draw a box over an area of the video that you want to zoom in on to restore zoom back to default setting to exit Digital Zoom mode 5 Image Setting Displays...

Page 21: ...21 Chapter 3 Advanced Configuration...

Page 22: ...er the NVR s default behavior you ll need to change some of the advanced settings You can do this by using either the NVR s built in interface or SwannView Link PC software as detailed see SwannView L...

Page 23: ...el because the NVR does not allow identical channels to be displayed If there is a particular channel in which you want to display a camera you will have to delete this camera from it s existing chann...

Page 24: ...w light the image appears to be However it can t make the camera see further in the dark or increase the clarity of an ill lit image Contrast Increases the difference between the blackest black and th...

Page 25: ...u might need to enable letter boxing on your monitor and use a 4 3 format PC Monitor via HDMI Choose a format appropriate for your monitor If it s a widescreen use a widescreen format Set to the highe...

Page 26: ...ing recordings encoded at higher bitrates will be of better quality especially when recording movement The main stream uses a variable bitrate to record video the more movement occurs in the video the...

Page 27: ...ery useful for example if an intruder or potential target triggers the motion detection but pauses in view having post record enabled will get a much better look at them 30 seconds is the recommended...

Page 28: ...o choose from Normal The NVR will constantly record for any period where Normal is selected You won t miss anything but constant recording will fill your hard drive very quickly The NVR does record th...

Page 29: ...All Set your Start Date Time and your End Date Time If you want to see a graphical representation of when recordings were made and what recording mode triggered them choose Details Select Search Choo...

Page 30: ...normal speed Pause Step Pauses playback but retains still images on screen Subsequent presses will move a single frame forward in the video This will usually be 1 30th NTSC or 1 25th PAL of a second...

Page 31: ...as a single pack and the interesting bit is from 33 12 to 33 26 We re sure you don t want to copy and convert the whole hour for those precious 14 seconds So there is a better way Shown above is the P...

Page 32: ...e shows the overall progress To end the backup process before it s complete choose Cancel Some or all of the incidents you selected will not have been copied While backing up particularly when transco...

Page 33: ...t Mask might be something like 255 255 255 0 Default Gateway This is the address of the way to the Internet to continue the road analogy this is like your local access point to the highway This is an...

Page 34: ...ort This is the port through which you will be able to log in to the NVR Like the serverport it will need to be forwarded properly in order to ensure smooth latency free communication The default valu...

Page 35: ...st To check if the DDNS is working click the Test button After a short delay a message will be displayed on screen informing you whether the update was successful or not If the test is unsuccessful a...

Page 36: ...correct SMTP server SMTP port SSL or TSL requirements and so on SMTP Port The SMTP port used by the email provider of your choice This field will automatically self populate if you use one of the pres...

Page 37: ...here if you re not sure what you re doing is more likely to break things than make anything better Network Advanced IP Filter Network Network Status The Network Status screen displays a quick summary...

Page 38: ...tion detection triggers an alarm signal Enable Whetherornotmotiondetectionisenabledonaspecific channel Each channel can be configured independently of one another MotionDetection Click the applicable...

Page 39: ...motion sensitivity values for You can change what time s each period starts and ends to best match the changing lighting conditions in your location Typically values between 5 and 10 will give good re...

Page 40: ...important to have as much information as possible For example images of someone in your home may not actually prove that they broke in but footage of them breaking a window does If you use a camera in...

Page 41: ...m the Network menu see Network Advanced Email Settings on page 36 for details Alarm Motion Detection Action Audio Warning The NVR will use its internal buzzer to emit an alarm tone It sounds like an o...

Page 42: ...a problem with the NVR s configuration a fault with your network or a problem with your Internet Service Provider ISP IP Conflict This event will occur if the NVR detects another device on the same n...

Page 43: ...the S M A R T report is practically identical to what you d see on a desktop PC while using Administrator Tools or a similar service Device HDD Device S M A R T Init Initializes the hard drive You ll...

Page 44: ...ually tell the NVR exactly when it commences and ends in your locality First turn DST on We suggest setting the Daylight Saving Time Mode to Date and manually entering the dates and times that dayligh...

Page 45: ...ss to the NVR Guests and Operators Guest By default a Guest user has access to the live images on the NVR and can search through recorded events They cannot change any settings or configure the NVR in...

Page 46: ...ou re still curious Device Name The name that the NVR considers to be its own and what it will use to register an IP address with your DHCP host The remaining information is for use by Swann s Technic...

Page 47: ...nfiguration first so you don t have to re set everything Default Settings Restore Loads the factory default settings This must be done after a firmware upgrade to ensure proper operation of the NVR Yo...

Page 48: ...48 Chapter 4 Reference...

Page 49: ...yback and backup Image Controls You can alter the brightness contrast saturation and hue of your images here They operate in the same way as those in the NVR s menu see Display Camera on page 24 for m...

Page 50: ...complex word transcoding is just a shortening of translating code Transcoding while a straight forward process is very processor intensive You may notice significant slow down on your computer while t...

Page 51: ...o a remote device such as the PC you re using to access the NVR RecordAudio CheckBox Thisfunctionisnotsupportedbythecamera s supplied with the NVR Resolution How many pixels little dots make up your i...

Page 52: ...se uses this port The default value is 9000 This is the port number you ll use when logging in over the Internet from the SwannView Link software or remote access from a mobile device HTTP Port The se...

Page 53: ...is configured to do so this will be to record video It can also be a cue to trigger an email alert or to sound the NVR s internal buzzer Alarm Video Loss Action Check boxes Whether you d like the NVR...

Page 54: ...enu in the NVR menu Rather than attempt to summarize here it s easier to simply turn to page 43 to learn more System General System Information Maintenance Operates in the same way as the System subme...

Page 55: ...which might cause false triggers include the flickering of screens monitors or fluorescent lights reflections of movement in windows mirrors and so on lights which are often turned on or off shadows...

Page 56: ...Note Each number in the IP address cannot exceed 255 Assigning the IP Address information to the NVR We recommend doing this locally on the NVR itself even if you can access the NVR via the network us...

Page 57: ...ntry of origin The warranty does not cover any incidental accidental or consequential damages arising from the use of or the inability to use this product Any costs associated with the fitting or remo...

Page 58: ...Telephone Helpdesk USA Toll Free 1 800 627 2799 USA Exchange Repairs 1 800 627 2799 Option 1 M F 9am 5pm US PT AUSTRALIA 1300 138 324 NEW ZEALAND Toll Free 0800 479 266 UK 0203 027 0979 Helpdesk Techn...

Reviews: