background image


38

8.5. Measurement 

1

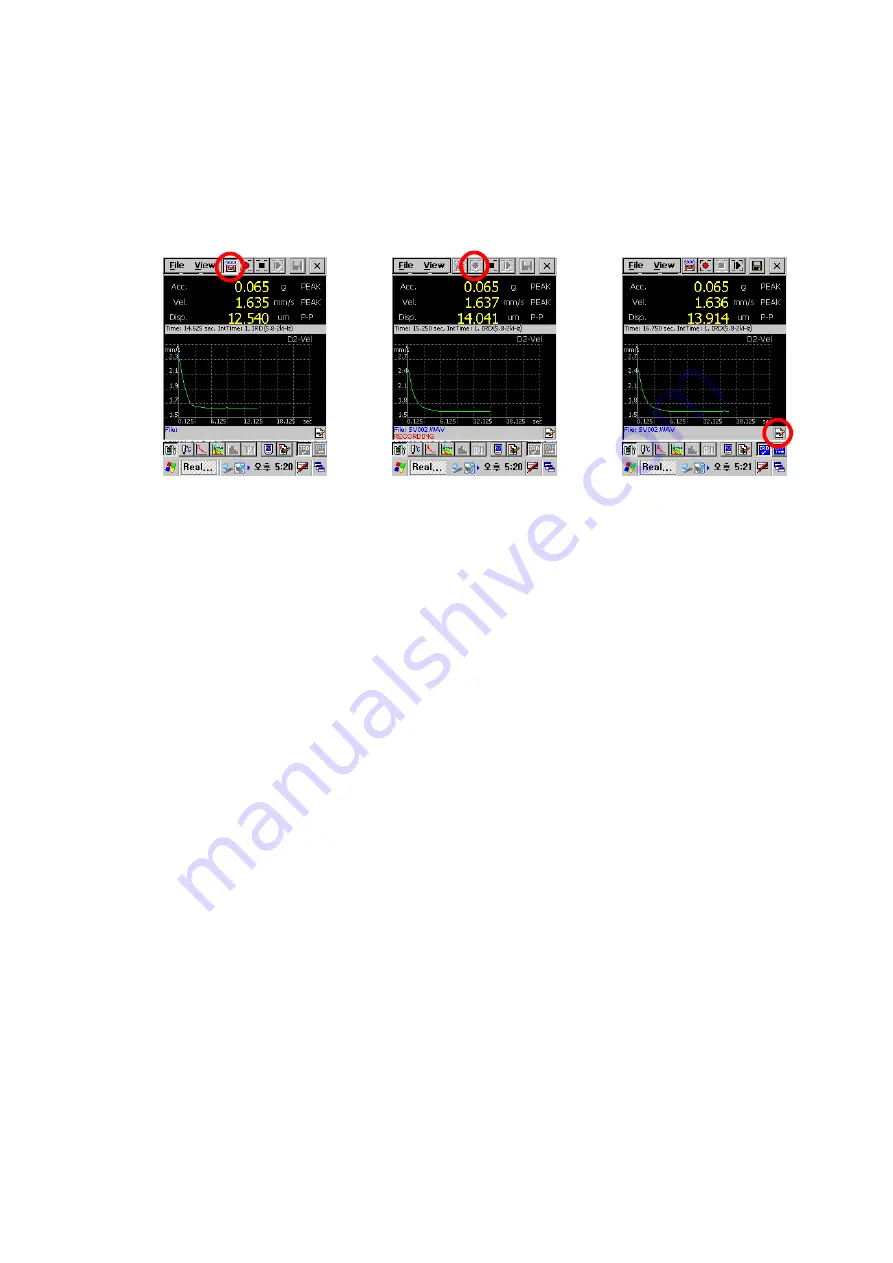
 Confirm the status of measurement to press [ARM] button. 

2

 Start measurement to press [Record] button. 

3

 Enter recording information to press [Entering recording information] button. 


[Fig. IV-8-7] ARM Button 


[Fig. IV-8-8] Recording Button


[Fig. IV-8-9] Entering recording 

information Button


Summary of Contents for SLA-PA201

Page 1: ...Smart Sound Vibration Analyzer Real Time Based Measurement System Manual First Edition Ver 1 7 SV Corp ...

Page 2: ...e you can download a upgraded program Smart Sound Vibration Analyzer Copyright by SV Corporation http www svdigital com http www svemall com ftp realwave realwave svdigital com email sales svdigital com RM302 SangShin BD 719 1 Yi Dong SangRok Gu AnSan City KyongGi Do 426 857 South Korea Tel 82 31 501 4030 Fax 82 31 501 4032 ...

Page 3: ...l Meter 21 2 Setting of measuring option 26 3 Display Option 32 4 Measurement and Storage 33 5 Playback and Analysis 34 6 Input of Measurement Information 35 7 Octave Analysis in Vibration Level Meter 35 8 Setting options for Human Vibration Measurement 36 V Real Time FFT SpectrumxSpectrogram and Octave Analysis 39 1 Understanding of Frequency Analysis 39 2 Fast Fourier Transform 39 3 FFT Based Oc...

Page 4: ...되어 있지 않습니다 4 Power Setting of PDA 오류 책갈피가 정의되어 있지 않습니다 5 memory 오류 책갈피가 정의되어 있지 않습니다 6 Backlight 오류 책갈피가 정의되어 있지 않습니다 7 Deleting Programs 오류 책갈피가 정의되어 있지 않습니다 Appendix 1 64 The Theory for calculating RMS by ISO2631 and ISO8041 64 Appendix 2 67 Frequency Response of Filter in the Vibration Level Meter 67 1 1Hz Highpass Filter 68 2 5Hz Highpass Filter 69 3 10Hz Highpass Filter 70 4 2Hz 300Hz Bandpas...

Page 5: ...und Vibration Analyzer AC Adapter 1set USB Interface Cable 1 ea Smart Sound Vibration Analyzer 1 ea S W CD RealWave S W Firmware Update S W RealWave Desk S W 1ea Manual 1 ea Portable Aluminum Hardcase 1 ea Fig I 1 System Diagram ...

Page 6: ...t the CD Run the RealWave exe file from the RealWave folder of the CD Rom drive When the window appears like Fig II 1 1 and click Next it can be proceed to Fig II 1 2 and Fig II 1 3 And then click OK to finish installation Fig II 1 3 Realwave ARM CAB files use when installing a program from PDA directly Fig II 1 1 Installation window 1 Fig II 1 2 Installation window 2 Fig II 1 3 Installation windo...

Page 7: ...alWave program doesn t work properly if the license number is different Please contact us when you have a problem with the license number Fig II 2 1 Registration window Fig II 2 2 Entering license number 2 2 Pre registered PDA If you have PDA included package program will start without register procedure like Fig II 2 1 In case of no H W or failure to recognize icons in the red box are not activat...

Page 8: ...hen the new version is released First FirmUp1 0_ENG exe file in the RealWave software CD has to be copied at a proper folder in PDA Here is the way to copy it 1 Copy the FirmUp1 0_ENG exe in the RealWave software CD 2 Connect PDA with PC using a USB cable 3 After ActiveSync connected double click the Mobile Devices folder on the windows explorer Several folder in PDA will be found 4 Paste FirmUp1 ...

Page 9: ...se AC adaptor or USB cable but not to use PDA while updating It is very harmful that H W is removed from CF card slot or shut down compulsorily while updating If it causes you can t to update it and the hardware has to be repaired You must turn off PDA after finishing upgrade Or remove hardware from PDA and then insert hardware again Attention before updating firmware 1 Use of AC adaptor or USB ca...

Page 10: ...e called ARM button Icon to measure and record wave file in real time To accomplish sound hearing function press and icons so that you can hear sounds in real time Fig III 1 1 Vibration Level Meter Fig III 1 2 Vibration Options Fig III 1 3 Display Options 1 2 Sound Level Meter Upon clicking File Transducer Calibration tap Fig III 1 4 will appear and if you choose Microphone in Type option then you...

Page 11: ...r and microphone with and icons Fig III 1 7 FFT Analyzer Fig III 1 8 Spectrogram Fig III 1 9 Octave Analyzer 1 4 Spectrogram Icon for spectrogram The activated icons are identical with FFT Analyzer 1 5 Octave Analyzer Icon for FFT Based Octave Analysis The activated icons are identical with FFT Analyzer 1 6 FFT Based RPM Meter Icon to measure RPM Graph control icon and measurement option control i...

Page 12: ...n to store wave file and data in real time Stop mode Icon to stop arm record and playback Playback mode Icon to analyze data playing wave file The measured data with this function is the same as the one of record mode 2 Control of Wave File 2 1 Open a file When clicking File menu on lower left side of the screen wave file can be controlled with Open Save As and Delete tap at Fig III 2 1 To open fi...

Page 13: ... one of the window from Fig III 2 4 to Fig III 2 6 will appear so you can define a folder and file name at the window Fig III 2 7 shows how to enter a file name Fig III 2 3 Confirmation of a file name Fig III 2 4 Selection of a folder to save as another name Fig III 2 5 Selection of a folder and file to save as another name Fig III 2 6 Selection of a file to save as another name Fig III 2 7 Enteri...

Page 14: ...t and graphic display option of the program File Configuration Open is to open and change to the saved configuration Extension of the saved file is CFG The functions of Open and Save As is similar to that of chapter 2 Control of Wave File Fig III 3 1 Entering a configuration file name 4 Data Export 4 1 Vibration Level Meter Mode Each different data is exported according to the display option When ...

Page 15: ...king Ok button The supported data file type Text Excel MATLAB The supported image file type BMP JPEG Fig III 4 4 shows exported file and filename is similar to wave file s name For example exported octave image file is named as wave file name_OCT bmp If you should select Automatic Export dialog box shown in Fig III 4 6 would appear after every measurement Pressing Export button have data be export...

Page 16: ...onding values are arranged vertically 5 Transducer type and Calibration 5 1 Selection of transducer type and entering sensitivity By clicking File Transducer Calibration tap Fig III 5 1 window is opened Fig III 5 1 Selecting transducer Fig III 5 2 Entering sensitivity Fig III 5 3 Gain adjustment ICP IEPE type microphone and accelerometer is supported and input sensitivity data as shown on Fig III ...

Page 17: ...s to extract data shifting bit position as figure below when extracting 16bits data from 24bits data Unlike conventional method using fixed magnification It is very effective to amplify signal without the amplification of noise 5 3 Calibration After selecting type of transducer and entering sensitivity and adjust gain click Calibrate button A graph window will appear like Fig III 5 5 It is only th...

Page 18: ...option vibration values sound values and wave files are stored simultaneously If it is not checked actual wave data will not exist although file name will remain Fig III 6 1 Recording options window Fig III 6 2 Memory information window Fig III 6 3 shows the difference between checking Save Wave File In VLM option and no checking the option on the vibration level meter mode The size of SV001 wav i...

Page 19: ...nt losing data in case of battery discharge it is recommended to set saving folder to the SD Card 7 Recording Information Recording Information window is for entering the recording information Name object or axis of measurement etc Name Operator Object Object of measurement Location Location of measurement Direction Measurement directions of accelerometer as x y z axis In Location option you shoul...

Page 20: ...20 Fig III 7 1 Recording Info Fig III 7 2 Completion to enter Rec Info Fig III 7 3 Example of pre defined location Do not use special character for Location ...

Page 21: ...rganization standard The RMS calculation equation in real time can be arranged as below 0 0 2 0 1 t rms t T a t a t dt T Eq IV 1 2 where 0 t is current time T is measurement period time for calculation Sometimes this period is called by integral time This calculation for RMS is linear Averaging RMS 0 t 0 t T t T Fig IV 1 1 The Calculation Method with Linear Averaging RMS The linear averaging RMS M...

Page 22: ...culated we also use Peak Detector with exponential averaging Fig IV 1 3 shows how to detect peak values in real time Peak Detector has two time constants One is the attack time constant and another is the release or decay time constant The attack time constant means how peak values increase quickly And the release time constant means how the peak values decrease slowly after a peak Both time const...

Page 23: ... goes If you want to observe the peak value or maximum during measuring you have to use the maximum detector You can t observe the peak value with peak detector The value is found from the signal during the integration time For example suppose that the integration time is 5sec This system finds the maximum value from time signal with 5sec and then saves and displays it to file at every 5sec the in...

Page 24: ...ted Result Discrete integrator generates offset of signal see Fig IV 1 7 We must use highpass filter for removing the offset The highpass filter with 10Hz cutoff frequency 2 pole Butterworth IIR Filter is used in RealWave The procedure for velocity and displacement is shown in the Fig IV 1 8 Integrator Highpass filter 10Hz Integrator Highpass filter 10Hz Acceleration Velocity Displacement Fig IV 1...

Page 25: ...el meter is 80Hz Fig IV 1 9 Frequency Response Fig IV 1 10 Phase Response 1 5 Sound Pressure Level Calculation Differently with Vibration Level Meter you can calculate dB value of measured sound signal which uses microphone using such below basic theory through the chapter1 1 to 1 4 Sound Pressure Level SPL is composed as below 10 20 log rms P ref p SPL L p rms p Root Mean Square Pa ref p Referenc...

Page 26: ...ed for low frequency analysis as below BW 1 6kHz it means 1 6kHz bandwidth for analysis Sampling Frequency is 4096Hz BW 200Hz it means 200Hz bandwidth for analysis Sampling Frequency is 512Hz BW 100Hz it means 100Hz bandwidth for analysis Sampling Frequency is 256Hz Highpass Filter uses 2 pole Butterworth Filter Bandpass filter uses 4 pole Butterworth Filter And Whole Body Combined filter is made ...

Page 27: ...e measuring time or the observation time The calculated values are saved to file at every integration time If you select stop check box in Fig IV 2 4 and Fig IV 2 5 RealWave will stop measuring in the integration time Also if you select Timer in the Recording Options and Stop in the integration time simultaneously the system will stop at a short time For example if the timer is set by 10sec and th...

Page 28: ...on in vibration level meter you can select only a detector like Fig IV 2 7 And if you want to measure Leq in sound level meter you can select only a detector like Fig IV 2 9 And Fig VI 2 8 Fig VI 2 10 is shown the activated display window The options of each detector are listed vertically as shown in Fig VI 2 7 and Fig VI 2 9 RealWave supports various units with gravity acceleration g and decibel ...

Page 29: ...nits in VLM Fig IV 2 12 Display with various units in VLM You can change unit with m mm m μ g For example you can set a unit of acceleration to 2 m s 2 cm s 2 mm s 2 μm s g and display vibration levels with linear scale or logarithms scale dB Decibel The reference acceleration of decibel unit is 6 2 10 m s Of course you can choose 5 2 10 m s in the Acc Decibel Ref of File Transducer Calibration ta...

Page 30: ... ISO Acceleration 2 5 10 m s 2 6 10 m s Velocity 9 10 m s 9 10 m s Displacement 12 10 m 12 10 m You can measure the Leq Lp Lmax Lmin Lpk in sound level meter Fig IV 2 14 Setting with various units in SLM Fig IV 2 15 Display with various units in SLM Reference level value of sound level meter is 20 Pa μ ...

Page 31: ... Level Meter mode and among 2 detectors in Sound Level Meter mode in the Detector of Display Option You can see 4 types None Trace Octave FFT graph as display option from Fig IV 2 17 to Fig IV 2 21 Fig IV 2 17 Display None in VLM Fig IV 2 18 Display None in SLM Fig IV 2 19 Display Trace in VLM Fig IV 2 20 Display Trace in SLM ...

Page 32: ... Vibration Filter BW 1 6kHz BW 200Hz and BW 100Hz They are not supported in another Filter Also the option of octave is set in the FFT option window 3 Display Option 3 1 Trace Graph If you press the button the display option window appears as Fig IV 3 1 The option in the red square is only for vibration level meter The range of y axis in the trace graph is defined at Range as Fig IV 3 1 or you can...

Page 33: ...g button If you don t use Timer or Integration Time option you have to press stop button for stopping Stored files are three which are a wave file text file with measurement option and text file with vibration level Saving the wave file depends on Save Wave File In VLM SLM option in File Recording Options tap If you check the saving option a wave file will be saved Otherwise a wave file exists wit...

Page 34: ...n level meter 5 Playback and Analysis You can play the wave file using playback button after opening or loading wave file The measured wave file is so loading basically that you can play that without loading see Fig IV 5 1 Playback button is activated always when wave file is loading The analysis is carried out playing wave file as the measured options If you play wave file again the results of an...

Page 35: ...on which is measurement information input button If you click it dialog box appears for selecting the information of measurement as Fig IV 6 2 Texts or Information of dialog box are inputted previously in File Recording Informations option Also the information is written in the result file of vibration level Fig IV 6 1 Measurement Information Button Fig IV 6 2 Selection of Measurement Information ...

Page 36: ...button to accomplish calibration Compens Gain value is changed from 1 to another value 4 Adjustment of ICP Amp Gain just before measuring With connecting sensor and adhering the sensor at measurement position select ICP Amp Gain or AutoRange button to set the gain automatically Fig IV 8 1 Selecting Sensor and Entering Sensitivity Fig IV 8 2 Calibration 8 2 Setting the measurement time and file nam...

Page 37: ...ement in advance 8 4 Selecting Vibration Level Meter and Setting the measurement options 1 Change the analysis mode to vibration level meter 2 Select the vibration options as Fig IV 8 5 Set Integration Time for 1 second and Time Constant for 1 second Therefore the data is stored per 1 second for 1 minute Fig IV 8 5 Conversion of Vibration Level Meter Mode Fig IV 8 6 Window for Vibration Options ...

Page 38: ...surement to press ARM button 2 Start measurement to press Record button 3 Enter recording information to press Entering recording information button Fig IV 8 7 ARM Button Fig IV 8 8 Recording Button Fig IV 8 9 Entering recording information Button ...

Page 39: ...equency analysis usually uses Fast Fourier Transform which is abbreviated to FFT The basic assumption to calculate FFT is that time signal has infinite periodicity Here is the calculating equation below 1 2 0 0 1 k N j n N n X k x n e k N π Eq V 2 1 where x n is discrete time signal N is the buffer size of FFT And X k is the calculated result of FFT In general N has the number of 2n 512 1024 2048 ...

Page 40: ...eq Buffer 1 Buffer 2 Buffer 3 FFT of Buffer 1 FFT of Buffer 2 Fig V 2 1 Instantaneous FFT results from each FFT calculation As previously mentioned the basic assumption of FFT analysis is that time signal has infinite periodicity But buffer size is so finite that energy leakage causes So we call it leakage error As shown in Fig V 2 2 time signal with infinite periodicity generates just one peak in...

Page 41: ...figure b is shown the finite periodicity of time signal that is recognized in FFT algorithms but figure d represents the infinite periodicity of time signal by multiplying original time signal and windowing function Therefore a windowed time signal has not leakage error Fig V 2 4 Windowing Procedure Windowing is multiplied time signal and the coefficients of window which has number N Here is the e...

Page 42: ...se that the first time data 1 x has 0 N 1 the second time data 2 x has N 2N 1 and so on 1 FFT is the FFT spectrum of 1 x and 2 FFT is the FFT spectrum of 2 x See Fig V 2 7 The left figure is no overlap that means the time signal buffer for FFT is not repeated 50 Overlapping uses the second half data of 1 x and the first half data of 2 x together Over 66 overlapping doesn t usually have the loss of...

Page 43: ... divide summed values with averaging number like the equation below 1 1 a n i i a FFT k FFT k n 0 2 N k Eq V 2 3 where FFT is the averaged spectrum of FFT a n is averaged number N is buffer size Time1 Time2 Time3 FFT1 FFT2 FFT3 Fig V 2 8 Instantaneous FFT Spectrum 2 3 2 Exponential Averaging Exponential averaging is calculated from the exponential averaged spectrum at each frequency using Eq V 2 4...

Page 44: ...nstant FFT FFT1 FFT2 FFT3 Averaged FFT Fig V 2 10 Peak Hold Averaging 2 4 Picket Fence Error The resolution of frequency is defined as dividing the sampling frequency by buffer size Therefore if the peak of spectrum exists in the smaller region than resolution the peak was not shown with real value The energy of peak divides into both side spectrums In this situation we can t get a real frequency ...

Page 45: ...ndards ANSI S1 11 Therefore we can make bandpass filters with center frequency which is based on octave of 1kHz Octave analysis uses a lot of defined bandpass filter The 1 1 octave bandpass filter with 1kHz center frequency is shown in Fig V 3 2 This 1 1 octave filter means bandpass filter with a full octave band 1 3 octave filters are realized by bandpass filter with bandwidth that is divided an ...

Page 46: ...3 1 2 2 1 3 0 Window Correction N Octave i i y y Eq V 3 1 where i y is the spectrum of FFT 1 3Octave y is the octave value of each band i is frequency index in the spectrum 4 Weighting Microphone is reacted uniformly as the frequency of sound So when you measure the sound using a microphone you can t get the sound level as you hear the sound because the ear of human being hears sound differently a...

Page 47: ...d in Table V 4 1 Table V 4 1 Various Weighting Filer Weighting Term Curve Definition Remarks A weight Reciprocal of 40phon Curve Useful in Noise Analysis B weight Reciprocal of 70phon Curve C weight Reciprocal of 100phon Curve D weight Useful in Airplane Noise Analysis E weight Normal Equal Loudness Contour is shown in Fig V 4 1 the frequency responses of each weighting function are shown in Fig V...

Page 48: ...ncy Response 5 Integration in Frequency Domain Velocity and displacement spectrum can be analyzed in FFT and Octave Spectrogram analysis when accelerator is used For this you select Integral option in Fig V 5 1 The detailed theory of integral in frequency domain sees VI 3 2 verse ...

Page 49: ...nd maximum value is 32768Hz You have to also choose the buffer size which has the max 4096 A frequency resolution dF is dependent on the relationship between sampling frequency and buffer size The number of lines is dependent on the buffer size The relationships of parameters are listed in Table V 2 1 Window function is supported with rectangular hanning and flat top window Average mode is offered...

Page 50: ...efines the start frequency and end frequency in the FFT graph And the scale of frequency axis is defined linear axis or logarithms axis Frequency range is editable in linear scale but it is impossible in logarithms scale The units in magnitude axis is displayed with RMS 2 m s or Pa Peak 2 m s or Pa Power 2 4 m s or 2 Pa and scale is displayed with linear logarithms decibel scale For example if you...

Page 51: ...ss the stop button to stop arming If you want to hear the sound in real time you have to press hearing button and arming button simultaneously Press the record button to record and analyze the data After recording is finished wave file is loaded and playback button is activated If you press playback button playing the wave file and analyzing the data executes at the same time To export a measured ...

Page 52: ...otor teeth bearing But a first peak generates by an input rotation Therefore this peak is called 1st order The peaks which is an integer times of the frequency of a first peak are called harmonic components The relationship of frequency and RPM represents in Eq VI 1 1 60 RPM Freq Eq VI 1 1 where RPM is the abbreviation of a revolution per minute Therefore we can calculate RPM from the first freque...

Page 53: ...fer the recording except arming RPM Meter has the RPM window and FFT graph window as Fig VI 3 1 FFT graph window has two vertical lines for setting range of a first frequency To calculate RPM from the maximum peak in a defined region by two vertical lines you have to drag lines with stylus pen Fig VI 3 1 RPM Meter Fig VI 3 2 Option Setting Window The option setting window is shown in Fig VI 3 2 an...

Page 54: ...m the highpass filter with 4Hz cutoff frequency is used In other words the frequency less than 4Hz has 0 magnitudes To get the graph of acceleration velocity displacement you can set it in Integral of Fig VI 3 2 A magnitude has RMS units is fixed with 2 m s cm s and mm Fig VI 3 3 Acceleration Fig VI 3 4 Velocity Fig VI 3 5 Displacement 3 2 Integral in the spectrum of FFT The relationships of accel...

Page 55: ...se the route of the project which has to be installed enter the project name and just put the OK button Fig VII 1 1 After then a new project like Fig VII 1 2 will be created Fig VII 1 1 Enter the information of Project Fig VII 1 2 Program When user opens a project of file menu and choose a project file PRJ the chosen project is loading like Fig VII 1 3 ...

Page 56: ...n user add a wave file of file menu and choose the wave file which has to be added at the Project the wave file and the result file of analysis are added like Fig VII 2 1 Fig VII 2 1 Project tree control If user wants to the added file user has to select the Delete menu in the menu window which is displayed by clicking of mouse right button All file of folder and sub folder will be deleted ...

Page 57: ...raph will be displayed on the upper side in VLM peak position is detected in the FFT graph Also user can select the specific range by clicking of mouse right button and dragging FFT User can display the cursor value by clicking of mouse left button also user can select the specific range as same way in VLM FFT Selection Button After user select the specific range in the graph control The peak aver...

Page 58: ...of toolbar is activated like Fig VII 5 1 Sound play stop play time are displayed Fig VII 5 1 Control of Sound 6 List of Result Report The measuring result data is displayed as a report form of ISO6954 like Fig VII 6 1 from current project file Fig VII 6 1 Reporting of Result New Tap to load a result date from current project ...

Page 59: ...save a current result list file as another name Delete Tap to delete a date of selected list Excel Tap to change details of list as MS Office Excel file like Fig VII 6 2 Fig VII 6 2 Result Report with MS Office Excel Fig VII 6 3 Printed Result at MS Office Excel ...

Page 60: ...data is transported each other If selecting the folder named Mobile Device user can see the internal data of PDA ActiveSync program must be installed at PC which will be used before connecting PDA at a USB port of PC Fig VIII 1 1 ActiveSync Executed Window 2 Installation of ActiveSync Run MSASYNC EXE at the folder named ActiveSync in CD and follow from Fig VIII 2 1 to Fig VIII 2 9 Fig VIII 2 1 ...

Page 61: ... use PDA at the office When standard relationship of partner is set up Sync item of data is selected and PDA is connected with PC the data of PC is copied at PDA and the one of PDA is copied at PC so the data of each device is identical Generally this is called to be Sync Synchronization The synchronized data is Microsoft Outlook data E mail and the files to be set up synchronization If user just ...

Page 62: ...d like Fig VIII 2 6 and push the NEXT button because this step is for what the data of PC and PDA is transferred each other And then the connection comes to an end Generally it is not used for office but for measurement so it is useful to delete the item of data synchronization ...

Page 63: ... VIII 2 8 The State of Connection If the connection is completed user can see and copy the entire data of PDA with the folder Mobile Device like Fig VIII 2 9 at Window Explorer Fig VIII 2 9 PDA Folders at Window Explorer ...

Page 64: ...64 Appendix 1 The Theory for calculating RMS by ISO2631 and ISO8041 ...

Page 65: ...ng integration of the squared signal The result is the running r m s value 1 2 2 0 1 o o t t t rms o a t a t e dt τ τ τ It is a function of the instant time o t All recent parts of the signal a t contribute to the value They are weighted by a factor decreasing exponentially with the time distance from o t The corresponding time weighted vibration level in decibels is given by 2 2 0 1 10log o o t t...

Page 66: ... 1 10 i n L i eq T i t a a T where 1 n i i T t From a statistical distribution giving the percentages i p of the total measuring time T during which the level is within an interval e g 1dB around a central value Li the equivalent value is given by 1 2 0 1 0 1 10 100 i n L i eq T i p a a where 1 100 n i i p o t τ Linear Averaging Averaging Time Exponential τ RC Averaging t Figure Weighting curves f...

Page 67: ...67 Appendix 2 Frequency Response of Filter in the Vibration Level Meter ...

Page 68: ...68 1 1Hz Highpass Filter A 2 pole Butterworth IIR Filter was used for this filter and integrator has highpass filter with 10Hz Cutoff frequency ...

Page 69: ...69 2 5Hz Highpass Filter A 2 pole Butterworth IIR Filter was used for this filter and integrator has highpass filter with 10Hz Cutoff frequency ...

Page 70: ...70 3 10Hz Highpass Filter A 2 pole Butterworth IIR Filter was used for this filter and integrator has highpass filter with 10Hz Cutoff frequency ...

Page 71: ...71 4 2Hz 300Hz Bandpass Filter A 4 pole Butterworth IIR Filter was used for this filter and integrator has highpass filter with 10Hz Cutoff frequency ...

Page 72: ...72 5 2Hz 1kHz Bandpass Filter A 4 pole Butterworth IIR Filter was used for this filter and integrator has highpass filter with 10Hz Cutoff frequency ...

Page 73: ...73 6 10Hz 500Hz Bandpass Filter A 4 pole Butterworth IIR Filter was used for this filter and integrator has highpass filter with 10Hz Cutoff frequency ...

Page 74: ...74 7 10Hz 1kHz Bandpass Filter A 4 pole Butterworth IIR Filter was used for this filter and integrator has highpass filter with 10Hz Cutoff frequency ...

Page 75: ...75 Appendix 3 Theory of WBCombined Filter and Frequency Response ISO6954 Filter ...

Page 76: ... 9 15 915 15 915 0 64 b W 0 4 100 16 16 0 55 2 5 0 9 4 0 0 95 The frequencies 1 f to 6 f and the resonant quality factors 4 Q to 6 Q are parameters of the transfer functions determining the overall frequency weighting referred to acceleration as input quantity The transfer function is expressed as a product of several factors a Band limiting Two pole filter with Butterworth characteristics 1 2 1 2...

Page 77: ...on Its corner frequencies intersection of asymptotes are given by 1 f and 2 f The product t s H s H s represents the actual frequency weighting transfer function for a certain application 1 t H s for frequency weighting j W 1 s H s for frequency weighting c W d W e W h W and W B Combined This is indicated by infinity frequencies and absence of quality factors in Table 1 The total weighting functio...

Page 78: ...p and s H p are 1 0 4 f Hz 2 100 f Hz 3 4 16 f f Hz 4 0 55 Q 5 2 5 f Hz 5 0 9 Q 6 4 0 f Hz 6 0 95 Q NOTE 3 Parameter values in Table 1 define exactly the frequency weighting k W d W t W c W e W and i W according to ISO2631 1 1997 NOTE 4 Frequency weighting W B Combined and h W formerly H A are unchanged by this amendment The parameter values in Table 1 are chosen to reproduce the weighting curves ...

Page 79: ...79 Fig 2 Lowpass Filter with 100Hz Cutoff Fig 3 a v transition Frequency Response ...

Page 80: ...80 Fig 4 Frequency Response of Whole body Combined Filter using s function Fig 5 Frequency Response of Whole body Combined Filter using z function ...

Page 81: ...ulse Response Function in the Matlab and C code A simulated impulse response function is same to a theoretical impulse response function in C code s algorithms as shown in Fig 7 Where the sampling frequency for simulation is 2048Sample sec a buffer size is 4096 ...

Page 82: ... 19 0 13463 4 000 3 9811 1 7404 1 74 0 022983 5 000 5 0119 2 5008 2 5 0 03199 6 300 6 3096 3 4885 3 49 0 043 8 000 7 9433 4 7032 4 7 0 068039 10 000 10 6 1234 6 12 0 055525 12 500 12 589 7 7138 7 71 0 049262 16 000 15 849 9 4352 9 44 0 05087 20 000 19 953 11 253 11 25 0 02666 25 000 25 119 13 141 13 14 0 00761 31 500 31 623 15 088 15 09 0 01326 40 000 39 811 17 102 17 1 0 011695 50 000 50 119 19 2...

Page 83: ...ight factor of Weighting Filter as acceleration input Fig 8 Comparison of a theoretical acceleration and a measured acceleration y axis Decibel Fig 9 Comparison of a theoretical acceleration and a measured acceleration y axis Linear ...

Page 84: ...9 0 125 0 025100 32 01 2 0 1585 0 160 0 040000 27 96 2 0 1995 0 200 0 062900 24 03 2 0 2512 0 250 0 099400 20 05 2 0 3162 0 315 0 156000 16 14 2 0 3981 0 400 0 243000 12 29 2 0 5012 0 500 0 368000 8 68 2 0 6310 0 630 0 530000 5 51 2 0 7943 0 800 0 700000 3 10 2 1 0000 1 000 0 833000 1 59 2 1 2590 1 250 0 907000 0 85 1 1 5850 1 600 0 934000 0 59 1 1 9950 2 000 0 932000 0 61 1 2 5120 2 500 0 910000 ...

Page 85: ...00 17 08 1 50 1200 50 000 0 109000 19 25 1 63 1000 63 000 0 083400 21 58 1 79 4300 80 000 0 060400 24 38 2 100 0000 100 000 0 040100 27 94 2 125 9000 125 000 0 024100 32 36 2 158 5000 160 000 0 013300 37 52 2 199 5000 200 000 0 006940 43 17 2 251 2000 250 000 0 003540 49 02 2 316 2000 315 000 0 001790 54 94 2 398 1000 400 000 0 000899 60 92 2 501 2000 500 000 0 000451 66 92 2 631 0000 630 000 0 00...

Page 86: ...r in Human Vibration True Frequency Hz Velocity Weighting Referen ce Calculat ed Error 0 1995 0 0022 1 0 00223 0 679 0 2512 0 0043 9 0 00438 0 150 0 3162 0 0087 0 0 00868 0 260 0 3981 0 0170 0 0 01701 0 053 0 5012 0 0325 0 0 03246 0 135 0 6310 0 0589 0 0 05889 0 025 0 7943 0 0979 0 0 09779 0 115 1 000 0 147 0 147 0 313 1 259 0 201 0 201 0 040 ...

Page 87: ...9 0 036 12 590 0 911 0 911 0 033 15 850 0 941 0 941 0 001 19 950 0 961 0 961 0 003 25 120 0 973 0 973 0 042 31 620 0 979 0 979 0 035 39 810 0 978 0 978 0 026 50 120 0 964 0 964 0 037 63 100 0 925 0 925 0 014 79 430 0 844 0 843 0 118 100 000 0 706 0 705 0 201 125 900 0 533 0 531 0 439 158 500 0 370 0 366 0 959 199 500 0 244 0 240 1 635 251 200 0 156 0 153 2 103 316 200 0 100 0 096 3 856 398 100 0 0...

Page 88: ...88 Fig 12 Error between theoretical value and measured value ...

Reviews: