background image

5-20

S

UPER

S

ERVER 6027B-TLF User's Manual

5-9 Jumper 

Settings

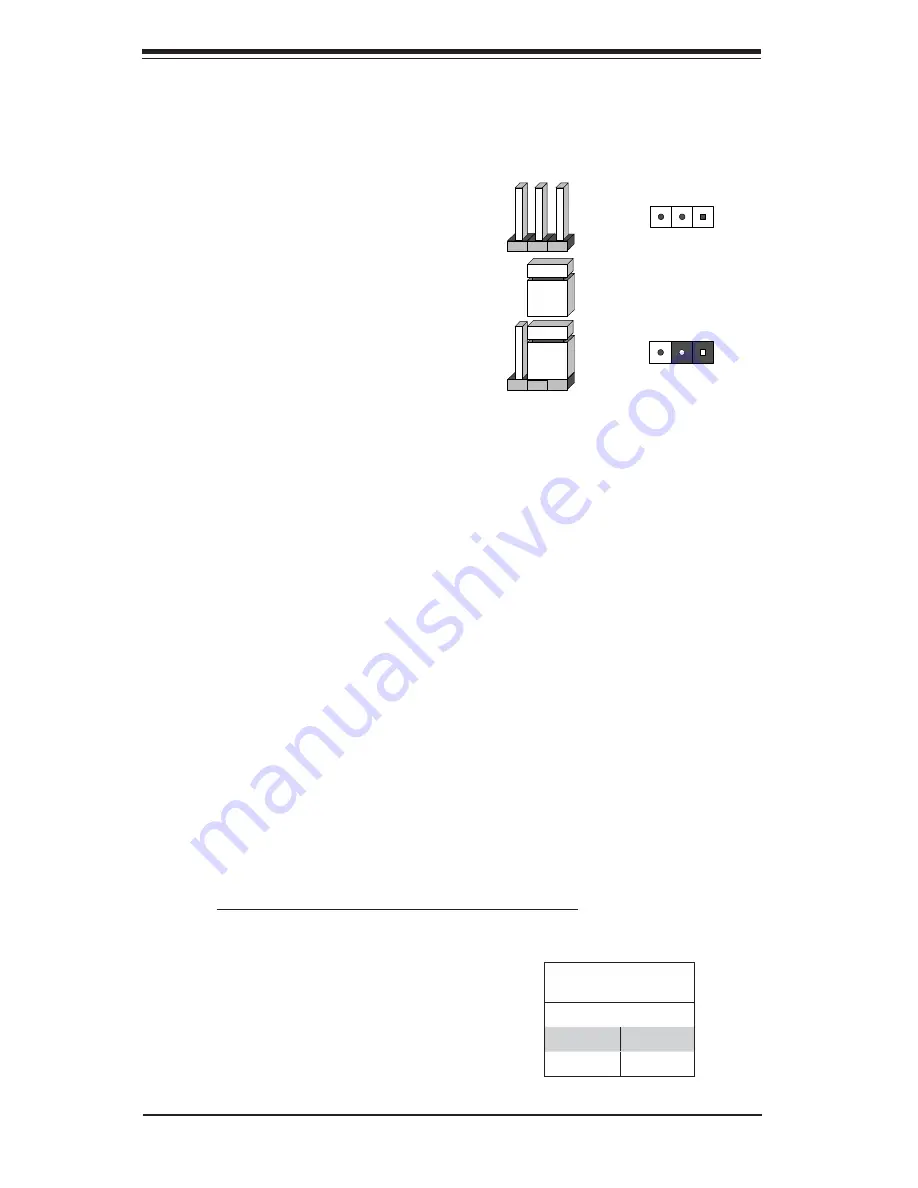
Explanation of Jumpers

To modify the operation of the serverboard, 
jumpers can be used to choose between 
optional settings. Jumpers create shorts 
between two pins to change the function 
of the connector. Pin 1 is identi

fi

 ed  with 

a square solder pad on the printed circuit 
board. See the diagram at right for an 
example of jumping pins 1 and 2. Refer 
to the serverboard layout page for jumper 
locations.

Note:

 On two-pin jumpers, "Closed" means 

the jumper is on and "Open" means the 
jumper is off the pins.

CMOS Clear

JBT1 is used to clear CMOS and will also clear any passwords.  Instead of pins, 
this jumper consists of contact pads to prevent accidentally clearing the contents 
of CMOS.

To Clear CMOS

1.  First power down the system and unplug the power cord(s).

2.  With the power disconnected, short the CMOS pads with a metal object such 

as a small screwdriver.

3.  Remove the screwdriver (or shorting device).

4.  Reconnect the power cord(s) and power on the system.

Note:


Do not use the PW_ON connector to clear CMOS.


Connector

Pins

Jumper

Setting

3      2      1

3      2      1

VGA Enable/Disable

JPG1 allows you to enable or disable the 
VGA port. The default position is on pins 
1 and 2 to enable VGA. See the table on 
the right for jumper settings.

VGA Enable/Disable 

Jumper Settings

Setting           De

fi

  nition     

Pins 1-2

Enabled

Pins 2-3

Disabled

Summary of Contents for SUPERSERVER 6027B-TLF

Page 1: ...SUPERSERVER 6027B TLF SUPER USER S MANUAL 1 0...

Page 2: ...ny such disputes Super Micro s total liability for all claims will not exceed the price paid for the hardware product FCC Statement This equipment has been tested and found to comply with the limits f...

Page 3: ...with the server system and describes the main features of the X9DBL iF serverboard and the SC823T 653LPB chassis Chapter 2 Server Installation This chapter describes the steps necessary to install th...

Page 4: ...e serverboard Chapter 6 Advanced Chassis Setup Refer to Chapter 6 for detailed information on the SC823T 653LPB server chassis You should follow the procedures given in this chapter when installing re...

Page 5: ...v Preface Notes...

Page 6: ...1 Choosing a Setup Location 2 1 Rack Precautions 2 2 Server Precautions 2 2 Rack Mounting Considerations 2 3 Ambient Operating Temperature 2 3 Reduced Airflow 2 3 Mechanical Loading 2 3 Circuit Overlo...

Page 7: ...Unpacking 5 1 5 2 Processor and Heatsink Installation 5 2 Installing an LGA 1356 Processor 5 2 Installing a CPU Heatsink 5 4 5 3 Connecting Cables 5 5 Connecting Data Cables 5 5 Connecting Power Cable...

Page 8: ...Component in the 5 25 Drive Bay 6 7 DVD ROM Drive Installation 6 8 Power Supply Failure 6 9 Chapter 7 BIOS 7 1 Introduction 7 1 Starting BIOS Setup Utility 7 1 How To Change the Configuration Data 7...

Page 9: ...ardware components have been included with the 6027B TLF as listed below Four 8 cm fans FAN 0126L4 One passive and one active CPU heatsink SNK P0038P and SNK P0048AP4 One air shroud MCP 290 28002 0N S...

Page 10: ...sockets that can support up to 192 GB of ECC DDR3 1600 1333 1066 800 R LRDIMMs LRDIMM Reduced Load DIMMs or up to 48GB of ECC UDIMMs Please refer to Chapter 5 for installing memory SATA An on chip SA...

Page 11: ...single 650W high efficiency power supply Control Panel The control panel on the SC823T 653LPB provides important system monitoring and control information LEDs indicate power on network activity and h...

Page 12: ...X4 Gen3 PCI E X1 Gen2 3 0 Gb S for Ports 2 5 SCU SATA SAS PCI E 1 PCI E 1 6 0 Gb S PEG0 PCI E x4 CPU 2 DDR 3 P1 3 3 1 CPU 1 DDR 3 P0 1 3 1 DMI D 1 800 1066 1333 1600 DDR3 E 1 F 1 PCI E X1 Gen2 A 1 80...

Page 13: ...per Micro Computer B V Het Sterrenbeeld 28 5215 ML s Hertogenbosch The Netherlands Tel 31 0 73 6400390 Fax 31 0 73 6416525 Email sales supermicro nl General Information support supermicro nl Technical...

Page 14: ...1 6 SUPERSERVER 6027B TLF User s Manual Notes...

Page 15: ...be situated in a clean dust free area that is well ventilated Avoid areas where heat electrical noise and electromagnetic fields are generated You will also need it placed near a grounded power outle...

Page 16: ...zers should be attached to the rack In multiple rack installations the racks should be coupled together Always make sure the rack is stable before extending a component from the rack You should extend...

Page 17: ...pment should be mounted into a rack so that the amount of airflow required for safe operation is not compromised Mechanical Loading Equipment should be mounted into a rack so that a hazardous conditio...

Page 18: ...ils You should have received two rack rail assemblies with the SuperServer 6027B TLF Each of these assemblies consist of three sections an inner fixed chassis rail that secures to the 6027B TLF A and...

Page 19: ...tab which serves two functions The first is to lock the server into place when installed and pushed fully into the rack which is its normal position Secondly these tabs also lock the server in place...

Page 20: ...ack Do this by lining up the rear of the chassis rails with the front of the rack rails Slide the chassis rails into the rack rails keeping the pressure even on both sides you may have to depress the...

Page 21: ...o type rack follow the directions given on the previous pages for rack installation The only difference in the installation procedure will be the positioning of the rack brackets to the rack They shou...

Page 22: ...2 8 SUPERSERVER 6027B TLF Manual Notes...

Page 23: ...buttons on the chassis control panel 3 2 Control Panel Buttons There are two buttons located on the front of the chassis a reset button and a power on off button Reset Use the reset button to reboot t...

Page 24: ...activity when flashing 3 3 Control Panel LEDs The control panel located on the front of the SC823 chassis has five LEDs These LEDs provide you with critical information related to different parts of...

Page 25: ...heatsinks are installed properly see Chapter 5 This LED will remain flashing or on as long as the indicated condition exists 3 4 Drive Carrier LEDs Each drive carrier has two LEDs SATA Drives Green Wh...

Page 26: ...SUPERSERVER 6027B TLF User s Manual 3 4 Notes...

Page 27: ...serverboard memory modules and floppy drive When disconnecting power you should first power down the system with the operating system first and then unplug the power cords of all the power supply uni...

Page 28: ...roduct may be connected to an IT power system In all cases make sure that the unit is also reliably connected to Earth ground Serverboard Battery CAUTION There is a danger of explosion if the onboard...

Page 29: ...PCBs come into contact with your clothing which may retain a charge even if you are wearing a wrist strap Handle a board by its edges only do not touch its components peripheral chips memory modules o...

Page 30: ...actice is not strictly followed Figure 4 1 Installing the Onboard Battery L T UM B TTER B TTER OL ER Please handle used batteries carefully Do not damage the battery in any way a damaged battery may r...

Page 31: ...hat the size and weight of the serverboard can cause it to bend if handled improperly which may result in damage To prevent the serverboard from bending keep one hand under the center of the board to...

Page 32: ...ing direct pressure on the label area of the fan Notes Always connect the power cord last and always remove it before adding re moving or changing any hardware components Make sure that you install th...

Page 33: ...cket do not rub the CPU against the surface of the socket or its pins 8 With the CPU inside the socket inspect the four corners of the CPU to make sure that the CPU is prop erly installed 9 Once the C...

Page 34: ...igned with those on the preinstalled heatsink retention mechanism 4 Screw in two diagonal screws i e the 1 and the 2 screws until just snug Do not fully tighten the screws or you may damage the CPU 5...

Page 35: ...cations Control Panel cable JF1 see next page SATA cables I SATA0 I SATA5 Connecting Power Cables The X9DBL iF has a 24 pin primary power supply connector designated JPW1 for connection to the ATX pow...

Page 36: ...ure 5 3 Rear Panel I O Ports 1 1 1 9 1 8 1 7 1 6 1 5 1 4 1 3 1 2 I O Ports 1 Keyboard Purple 6 COM1 2 PS 2 Mouse Green 7 VGA 3 USB Port 0 8 LAN1 4 USB Port 1 9 LAN2 5 IPMI LAN 10 UID Switch Power Butt...

Page 37: ...the slot until the module snaps into place 4 Press the release tabs to the lock positions to secure the DIMM module into the slot See Figure 5 4 Memory Support The X9DBL iF supports up to 192 GB of E...

Page 38: ...PUs 3 DIMMs CPU1 CPU2 P1 DIMM1A P2 DIMM1D P1 DIMM1B 2 CPUs 4 DIMMs CPU1 CPU2 P1 DIMM1A P2 DIMM1D P1 DIMM1B P2 DIMM1E 2 CPUs 5 DIMMs CPU1 CPU2 P1 DIMM1A P2 DIMM1D P1 DIMM1B P2 DIMM1E P1 DIMM1C 2 CPUs 6...

Page 39: ...emory Modules Intel E5 2400 Series Processor LRDIMM Memory Support Ranks Per DIMM Data Width Memory Capacity Per DIMM See the Note Below 1 Slot Per Channel 1DPC 1 35V 1 5V QRx4 DDP 16GB 32GB 1066 1066...

Page 40: ...the system PCI Card Installation Before installing a PCI add on card make sure it is supported by the slot you are installing it to 1 Begin by releasing the locking tab that corresponds to the slot yo...

Page 41: ...8 CPU1 SLOT6 PCI E 3 0 X16 SLOT1 PCI 33MHZ USB6 IPMI_LAN VGA COM1 USB0 1 LAN1 COM2 CPU2 JWD1 BIOS Battery LAN CTRL LAN CTRL BMC CTRL CPLD Intel PCH X9DBL i 3 F Rev 1 01 LED2 JUIDB1 SCU SGPIO2 S SATA S...

Page 42: ...LAN Port Slot1 PCI 133 MHz Slot Slot3 4 5 CPU2 PCI Exp 3 0 x8 Slots Slot2 CPU1 PCI Exp 3 0 x4 in x8 Slot Slot6 CPU1 PCI Exp 3 0 x4 in x16 Slot SCU SGPIO1 2 Serial Link General Purpose I O Header 1 for...

Page 43: ...ons JF1 Pin Definition 15 5V 16 Ground HDD LED The HDD LED connections are located on pins 13 and 14 of JF1 Attach a cable here to indicate HDD activity See the table on the right for pin definitions...

Page 44: ...fail ure or power failure The blue LED on pin 8 works as the front panel UID LED indicator The red LED takes precedence over the blue LED by default Refer to the table on the right for pin definitions...

Page 45: ...ional four USB ports on two head ers USB2 3 4 5 provide front chassis access USB 6 is a Type A USB connec tor USB cables are not included See the tables on the right for pin definitions Back Panel USB...

Page 46: ...able from the chassis to inform you of a chassis intrusion when the chas sis is opened ATX PS 2 Keyboard and PS 2 Mouse Ports The ATX PS 2 keyboard and the PS 2 mouse ports are located on the I O back...

Page 47: ...not installed in the system See the table on the right for pin definitions Trusted Platform Module Header Pin Definitions Pin Definition Pin Definition 1 LCLK 2 GND 3 LFRAME 4 No Pin 5 LRESET 6 VCC5...

Page 48: ...nd the front UID LED This provides easy identification of a system unit that may be in need of service Note UID can also be triggered via IPMI on the serverboard For more information on IPMI please re...

Page 49: ...Definition Pin Definitions Pin 1 Pos Beep In Pin 2 Neg Alarm Speaker Overheat Fan Fail LED JOH1 The JOH1 header is used to connect an LED to provide warnings of chassis over heat This LED will also bl...

Page 50: ...d to clear CMOS and will also clear any passwords Instead of pins this jumper consists of contact pads to prevent accidentally clearing the contents of CMOS To Clear CMOS 1 First power down the system...

Page 51: ...system monitor that can reboot the system when a software appli cation hangs Close pins 1 2 of JWD1 to reset the system if an application hangs Close pins 2 3 to generate a non mask able interrupt sig...

Page 52: ...sy identification of a system that might be in need of service IPMI Dedicated LAN LEDs In addition to the Gigabit Ethernet ports an IPMI Dedicated LAN is also located above the Backplane USB ports 0 1...

Page 53: ...4 Ground 5 RXN 6 RXP 7 Ground Onboard Power LED An Onboard Power LED is located at LED2 on the serverboard When this LED is on the system is on Be sure to turn off the system and unplug the power cord...

Page 54: ...mputer icon and then on the icon representing your CD ROM drive Finally double click on the S Setup icon Figure 5 6 Driver Installation Display Screen Click the icons showing a hand writing on paper t...

Page 55: ...rucial system information such as CPU temperature system voltages and fan status See the Figure below for a display of the SuperDoctor III interface Note The default User Name and Password for SuperDo...

Page 56: ...ctor III program and User s Manual can be downloaded from the Supermicro web site at http www supermicro com products accessories software SuperDoctorIII cfm For Linux we recommend using SuperDoctor I...

Page 57: ...prevent damage to any printed circuit boards PCBs it is important to handle them very carefully The following measures are generally sufficient to protect your equipment from ESD damage Precautions U...

Page 58: ...s Control Panel SATA Drives 6 5 25 Drive Bay IO Panel see Figure 5 3 7 Low Profile PCI Slots DVD ROM Drive optional Unpacking The serverboard is shipped in antistatic packaging to avoid static damage...

Page 59: ...air to circulate properly through the chassis and cool the components See Figure 6 2 System Fan Failure Fan speed is controlled by system temperature via IPMI If a fan fails the remaining fan will ram...

Page 60: ...ystem For installing removing the DVD ROM you will need to gain access to the inside of the server by removing the top cover of the chassis Proceed to the DVD ROM Installation section later in this ch...

Page 61: ...r information on recommended HDDs visit the Supermicro Web site at http www supermicro com products nfo files storage SAS 1 CompList 110909 pdf SATA Drive Installation The SATA drives are mounted in d...

Page 62: ...on on the drive carrier 2 Swing the handle fully out and use it to pull the drive carrier straight out see Figure 6 4 Note Your operating system must have RAID support to enable the hot plug ca pabili...

Page 63: ...ower must be turned off before installing and or removing them Installing Removing a 5 25 Drive Bay Component 1 First power down the system and then remove the top cover of the chassis 2 Push the lock...

Page 64: ...lick into place to be correctly and fully installed in their bays You must power down the system before installing or removing a DVD ROM drive 1 Release the screws that secure the server unit to the r...

Page 65: ...with the same model which can be ordered directly from Supermicro see Contact Information in the Preface 1 First shut down the system then unplug the AC power cord from the power supply module 2 Remov...

Page 66: ...6 10 SUPERSERVER 6027B TLF User s Manual Notes...

Page 67: ...be configured Grayed out options cannot be configured Options in blue can be configured by the user The right frame displays the key legend Above the key legend is an area reserved for informational t...

Page 68: ...y From the main menu you can access the other setup screens An AMI BIOS identification string is displayed at the left bottom corner of the screen below the copyright message Warning Do not upgrade th...

Page 69: ...Tab key to move between fields The date must be entered in Day MM DD YY format The time is entered in HH MM SS format Note The time is in the 24 hour format For example 5 30 P M appears as 17 30 00 S...

Page 70: ...ad of the normal POST messages The op tions are Enabled and Disabled AddOn ROM Display Mode Use this item to set the display mode for the Option ROM Select Keep Current to use the current AddOn ROM Di...

Page 71: ...allow the system to automatically reboot when a non recoverable error occurs that lasts for more than five minutes The options are Enabled and Disabled Power Button Function If this feature is set to...

Page 72: ...nology Intel VT x Technology Intel SMX Technology L1 Data Cache L1 Code Cache L2 Cache L3 Cache CPU Speed This item displays the speed of the CPU installed in Socket 1 Socket 2 64 bit This item indica...

Page 73: ...not thus preventing a worm or a virus from flooding illegal codes to overwhelm the processor or damage the system during an attack The default is Enabled Refer to Intel and Microsoft Web sites for mor...

Page 74: ...ct Energy Efficiency to support power saving mode Select Custom to cus tomize system power settings Select Disabled to disable power saving settings The options are Disabled Energy Efficient and Custo...

Page 75: ...um system performance with maximum cooling or maximum energy efficiency with maxi mum power saving The fan speeds are controlled by the firmware management via IPMI 2 0 The options are Performance Bal...

Page 76: ...l Machine Monitor through the DMAR ACPI Tables This feature offers fully protected I O resource sharing across Intel platforms providing greater reliability security and availability in networking and...

Page 77: ...nd the Ethernet controllers adaptors This direct communication greatly reduces trips to the main memory which increases performance while also lowering power consumption Port 0A This feature allows th...

Page 78: ...or Port 3C The options are GEN1 GEN2 and GEN3 IIO 2 PCIe Port Data Direct I O Control This feature configures the following IO PCIe port data direct I O control settings for IIO 2 PCIe ports Intel s D...

Page 79: ...8 0 GT s XDIMM Configuration This section displays the following DIMM information Current Memory Mode This item displays the current memory mode Current Memory Speed This item displays the current me...

Page 80: ...methods The options are Auto 1 Way 2 Way 3 Way and 4 Way Rank Interleaving This feature allows the user to select a rank memory interleaving method The options are Auto 1 Way 2 Way 4 Way and 8 Way Pa...

Page 81: ...item displays the name of the PCH chip Stepping This item displays the PCH stepping USB Devices This item displays the USB devices detected by the BIOS All USB Devices This feature enables all USB po...

Page 82: ...detected by the BIOS SATA Mode Use this feature to configure SATA mode for a selected SATA port The options are Disabled IDE Mode AHCI Mode and RAID Mode The following are displayed depending on your...

Page 83: ...e options are Enabled and Disabled XSCU Storage Control Unit Configuration Storage Controller Unit Select Enabled to enable PCH SCU storage devices The options are Disabled and Enabled OnChip SCU Opti...

Page 84: ...enhance system performance The options are Auto 128 Bytes and 256 Bytes Maximum Read Request Select Auto to allow the system BIOS to automatically set the maximum Read Request size for a PCI E device...

Page 85: ...the graphics adapter to be used as the primary boot device The options are Onboard and Offboard XSuper IO Configuration Super IO Chip This item displays the Super IO chip used in the motherboard XSer...

Page 86: ...12 and IO 2E8h IRQ 3 4 5 6 7 9 10 11 12 Device Mode Use this feature to select the desired mode for a serial port specified The options are Normal and High Speed Serial Port 2 Attribute Use this featu...

Page 87: ...smission errors Select Even if the parity bit is set to 0 and the number of 1 s in data bits is even Select Odd if the parity bit is set to 0 and the number of 1 s in data bits is odd Select None if y...

Page 88: ...re Console Redirection settings to support Out of Band Serial Port management Console Redirection for EMS Select Enabled to use a COM Port selected by the user for Console Redirection The options are...

Page 89: ...m ACPI Sleep State Use this feature to select the ACPI State when the system is in sleep mode Select S1 CPU Stop Clock to erase all CPU caches and stop executing instructions Power to the CPU s and RA...

Page 90: ...ne Enable Take Ownership Disable Take Ownership and TPM Clear Note During restart the computer will reboot in order to execute the pend ing operation and change the state of the security device Curren...

Page 91: ...ault setting is Disabled Intel TXT LT SX Dependencies This feature displays the features that need to be enabled for the Intel Trusted Execution Technology to work properly in the system VT d Support...

Page 92: ...System Management BIOS Event Logging during system boot The options are Enabled and Disabled Runtime Error Logging Support Select Enabled to support Runtime Error Logging The options are Enabled and D...

Page 93: ...e Immediately SMBIOS Event Log Standard Settings Log System Boot Event Select Enabled to log system boot events The options are Disabled and Enabled MECI Multiple Event Count Increment Enter the incre...

Page 94: ...installed in your system XSystem Event Log Enabling Disabling Options SEL Components Select Enabled for all system event logging at bootup The options are Enabled and Disabled Erasing Settings Erase...

Page 95: ...the system is rebooted The options are No and Yes Configuration Address Source This feature allows the user to select the source of the IP address for this computer If Static is selected you will need...

Page 96: ...ies Boot Option 1 Boot Option 2 Boot Option 3 etc Use this feature to specify the sequence of boot device priority Network Devices Hard Disk Drives This option sets the order of the legacy network and...

Page 97: ...t the Administrator Password which is required to enter the BIOS setup utility The length of the password should be from 3 characters to 20 characters long User Password Use this feature to set a User...

Page 98: ...hanges and Reset When you have completed the system configuration changes select this option to save the changes and reboot the computer so that the new system configuration settings can take effect S...

Page 99: ...s feature and press Enter to save the current settings as the user s defaults When the dialog box appears asking you if you want to save values as user s defaults select Yes to save the current values...

Page 100: ...7 34 SUPERSERVER 6027B TLF User s Manual Notes...

Page 101: ...system manufacturer for possible repairs These fatal errors are usually communicated through a series of audible beeps The numbers on the fatal error list correspond to the number of beeps for the cor...

Page 102: ...A 2 SUPERSERVER 6027B TLF User s Manual Notes...

Page 103: ...LRDIMMs LRDIMM Reduced Load DIMMs or up to 48GB of ECC UDIMMs See the memory section in Chapter 5 for details SATA Intel on chip controller for two 6 Gb sec SATA3 ports and four 3 Gb sec SATA2 ports w...

Page 104: ...tput Voltages 3 3V 25A 5V 30A 12V 49 54A 12V 0 5A 5Vsb 4A Operating Environment Operating Temperature 10 to 35 C 32 to 95 F Non operating Temperature 40 to 60 C 40 to 140 F Operating Relative Humidity...

Page 105: ...y indemnify defend and hold Supermicro harmless for and against any and all claims demands actions litigation and proceedings of any kind arising out of or related to such ultra hazardous use or sale...

Page 106: ...B 4 SUPERSERVER 6027B TLF User s Manual Notes...

Reviews: