


If IPv4 networking is enabled, you can continue configuring the IPv4
network settings from the OCP:
1.
From the Home screen, press
Next
until the display shows
Configuration
. Press
Enter
.
2.
Press
Next
until the display shows
Configure Network
Settings
. Press
Enter
.
3.
Press
Next
until the display shows
IPv4 Networking
. Press
Enter
.
4.
Press
Next
until the display shows
DHCP (IPv4) Enabled
.
To change the setting, press
Enter
. Press
Next
until the screen
displays the desired setting. Press
Enter
to accept the new setting.
5.
If DHCPv4 is disabled, press
Next
to display the
IP address
.
To change the IP address, press
Enter
. Set the new IP address
with the
Next
and
Enter
keys.
6.
Press
Next
to display the subnet mask. To change the subnet
mask, press
Enter
. Set the new subnet mask with the
Next
and
Enter
keys.
7.
Press
Next
to display the gateway address. To change the
gateway address, press
Enter
. Set the new subnet address with
the
Next
and
Enter
keys.
If you enabled IPv6, you must continue configuring IPv6 from the
RMI after setting the administrator password in Step 12. You can
find the IPv6 IP address obtained by the Autoloader from the OCP
Information/Status > Network Information
menu item.
See the
Sun StorageTek SL24 Tape Autoloader and SL48 Tape Library
User and Service Guide
included in the product documentation for
additional information on configuring IPv6.
11 Setting the date and time
This option sets the date and time used by the Autoloader to record
events and should be set during the initial installation process. You
can also set the date and time from the RMI
Configure: System
screen.
Access to this feature requires the administrator password, if set.
To set the date and time from the OCP:
1.
From the Home screen, press
Next
until the display shows
Autoloader Date/Time
. Press
Enter
.
2.
Enter the administrator password, if requested.
3.
A number in the year will flash. Click
Next
until the correct
number is displayed. Click
Enter
to accept the number. Repeat
for each number in the date and time.
4.
Press
Cancel
until the display shows the home screen.
NOTE:
When setting the hours, the time is based on a 24
‐
hour clock. There
is no a.m. or p.m. designation. For example, 1:00 p.m. is 13:00.
NOTE:
The Autoloader time does not adjust itself for daylight saving time;
you must adjust the time through the front panel or web
‐
based
management interface.
12 Setting the administrator password
Setting an administrator password provides access to the
administrator functions with the remote management interface (RMI)
to only those people who know the administrator password. The
administrator password must be exactly eight digits consisting of
the numbers 0 through 9.
To set the administrator password:
1.
On the front panel, press
Enter
.
2.
Press
Next
until the display shows
Configuration
. Press
Enter
.
3.
Press
Enter
to change the administrator password.
4.
The first number will flash. Press
Next
until the first number
for the new password is displayed. Press
Enter
to accept the
number. The next number flashes. Repeat for each number in
the password.
5.
Press
Cancel
twice to move to the top of the menu.
13 Configuring the Fibre Channel ports
Sun recommends leaving the Fibre Channel ports at the default
settings of
Port Speed: Automatic
and
Port Type: Auto Detect
.
With these settings, the tape drive will choose the appropriate
configuration. See the
Sun StorageTek
™
SL24 Tape Autoloader and
SL48 Tape Library User and service guide
on the documentation CD for
instructions on changing the Fibre Channel configuration.
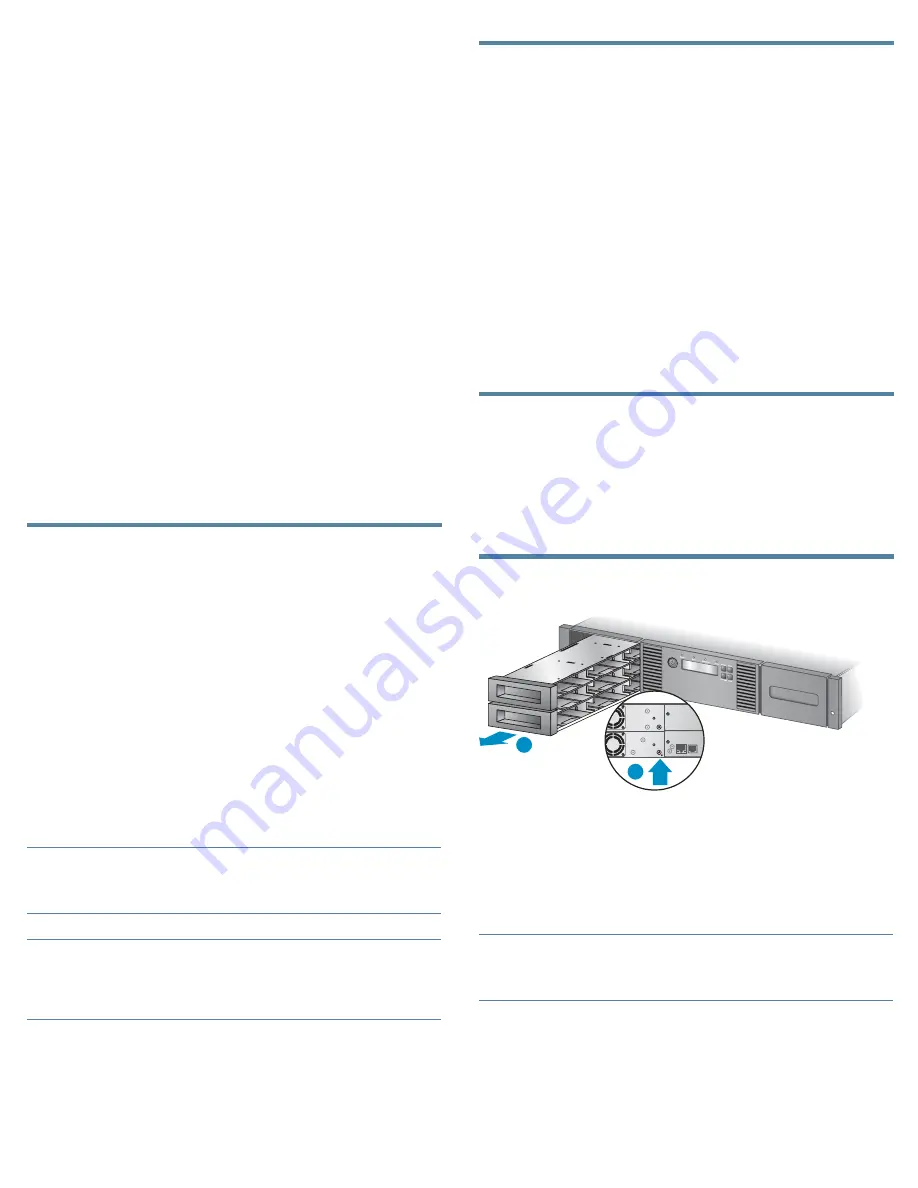
Magazine release
11342
2
1
When possible, release the magazines from the control panel or
web
‐
based interface. If you must remove the magazines from both
sides of the Autoloader at the same time or when the Autoloader is
not powered on: 1) insert a straightened paper clip or small pin about
1.5 cm (0.6 inch) into the magazine release hole, while 2) another
person pulls out the magazine from that side.
IMPORTANT:
Do not force the pin once you encounter resistance. Doing so can
damage the Autoloader.
Page 9