Sun Microsystems Sun StorageTek SL24 Getting Started Download Page 6

3 Securing the rails to the rack

11423

Using two screws and flat washers from the

Standard rack hardware

packet, secure the front of one rail to the front of the rack. Extend
the rail and secure the back of the rail to the rack using two screws
and flat washers.

Secure the other rail in a similar fashion.

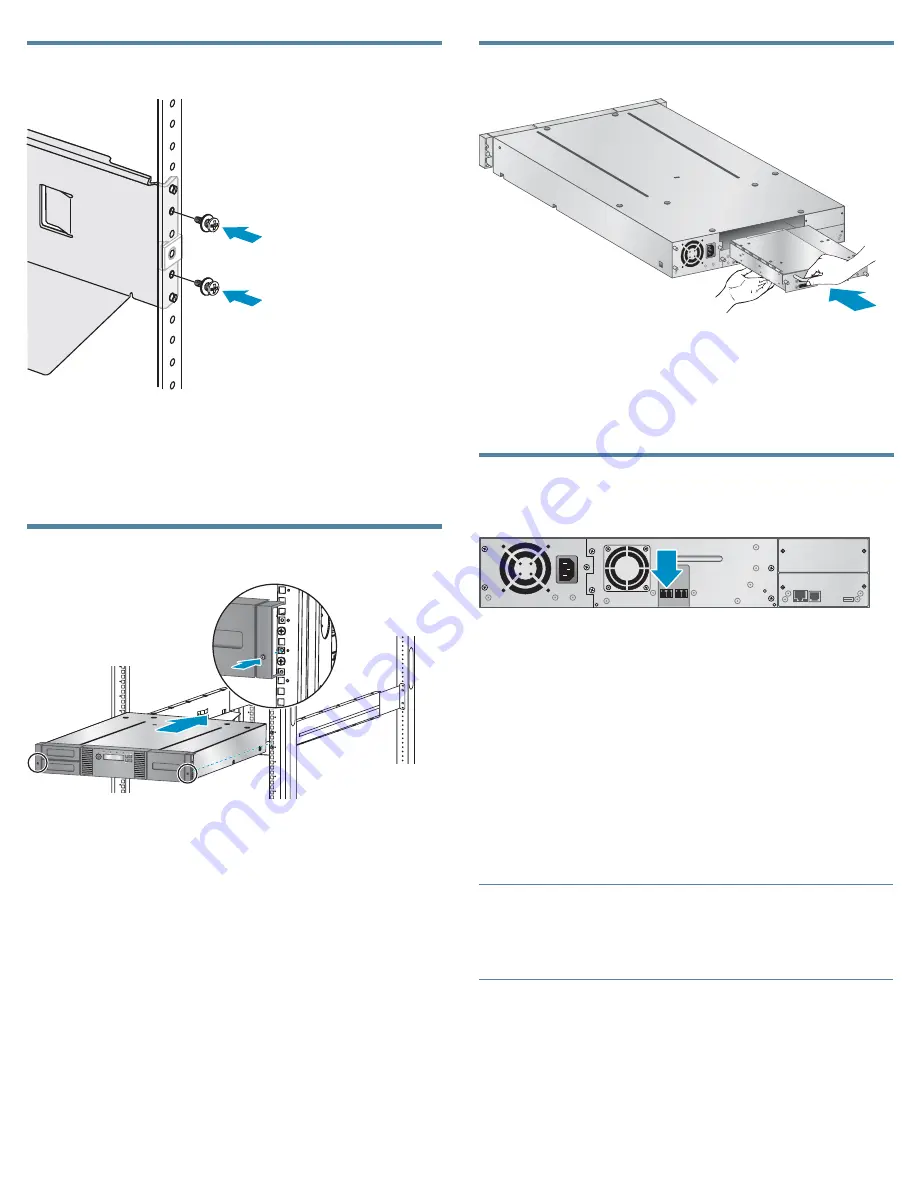
4 Installing the Autoloader

11404

Slide the Autoloader onto the rails. Secure the front bezel to the
rack using a #2 Phillips screwdriver placed through the small holes
in the mounting bracket to tighten the captive screws on each side
of the Autoloader.

Optional: Adding a tape drive

1 08 0 7 

With a tape drive upgrade kit, the Autoloader can hold up to two
half

height LTO tape drives.

Remove the drive bay cover with a Phillips screwdriver. Slide the
tape drive into the bay until it is firmly seated. Tighten the blue
thumbscrews with your fingers until the tape drive is secure.

5a Planning the Fibre Channel
configuration

11418

The Fibre Channel tape drive has two Fibre Channel ports. Only one
port may be used at a time, but both ports can be connected for path
failover if your application supports path failover.

Direct connection

You will need a 2 Gb or 4 Gb Fibre Channel HBA. A 4 Gb HBA is
recommended for LTO

4 tape drives for optimum performance.

SAN connection

All switches between the host and the Autoloader must be of the
appropriate type. A 2 Gb switch in the path may result in
performance degradation when backing up highly compressible data
to a 4 Gb tape drive.

Configure zoning on the Fibre switch so only the backup servers can
access the Autoloader.

NOTE:

See Step 13 for additional Fibre Channel configuration information.
See the

Sun StorageTek

SL24 Tape Autoloader and SL48 Tape Library

User and service guide

on the documentation CD for instructions on

changing the Fibre Channel configuration.

Page 6

Summary of Contents for Sun StorageTek SL24

Page 1: ...ng and storing the shipping lock WARNING The Sun StorageTek SL24 Tape Autoloader weighs 15 6 kg 34 3 lb without media and 20 4 kg 44 9 lb with media 24 cartridges When moving the Autoloader to reduce...

Page 2: ...rnet port 6 Serial port Factory use only 7 USB port 8 Magazine release hole 9 Pull out tab containing product information 10 Tape drive LED Back panel overview Fibre Channel 11362 4 8 8 9 10 2 2 3 6 5...

Page 3: ...s online help and is easier to use However the RMI is not required to use the product except to configure SNMP IPv6 and logical libraries The only tasks you cannot do from the RMI are Opening the mail...

Page 4: ...ackets of rack hardware 9 Product documentation 1 Removing and storing the shipping lock 11400 IMPORTANT Shipping lock The shipping lock must be removed for the robotics to work properly A robot move...

Page 5: ...ack hardware packet and the packet of alignment pins and clip nuts marked 9 5 mm square hole rack Customizing the rails for 10 32 threaded hole racks 11421 Using a flat screwdriver replace the two ali...

Page 6: ...he blue thumbscrews with your fingers until the tape drive is secure 5a Planning the Fibre Channel configuration 11418 The Fibre Channel tape drive has two Fibre Channel ports Only one port may be use...

Page 7: ...s qualified with the Autoloader The server might not be able to boot when the Autoloader is connected to a non supported SAS RAID controller 6 Changing the SCSI ID On a parallel SCSI Autoloader if you...

Page 8: ...n located on the front panel Check the LCD screen to make sure the Autoloader is receiving power Power on the host server and all devices you powered off earlier 10 Configuring the network Configuring...

Page 9: ...number is displayed Click Enter to accept the number Repeat for each number in the date and time 4 Press Cancel until the display shows the home screen NOTE When setting the hours the time is based on...

Page 10: ...hesive backed bar code label Only apply labels as designated 15 Loading cartridges Use the front panel Operations Unlock Left Magazine option to release the left magazine Pull the magazine straight ou...

Page 11: ...tructions for their configuration Partitioning an Autoloader with two tape drives into two logical libraries Configuring IPv6 networking Enabling and configuring SNMP network management Naming the Aut...

Page 12: ...Count Configure Mailslot Set Logical Libraries Change Drive 1 Change Drive 2 SCSI ID Enable Autoldr Password Locks Force Drive To Eject Tape Configure Network Settings Inventory Autoloader Informatio...

Reviews: