Sun Microsystems Sun StorageTek SL24 Getting Started Download Page 12

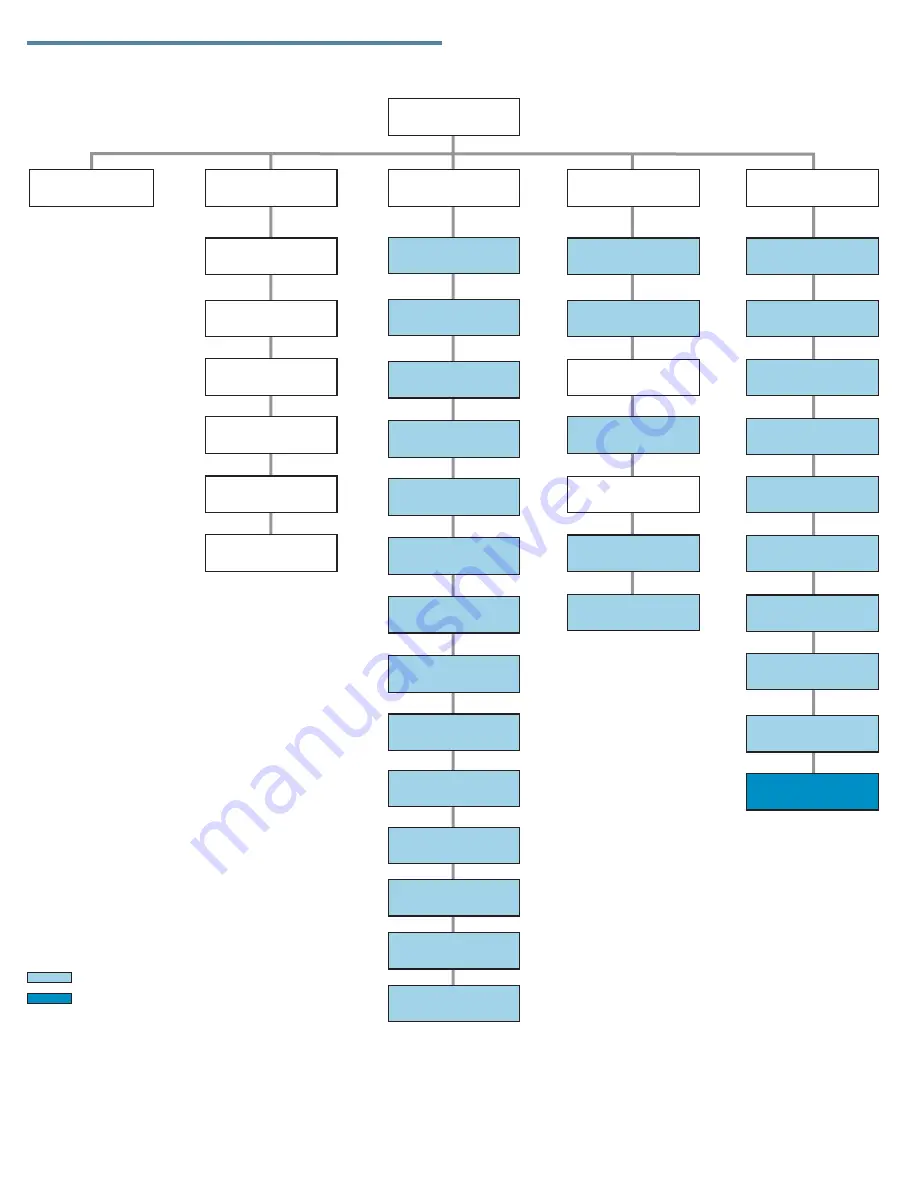
Operator control panel menu

Unlock Mailslot

Status/Information

Configuration

Operations

Support

Run Demo

Run Slot T

Run Wellness Test

o Slot Test

Power On/Off Drives

Unlock Left Magazine

Clean Drive

Move Tape

Perform Inventory

Reboot Autoloader

Unlock Right Magazine

Set Master Drive

Autoloader Behavior

Autoloader Date/Time

Change Admin 

Password

Set Reserved

Slot Count

Configure Mailslot

Set Logical Libraries

Change Drive 1

Change Drive 2

SCSI ID

Enable Autoldr

Password Locks

Force Drive

To Eject Tape

Configure Network

Settings

Inventory

Autoloader Information

Drive 1 Information

Drive 2 Information

Component Status

Network Information

Requires Admin Password
R
(Sun Service personnel only)

equires Service Password

HOME

Sun Service

Drive FW Upgrade

Autoloader

Error Log

Autoloader

Warning Log

Configure

Auto Cleaning

Restore Defaults

11412

Barcode Format

Reporting

Autoloader 

FW Upgrade

Save/Restore

Configuration

Page 12

Summary of Contents for Sun StorageTek SL24

Page 1: ...ng and storing the shipping lock WARNING The Sun StorageTek SL24 Tape Autoloader weighs 15 6 kg 34 3 lb without media and 20 4 kg 44 9 lb with media 24 cartridges When moving the Autoloader to reduce...

Page 2: ...rnet port 6 Serial port Factory use only 7 USB port 8 Magazine release hole 9 Pull out tab containing product information 10 Tape drive LED Back panel overview Fibre Channel 11362 4 8 8 9 10 2 2 3 6 5...

Page 3: ...s online help and is easier to use However the RMI is not required to use the product except to configure SNMP IPv6 and logical libraries The only tasks you cannot do from the RMI are Opening the mail...

Page 4: ...ackets of rack hardware 9 Product documentation 1 Removing and storing the shipping lock 11400 IMPORTANT Shipping lock The shipping lock must be removed for the robotics to work properly A robot move...

Page 5: ...ack hardware packet and the packet of alignment pins and clip nuts marked 9 5 mm square hole rack Customizing the rails for 10 32 threaded hole racks 11421 Using a flat screwdriver replace the two ali...

Page 6: ...he blue thumbscrews with your fingers until the tape drive is secure 5a Planning the Fibre Channel configuration 11418 The Fibre Channel tape drive has two Fibre Channel ports Only one port may be use...

Page 7: ...s qualified with the Autoloader The server might not be able to boot when the Autoloader is connected to a non supported SAS RAID controller 6 Changing the SCSI ID On a parallel SCSI Autoloader if you...

Page 8: ...n located on the front panel Check the LCD screen to make sure the Autoloader is receiving power Power on the host server and all devices you powered off earlier 10 Configuring the network Configuring...

Page 9: ...number is displayed Click Enter to accept the number Repeat for each number in the date and time 4 Press Cancel until the display shows the home screen NOTE When setting the hours the time is based on...

Page 10: ...hesive backed bar code label Only apply labels as designated 15 Loading cartridges Use the front panel Operations Unlock Left Magazine option to release the left magazine Pull the magazine straight ou...

Page 11: ...tructions for their configuration Partitioning an Autoloader with two tape drives into two logical libraries Configuring IPv6 networking Enabling and configuring SNMP network management Naming the Aut...

Page 12: ...Count Configure Mailslot Set Logical Libraries Change Drive 1 Change Drive 2 SCSI ID Enable Autoldr Password Locks Force Drive To Eject Tape Configure Network Settings Inventory Autoloader Informatio...

Reviews: