background image

27 

Maintenance 
 
Troubleshooting 

 
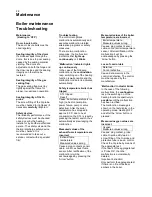
Measured values of the 
storage tank temperature are 
incorrect 

Storage tank temp. 
Measured values wrong 

Causes: plug contact, sensor 
cable, control, storage tank 
temperature sensor. 
After rectification of the 
malfunction it must be 
acknowledged by pressing the 
‘Arrow’ button.


Boiler temperature too low 

Boiler temperature 
too low [

C] ### 

Causes: plug contact, cables, 
non-return valve, actuator, 
control. 
After rectification of the 
malfunction it must be 
acknowledged by pressing the 
‘Arrow’ button. 


Exhaust fume temperature too 
high 

Exhaust fume 
temperature 
too high [

C] ### 

Cause: because of a too long 
fuel adding procedure or open 
gas vent flap, the exhaust fume 
temperature has exceeded 300 

C. 

For rectification, refer to the 
operating manual. 

 
Work on the electrical 
equipment may only be 
carried out by a specialist 
after disconnecting the 
installation from the mains!


Summary of Contents for 40S-70

Page 1: ...Installation manual for the authorised specialist Turbotec lambda control 20 100 kW 20 30 40S 70 40 50L 100L 12 2014 ...

Page 2: ... 12828 2003 Heating Systems in Buildings Design of water based heating systems BS EN 12831 2003 Heating Systems in Buildings Method for calculation of the design heat load All as applicable to the appliance Please note that it is a legal requirement under England and Wales Building Regulations that the installation of the boiler is either carried out under Local Authority Building Control approval...

Page 3: ... of fire cement are caustic and should not be allowed to come into contact with the skin In case of contact wash immediately with plenty of water Asbestos This boiler contains no asbestos If there is a possibility of disturbing any asbestos in the course of installation then please seek specialist guidance and use appropriate protective equipment Metal Parts When installing or servicing this boile...

Page 4: ...ing the minimum chimney draught is responsibility of the Chimney specialist appointed The outlet from the chimney should be above the roof of the building in accordance with the provisions of Building Regulations Approved Document J Because the boiler runs at high efficiencies the temperature of the flue gases is at times lower than conventional solid fuel appliances Although it is not classed as ...

Page 5: ...e with Building Regulations Approved Document J A single wall metal fluepipe is suitable for connecting the boiler to the chimney but is not suitable for use as the complete chimney The chimney and connecting fluepipe must have a minimum diameter of 150 mm and its dimension should be not less than the size of the outlet socket of the boiler Any bend in the chimney or connecting fluepipe should not...

Page 6: ...er that errors during the installation sooner or later can lead to difficulties with approval authorities to malfunctions or even to damage i e in all cases to customer s complaints Moreover subsequent rectification is always more expensive than a proper careful implementation right from the start A commissioning protocol is included with the delivery It must be our common goal to hand over to the...

Page 7: ...ol ON 25 Maintenance Boiler maintenance 26 Malfunctions Troubleshooting 26 General instructions Installation assembly electrical connections and first commissioning are tasks for a qualified expert He is responsible for ensuring proper implementation Explanation of our warranty conditions We have to exclude our warranty for damages occurring due to the following reasons inappropriate or improper u...

Page 8: ... for thermal discharge safety device 18 Heating feed connection 19 Opening rod for the gas vent flap 20 Heating return connection 21 Sleeve for O2 probe 22 Exhaust fume nozzle 23 Induced draft fan 24 Filling and emptying sleeve 1 2 25 Gas vent flap 26 Opening handle for the gas vent flap 27 Cladding rear lid 28 Cladding left side with plug in wiring 29 Transport eye bolt 30 Cladding right side 31 ...

Page 9: ... safety device 18 Heating feed connection 19 Opening rod for the gas vent flap 20 Heating return connection 21 Sleeve for O2 probe 22 Exhaust fume nozzle 23 Induced draft fan 24 Filling and emptying sleeve 1 2 25 Gas vent flap 26 Opening handle for the gas vent flap 27 Cladding rear lid 28 Cladding left side with plug in wiring 29 Transport eye bolt 30 Cladding right side 31 Insulating panel top 3...

Page 10: ...173 178 182 173 172 171 169 CO2 content 15 15 15 15 15 15 15 16 16 16 15 15 CO at 13 O2 mg Nm3 80 91 102 123 123 144 166 187 126 135 149 172 Solids emission dust mg Nm3 15 15 14 14 14 14 15 15 14 14 14 14 Boiler efficiency 91 90 8 90 6 90 1 90 1 90 3 90 4 90 6 90 90 4 91 91 9 Contents Boiler water capacity litres 115 115 115 210 255 255 255 255 370 370 410 470 Filling chamber volume litres 150 150...

Page 11: ...7 Overview Boiler dimensions Turbotec 40 lambda control Turbotec 20 30 lambda control Turbotec 40S 70 lambda control Turbotec 50L 100L lambda control Showing optional filling lid centre line ...

Page 12: ...utputs for air regulator units 0 to 10 V max 3 mA Power supply output for air regulator units AC voltage output 24 V 6 VA Electromagnetic door opener AC voltage output 12 V 16 VA Power supply output for O2 probe AC voltage output 12 V 16 VA Measurement input for Pt100 R 108 20 C Storage tank sensor boiler sensor exhaust fume sensor Maximum sensor temperature Tmax 150 C Tmax 150 C Tmax 600 C Immers...

Page 13: ...arbon tetrachloride Installation site The boiler must be installed levelly on a fortified floor A plinth is not required For unhindered operation and maintenance of the boiler unit it must be ensured that there is a passage width of at least 80cm type 20 70 130cm type L in front of and on at least one side of the boiler and at least 50 cm behind the boiler On the top side of the boiler at the back...

Page 14: ...hment to the control later Connect the rear side cladding 34 to the side claddings 28 30 using spring steel clips and self tapping screws Place the top insulating plate 31 on top of the boiler Hook in the front lid cladding 2 Adjust the heights of the side claddings 28 30 using the knurled nuts so that the front edge of the side cladding 28 30 aligns with the doors at the front Unhook the front li...

Page 15: ...the diagram Connect the plugs to the connector strip at the front and hook in the actuator cover 11 Caution Never separate the air regulator flap and the actuator from each other Mounting the induced draft fan Fasten the induced draft fan to the boiler using four nuts as shown in the diagram and connect the plug to the connector strip at the rear Electrical connections The installation of any elec...

Page 16: ... suitable safety heat exchanger and a type tested thermal discharge safety device The two 1 2 threaded nozzles 17 of the safety heat exchanger are located at the rear side of the boiler and can be used optionally as water inlet or water outlet The safety heat exchanger may not be used under any circumstances as an operational water heater The thermomechanical valve must be connected non isolatable...

Page 17: ... 15 C is achieved between the boiler feed and return The actuator on the 3 way valve has an electrical end position power off switch and can become defective if operated manually Mounting the control Lay the lid cladding 2 on the boiler and support it on the right side cladding Unpack the control carefully unroll the capillary tube of the safety temperature limiter don t bend it and push it throug...

Page 18: ... mode Systems 3 and 4 Monovalent or bivalent system with buffer storage tank and charging valve Dimensioning of the boiler power according to the calculated heating needs Heating priority startup relief by means of bypassing the buffer Intelligent buffer storage tank management buffer charging priority depends on set boiler temperature Residual heat withdrawal down to minimum boiler temperature di...

Page 19: ...ntrol BS Boiler sensor for the heating circuit and tap water control P1 Primary pump P2 Heating circuit pump P3 Charging pump tap water storage tank H1 Remote indicator Add fuel Position Y2 Storage tank bypassed 0 Storage tank switched in 1 Important instruction Stop valves vents and technical safety measures are not shown in this block diagram These must be installed system specifically in accord...

Page 20: ...ler temperature and the storage tank temperature Once the boiler temperature has fallen below the minimum value Tkmin can be set in the installer menu the withdrawal of heat from the boiler is ended The stored heat can now be discharged to the heating system or the tap water storage tank as required Once the temperature in the load compensation buffer or energy storage tank falls below the minimum...

Page 21: ...truction Stop valves vents and technical safety measures are not shown on this block diagram These must be installed system specifically in accordance with standards and regulations In the case of operation with one flue an approved exhaust fume temperature monitor DIN 3440 must be fitted to the Turbotec and switches mounted on the doors and in the control chain of the oil and gas fired boiler The...

Page 22: ...set in the installer menu the withdrawal of heat from the boiler is ended The stored heat can now be discharged to the heating system or the tap water storage tank as required Once the temperature in the load compensation buffer or energy storage tank falls below the minimum value TSmin can be set in the installer menu the oil or gas fired burner is released and can be put into operation depending...

Page 23: ...uctural reasons the actual cable length can be entered by pressing the Plus or Minus button so that correctly measured values will be obtained max cable length 50 metres cable cross section 2 x 0 75 mm 2 The entry is confirmed by pressing the Arrow button one arrives at the next setting and the following appears on the display only if a storage tank sensor is present Storage tank min TSmin C 45 Th...

Page 24: ...e following appears on the text display Heating OFF The selection menu is entered by pressing the Arrow button and the following appears on the display S E L E C T I O N INFORMATION By pressing the Plus button the menu item S E L E C T I O N SETTINGS Is selected The selection menu is abandoned automatically if no button is pressed for more than 30 seconds By further pressing of the Plus button the...

Page 25: ...automatically to stand by energy efficiency function Setting the boiler temperature Following the first commissioning of the control and the ensuing system settings by a professional the following message appears on the text display Heating OFF The Selection menu is entered by pressing the Arrow button and the following message appears on the display S E L E C T I O N INFORMATION The menu item SET...

Page 26: ...dicator lights up Pull and latch the operating handle of the gas vent flap Press the Add fuel button The text display shows DO NOT OPEN Please wait The induced draft fan operates at high speed and the Add fuel indicator blinks for 10 minutes The door opener is released after 15 seconds and the text display shows C A U T I O N OPEN SLOWLY Filling door 1 centre can now be opened Filling door 2 top t...

Page 27: ...23 Commissioning Circuit diagram ...

Page 28: ...G DEPENDS ON SYSTEM APPLICATION HYDRAULIC SYSTEMS 1 3 SPEICHERFÜHLER STORAGE TANK SENSOR Wärmeeinnahme EIN Heat absorption ON STELLANTRIEB RÜCKLAUFVENTIL RETURN VALVE ACTUATOR Wärmeeinnahme AUS Heat absorption OFF PRIMÄRPUMPE PRIMARY PUMP Stufe 2 Stage 2 SAUGZUGVENTILATOR INDUCED DRAFT FAN ABGASFÜHLER EXHAUST FUME SENSOR Heizung Heating O2 SONDE O2 PROBE Sonde Probe STECKERLEISTE 1 CONNECTOR STRIP...

Page 29: ...24 Commissioning Short operating instructions ...

Page 30: ...r Fan Türöffner Door opener Primärmotor Primary motor Sekundärmotor Secondary motor Ladeventil Charging valve Heizkreispumpe Heating circuit pump Ladepumpe Charging pump Umschaltkontakt Switchover contact Beleuchtung Lighting LED Wärmeerz LED Heating ON LED Nachlegen LED Add fuel LED Störung LED Malfunction CODE Eingabe CODE input Sprache Language Kesseltyp Boiler type System Nr System no Sind Sie...

Page 31: ......

Page 32: ...no malfunction EINSTELLUNGEN SETTINGS SOMMERBETRIEB SUMMER OPERATION KAMINFEGERTEST CHIMNEY SWEEP TEST AGGREGATETEST AGGREGATE TEST Kesselsollwert Boiler set value Servicecode mit Service code with Nennleistung Rated power Teillast Partial load Sicherheitstest Safety test Test wird durchgeführt Test is carried out CODE Eingabe CODE input Anzeige nur bei System 1 Display only for system 1 Anzeige n...

Page 33: ... temperature is too high no heat consumption power failure pump or valve defective After the boiler temperature has dropped to approx 80 C due to heat consumption the STL is reset by pressing the restart switch thus automatically acknowledging the malfunction Measured values of the exhaust fume temperature are incorrect Exhaust fume temperature Measured values wrong Causes plug contacts sensor cab...

Page 34: ...mperature too low C Causes plug contact cables non return valve actuator control After rectification of the malfunction it must be acknowledged by pressing the Arrow button Exhaust fume temperature too high Exhaust fume temperature too high C Cause because of a too long fuel adding procedure or open gas vent flap the exhaust fume temperature has exceeded 300 C For rectification refer to the operat...

Page 35: ...28 Notes ...

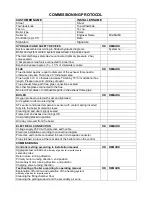
Page 36: ...sioning protocol and would ask that you return this to us having been filled in fully by a professional after completion of the commissioning but at the latest within two months after delivery The boiler warranty will not become effective until we have received the completed protocol Please note without this protocol which confirms the proper handover and training of the user we cannot give any wa...

Page 37: ...Oxygen probe mounted with seal and tightened Air regulator units mounted tightly STL sensor and boiler temperature sensor with contact spring inserted fully into the boiler immersion sleeve Cleaning lid and doors tightly sealed Flame duct and ashes door linings OK Cast grating placed in position Drip tray removed from the boiler ELECTRICAL CONNECTION OK REMARK Voltage supply 230 V with protective ...

Page 38: ......

Reviews: