Chapter 4. Controls, Indicators, and Operation of 10/20-GB DLT Cartridge Tape Drive
Order Number: EK–SM1TB–UG. E01
4–11
4.6.4 Tape in Use
When the yellow T
APE IN
U
SE
light is on steadily, the tape is ready for use. While the tape is
being read, written to, or rewound, the yellow T
APE IN
U
SE
indicator blinks. Table 4–7
describes what is happening during cartridge use:
Table 4–7 What is Happening During Cartridge Use (Right-Side Indicators)
If ...
It means ...
1.
The yellow T
APE IN
U
SE
indicator is
on steadily
A cartridge is loaded, but the tape is not moving.
This condition can mean that no application is com-
municating with the controller, or that the application
is communicating but is not delivering commands for
tape motion.
2.
The yellow T
APE IN
U
SE
indicator
blinks irregularly.
A read or write is in progress.
3.
The yellow T
APE IN
U
SE
indicator
blinks regularly.
The tape is loading, unloading, or rewinding.
4.
The audio transducer beeps and the
green O
PERATE
H
ANDLE
indicator
turns on.
The tape is unloaded.
5.
All four right-side indicators blink
An error has occurred during operation.
4.6.5 Unloading A Cartridge
NOTE
The cleaning cartridge expires after approximately 20 uses, after
which time there is insufficient cleaning area remaining on the
cleaning tape to adequately clean the heads.
NOTE
The following procedure presumes that the operator manually ini-
tiates the unloading sequence by pressing the Unload push-but-
ton. In some host-driven applications, the application software may
issue the appropriate system software command to initiate the
unloading sequence, producing the same effect.
1. Press
the
U
NLOAD
push-button on the front panel’s right side (or issue the appropriate
system software command). The yellow T
APE IN
U
SE
indicator blinks as the tape re-
winds.
2. When the internal audio transducer beeps and the green Operate Handle indicator lights
steadily, pull the cartridge insert/release handle open by pulling the bottom edge up and
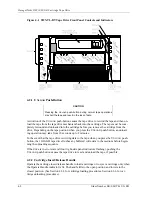
forward. (Refer to Figure 4–4).
3. Remove the cartridge by pulling it forward from the aperture.
4. Push the insert/release handle closed by pushing front edge back and down.


