background image

User’s Manual 

www.docunote.com


19 

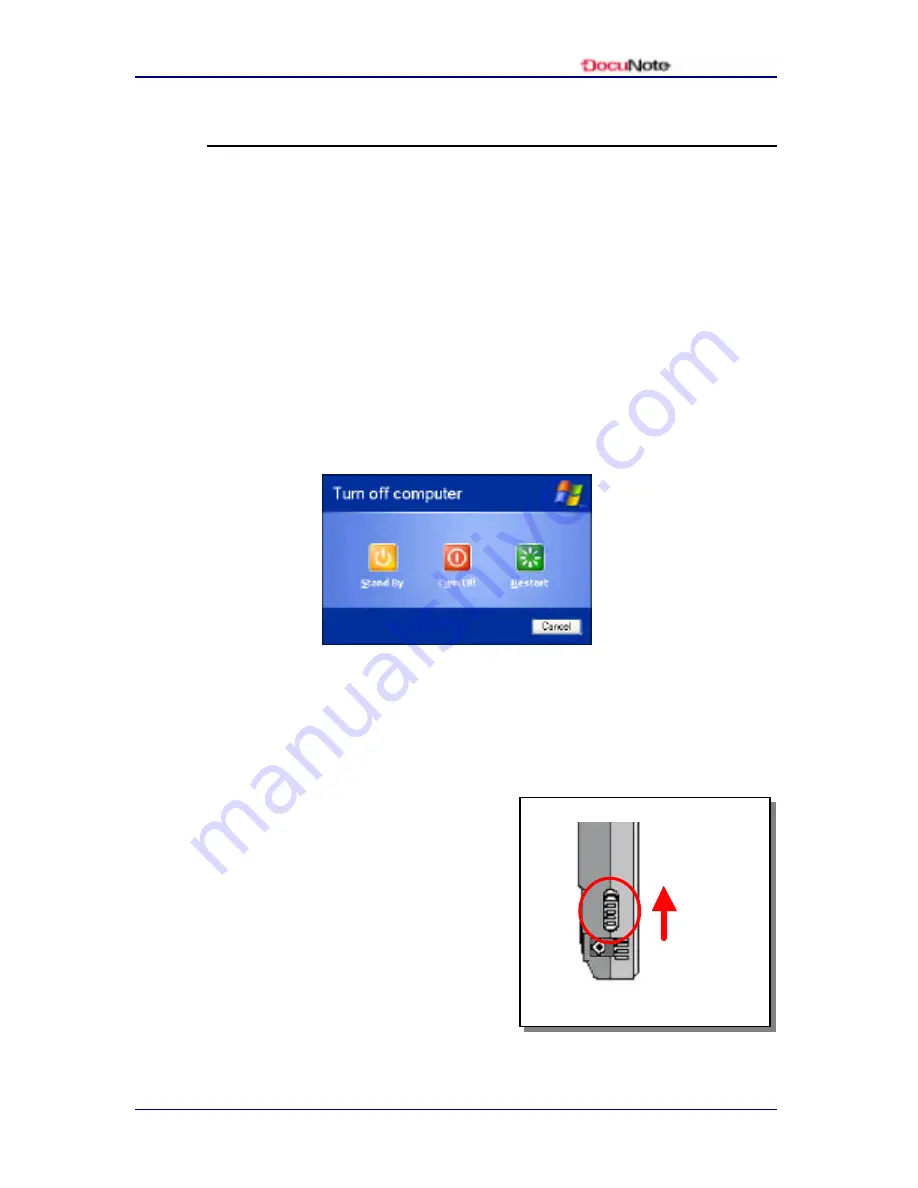
Shutting Down Your DocuNote 

When shutting down your DocuNote, follow these steps in the 
Windows. 

To turn your DocuNote off: 

1. Click the Start button in the Windows 

2. Click on Shut Down and the Shut Down Windows dialog box 

will appear 

3. Select Shut Down / Turn Off 

4. Click OK 


You can also easily turn off your DocuNote by pressing the power 
switch up twice in consecutive manner.  It will follow the normal 
Windows shutdown and turns DocuNote off. 

In case your DocuNote is not 
automatically shut down, you n eed 
to manually shut down by a power 
switch on the left side panel of 
DocuNote.  You can push a power 
switch up and hold it for five 
seconds to manually shut down 
DocuNote (

Please note t his 

operation may result in data loss

): 


Manual Shut Down 


Push  
Upward 
and Hold 
for 5 sec. 


Summary of Contents for DocuNote

Page 1: ...User s Manual ...

Page 2: ......

Page 3: ...R ANY PARTICULAR PURPOSE AND UNDER NO CIRCUMSTANCES SHALL STEPUP COMPUTING LLC BE LIABLE FOR ANY INCIDENTAL CONSEQUENTIAL OR SPECIAL DAMAGES WHETHER BASED ON TORT CONTACT OR OTHERWISE ARISING OUT OF OR IN CONNECTION WITH THIS MANUAL INFORMATION CONTAINED HEREIN OR THE USE THEREOF Copyright 2002 StepUp Computing LLC All rights reserved This manual may not be copied photocopied reproduced translated...

Page 4: ......

Page 5: ...g Power 5 Mobile Productivity 5 Wireless Mobility 6 Pen Computing 6 Standard Operating Systems Compatibility 7 Unpacking Your DocuNote 7 Understanding Your DocuNote 9 Two Ways to Use Your DocuNote 9 Stand alone Tablet PC On the Go 9 With an Optional Carrying Case and Keyboard 9 With an Optional Carrying Case and Keyboard 10 Locating Controls and Connectors 10 Locating Controls and Connectors 11 LE...

Page 6: ...tery as a Power Source 18 Starting Up Your DocuNote 18 Shutting Down Your DocuNote 19 Installing Operating System 21 How to Install Operating System 21 Drivers Utilities 22 Installing Device Drivers 23 Installing Utilities 26 Using Utility Software 29 G2 Video Capture 29 Virtual Keyboard 31 PenOffice 32 Pivot 33 Customizing Your DocuNote 35 Using LCD Touch Screen 35 Basics 35 Calibration 36 Custom...

Page 7: ...de 40 HDD Upgrade 40 Advanced Options 42 CMOS Setup 42 Setting up System Password 43 CMOS Battery Replacement 44 Getting Help 45 Support Options 45 Returning for Repair Service 45 Appendices 47 Frequently Asked Questions 47 Product Specifications 51 DocuNote Main Unit 51 DocuNote Accessories 52 ...

Page 8: ...User s Manual iv Contents This page is left blank intentionally ...

Page 9: ...rosol cleaners Use a damp cloth for cleaning Use only the supplied power source with your DocuNote If you lose it please contact your authorized reseller for replacement Do NOT place heavy objects on the LCD screen or the power cord To reduce the risk of electric shock do NOT disassemble the unit Opening or removing parts may expose you to high voltage Do NOT block the slots and openings of your D...

Page 10: ...in a residential installation This equipment generates uses and radiates radio frequency energy and if not installed and used in accordance with the instructions may cause harmful interference to radio communications However there is no guarantee that interference will not occur in any particular situation If this equipment causes harmful interference to radio or television reception which can be ...

Page 11: ...ed with DocuNote is UL listed Please refer to the back panel label for the UL listed number If you travel to a different country the power cord should match the plug and voltage requirements for the local area If you are unsure of the type of power cord to use in the area or to purchase a power cord or AC adapter replacement contact your authorized reseller or the local agency Disposal of Lithium ...

Page 12: ...User s Manual 4 Notice to Users This page is left blank intentionally ...

Page 13: ...io communications and video conferencing A high capacity lithium polymer battery provides confidence in extended use environments Features High Performance Computing Power DocuNote is powered by a 667 MHz mobile processor 128 256MB memory a 10 15 20 GB hard drive 4MB video memory with an external VGA port and USB connectivity for the user s most demanding mobile applications A built in digital col...

Page 14: ...e unfolds and extends the back panel to stand on its own and attaches to DocuNote using a single connector With a compact but intelligently designed 77 key keyboard you can have easy access to any typical typing requirements Wireless Mobility DocuNote not only features a built in 10 100 Base T Ethernet port but also supports wireless networking to maximize the value of its flexibility in any compu...

Page 15: ...arket applications Currently included with DocuNote are software drivers to support these Windows operating systems Unpacking Your DocuNote Your DocuNote comes complete with the Tablet PC device a stylus pen A C adapter a drivers utilities CD and user documentation When removing these items from the box please ensure that all hardware and accessories are included If any items are missing please co...

Page 16: ...ude DocuNote leather carrying case with a built in 77 key USB keyboard Microsoft Windows 2000 or Windows XP Professional with accompanying documentation PCMCIA wireless card with an accompanying manual DocuNote Tablet PC Stylus AC Adapter Drivers Utilities CD User s Manual Leather Case ...

Page 17: ... plus how to use the connectors and peripherals Two Ways to Use Your DocuNote Stand alone Tablet PC On the Go You can use DocuNote without a keyboard as the perfect tool for browsing the Internet accessing database information on a server checking email and presenting a slide to your prospective customer The only limit of its application is your imagination With a convenient touch screen and a sty...

Page 18: ...u can unfold and extend the back panel of the case to stand on its own With an exceptionally compact but intelligently designed 77 key USB keyboard you have easy access to all your typing needs such as creating a document on the run writing email to your colleague or polishing up a presentation Simply connect a little corded plug attached to the leather case into the keyboard connector on the side...

Page 19: ...d Connectors Front View Speakers Power Status LED HDD LED Network Connection LED Battery Status LED Web Browser Hot Key User defined Hot Key Camera Capture Hot Key Digital Camera 4 way Jog Mouse Mouse Right Button Mouse Left Button Touch Screen Microphone ...

Page 20: ...e Compartment Battery Compartment PCMCIA Type II Slot VGA Port IrDA Port Docking Connection DC in Power Jack Power Switch 10 100 Base T Ethernet Port USB Port Stereo Audio out Jack Keyboard Connector Top View Rear View Bottom View Left Side View Right Side View ...

Page 21: ... live images from the built in digital camera 4 way Jog Mouse moves the mouse pointer Mouse Left Button acts as a left mouse click Mouse Right Button acts as a right mouse click NOTE All 3 hot keys can be customized for your preference For instance you can use the user defined hot key to launch your email program instead of changing the screen mode between landscape and portrait You can also custo...

Page 22: ...uNote 10 100 Base TEthernet Port connects to a network or the Internet via RJ 45 cable from a hub or DSL cable modem USB Port connects to a wide range of available USB devices such as mice keyboards and external CD ROMs Stereo Audio out Jack connects to external stereo speakers DocuNote is equipped with built in stereo speakers and a microphone This connector will enhance your enjoyment while list...

Page 23: ... the AC adaptor to the DocuNote unit in either a powered on or off mode The Battery Status LED will be lit green while charging Once the battery is fully charged the green light turns off When the battery is low the Battery Status LED light turns red to signal that DocuNote needs to be recharged The battery status can also be monitored through the battery indicator in Window s system tray No Light...

Page 24: ...wo screws on the back panel that secure the battery compartment and unscrew them 3 Disconnect the battery connector from the main unit if you are replacing the battery 4 Insert the battery into the battery compartment and attach the battery connector to the main unit 5 Secure battery compartment with the two screws previously removed Managing the Battery If the battery is continuously charged and ...

Page 25: ... will be lit red Immediately switch to the AC adapter by connecting it to DC in on the left side panel of your DocuNote Once connected to the AC adapter your DocuNote will automatically switch to AC power and start charging the battery at the same time When there is a need to store the battery you should store it at room temperature and avoid high temperatures where the battery will discharge at a...

Page 26: ...ote will automatically switch to battery power when the AC power is disconnected Please make sure the battery is fully charged prior to using it first time to ensure that you will have full capacity of your battery If you need to insert or change an existing battery please refer to the section Installing the Battery Starting Up Your DocuNote Connect a power source to your DocuNote If you want to u...

Page 27: ...k OK You can also easily turn off your DocuNote by pressing the power switch up twice in consecutive manner It will follow the normal Windows shutdown and turns DocuNote off In case your DocuNote is not automatically shut down you need to manually shut down by a power switch on the left side panel of DocuNote You can push a power switch up and hold it for five seconds to manually shut down DocuNot...

Page 28: ...User s Manual 20 Understanding Your DocuNote This page is left blank intentionally ...

Page 29: ...tall Operating System To install a new operating system or re install the existing one you need to have an external medium such as an external USB CD ROM You can purchase an external USB CD ROM frommost electronics and computer retail stores Please consult with the authorized reseller where you purchased your DocuNote Please follow these general steps to install a new operating system or re instal...

Page 30: ...udes a specially marked Drivers Utilities CD that contains important device drivers and useful utility programs to take advantage of DocuNote s functions You will need this CD whenever you re install your operation system or repair any damage of your existing device driver or utility software Please keep this CD in a safe place for later use NOTE Drivers Utilities CD contains only the device drive...

Page 31: ...ce drivers for audio sound USB Camera USB interface drivers for built in camera Windows 2000 only For Windows XP video and audio devices will be automatically recognized and proper drivers will be installed Utilities G2 Video Capture Image capturing application for the built in camera Pivot Landscape portrait screen orientation application Pen Office Handwriting recognition application Virtual Key...

Page 32: ...ram 8 Follow the on screen step by step instruction to finish installation 9 Some installation procedures require automatic rebooting of the system to perform necessary system configurations NOTE When installing the Touch Screen device driver you should specify that the number of device is 1 accept the default settings for device 1 and then choose Semtech ScreenCoder USB as a device controller typ...

Page 33: ...ab 3 Using keyboard or arrow keys on the virtual keyboard set the values as follows and click Apply to reflect these changes Click time 1 Tap time 14 Lift off time 1 Place a check mark next to Use Liftoff Packet 4 Select the Events tab 5 Set Primary and Secondary values as follows and click Apply to reflect these settings Primary Touchdown Left Secondary None ...

Page 34: ...ngs to work correctly with DocuNote To customize Pivot settings 1 Go to Start Settings Control Panel and double click Display 2 Click on the Settings tab and then select Advanced 3 Click on the Pivot Software tab 4 On the Option menu uncheck the mark next to Allow to rotate to 180 and Allow to rotate to 270 DocuNote does NOT support 180 and 270 rotation 5 Check mark next to provides access to Quic...

Page 35: ...s a 30 day trial version Please use the serial number provided on the CD to complete the installation PenOffice Serial No docunote 1372 3212 09 After evaluation period you can register and purchase PenOffice through their website at http www paragraph com penoffice html ...

Page 36: ...User s Manual 28 Installing Operating System This page is left blank intentionally ...

Page 37: ...re G2 Video is an image capturing application you can use to capture images via DocuNote s built in digital camera To capture images using the G2 video program 1 Click on the G2Video icon on your Windows desktop or go to Start Programs G2Video and start the program 2 Choose STV0672 Camera at Camera Select 3 Captured images from the built in camera will be displayed in the preview window at the bot...

Page 38: ...ables to capture a still image into the BMP file format 4 To capture moving images into the AVI movie file format select AVI button under the Video Mode and type the file name to store on the AVI Capture Control dialog box Click OK to start image capturing and click STOP to finish recording 5 To capture a still image into the BMP picture file format select BMP button under the Video Mode and type ...

Page 39: ...ly tapping onto a character key of the virtual keyboard displayed on the screen will work similar to typing on an actual keyboard In Windows XP Virtual Keyboard is provided with the operating system called On screen Keyboard Go to Start Programs Accessories Accessibility and select On Screen Keyboard To start Virtual Keyboard in Windows 2000 click on the key button icon Virtual keyboard will be di...

Page 40: ...led information and a manual for PenOffice please visit their website at www paragraph com penoffice html To start PenOffice click the Start button in the lower left corner of the screen go to PenOffice 2 2 English Edition under Programs and click to launch the application When PenOffice starts three icons that represent different operating modes will appear on your system tray Recognition Mode Yo...

Page 41: ...l be most useful when you are surfing the Internet or reading a full page text document To change to portrait mode click on the screen icon on the system tray and select Rotate to 90 To change back to landscape mode click on the screen icon again on the system tray and select Rotate to 0 Using QuickRotate you can also rotate screen mode faster by clicking the mode icons displayed on screen from wh...

Page 42: ...User s Manual 34 Using Utility Software This page is left blank intentionally ...

Page 43: ...te Using LCD Touch Screen Basics The LCD touch screen of DocuNote allows you to move and click with a stylus pen or your fingertip Simply touch or drag a stylus pen to move the mouse pointer to the desired location Tapping once will act as a single click and tapping twice acts a double click You can also use the 4 way jog mouse and left right buttons on the upper right panel of DocuNote to move th...

Page 44: ... regularly calibrate the touch screen in order to have an accurate reading of your stylus position on the screen Please run the calibration utility on the Windows system tray and follow the simple steps described below 1 Right click on the calibration icon on the system tray 2 At the pop up menu select Calibrate Device1 Normal 3 Follow the on screen instruction and click at each corner displayed o...

Page 45: ...e hot keys to run any other applications You can also choose between two functional modes available for the 4 way jog mouse keyboard and mouse emulation To open E key Setting windows and assign a different application to a button 1 Click on F button icon on the Windows system tray 2 Select Key Setup 3 As a default three hot keys will launch following applications Web icon Launches Internet Explore...

Page 46: ...ommended to set to 10 as a default At default 4 way jog mouse is set to Mouse Emulation mode Power management Your DocuNote was designed to use power efficiently without compromising system performance Typically the LCD screen CPU and hard disk drive draw most of the power from DocuNote You can adjust the settings through the power management options included in Windows to customize it for your wo...

Page 47: ...ur screen and hard disk drive automatically Typically you would do this for a short period to conserve power If you plan to be away from your DocuNote for a while you put your DocuNote on standby Put your computer in hibernation You would do this when you will be away from your DocuNote for an extended time or overnight Hibernation turns off your DocuNote but when you restart the computer all prog...

Page 48: ...se unsaved information if power is lost To activate DocuNote from a Stand by Mode follow the same steps as described in putting DocuNote on standby Upgrading Your DocuNote Memory Upgrade Your DocuNote is pre installed with 128 256MB of memory to provide sufficient memory space for most personal and business applications If you need to upgrade to a higher capacity memory module please contact your ...

Page 49: ...ges to delicate HDD electric components 4 Slide the HDD bracket away from the main unit 5 Remove the HDD from the bracket and unplug a connector pin attached to the HDD 6 Plug the connector pin back onto a new HDD 7 Replace and tighten the side screws to secure the new HDD in place onto the bracket 8 Slide the HDD bracket into the HDD compartment of the main unit 9 Secure the HDD compartment with ...

Page 50: ...tings when you add new hardware Please read carefully when you need to change any settings Incorrect changes in the CMOS Setup can cause a system error To change CMOS Setup settings 1 Power on your DocuNote and wait for the system to boot up 2 Press F2 key once the booting screen appears 3 CMOS main screen appears 4 Browse the menu and make any necessary changes 5 Once setup has changed press F10 ...

Page 51: ...orized reseller Therefore use the system password feature discretely and keep your password in a safe place To set or remove the system password 1 Go to the CMOS Setup screen by pressing F2 key once the booting screen is on 2 Move to Security tab and select Supervisor Password tab in the menu 3 Type your password and press Enter 4 Type the same password one more time for confirmation and then pres...

Page 52: ...ovides power to the real time clock and CMOS RAM The battery will last long enough and will not require replacement unless the system time is not maintained consistently over a period of time If this condition happens please contact your authorized reseller to replace the CMOS battery ...

Page 53: ... the number below You will need to provide the product serial number located on the back of your DocuNote Please have the serial number ready when placing a call For technical support in U S A and Canada Technical Support Line 1 888 StepUp4 1 888 783 7874 Hours 10 00 a m 5 00 p m PST Monday Friday Returning for Repair Service In some cases you may need to send your DocuNote for repair by our own t...

Page 54: ...User s Manual 46 Getting Help This page is left blank intentionally ...

Page 55: ...t battery level it will automatically go into hibernation and shut itself off You can find the power source to connect AC power later and power up DocuNote to start from where you left off 3 WHAT IS THE CRITICALBATTERY LEVEL The critical battery level is when DocuNote will automatically save the settings and enter into hibernation It occurs at below 3 of battery capacity after the battery indicato...

Page 56: ...T DOCUNOTE ON STAND BY MODE It depends on the battery power left on DocuNote In Stand by Mode DocuNote will usually hold the information until the battery is depleted 8 HOW CAN I PRINT A DOCUMENT DocuNote is well designed to work with existing networks by providing built in support for connectivity such as wireless networking PCMCIA devices Ethernet port IrDA and USB port If you are connected to a...

Page 57: ...ily display to an external monitor for sharing the screen view Simply connect to the VGA port with a monitor cable from any standard CRT or LCD monitor If the connector has retaining screws be sure to tighten them to secure the connection 14 WHY DOES DOCUNOTE BECOME HOT ESPECIALLY ALONG THE BOTTOM It is common for the unit to become warm due to the heat from the CPU and LCD screen 15 HOW CAN I PRI...

Page 58: ...od 19 WHAT CAN I DO WHEN DOCUNOTE IS NOT RESPONDING OR SHUT DOWN Sometimes an application may not respond to your input due to internal errors First try to press CTRL ALT DEL at the same time to bring up the Windows Security dialog box and click on Task Manager Task Manager will display which application is causing the problem and not responding Terminate that specific application and close the wi...

Page 59: ...ps Keyboard Mouse Virtual on screen keyboard support 4 way jog mouse 2 mouse buttons 3 hot keys optional leather carrying case with built in 77 key USB keyboard Operating System Optional Microsoft Windows 2000 Professional or Windows XP Docking Interface Port availability depends on selected options Support for the desktop environment with 4 USB ports PS 2 keyboard and mouse ports 1 VGA port 1 par...

Page 60: ...User s Manual 52 Appendices DocuNote Accessories Leather Case Carrying bag with a built in 77 key USB keyboard 1 1 lbs Docking Station Available soon Vehicle Power Adapter Available soon ...

Page 61: ......

Reviews: