SSS Siedle CAU 850-1-0 E Product Information Download Page 6

6

Application

Siedle Compact

 audio door station 

flush mounting, for 

installation in 

the 

In-Home bus. With th

e functions 

calling, speech and door release.
Performance features:
• Integrated door loudspeaker
• 

Adjustable voice vol

ume

• Number of integrated call buttons: 
1, 2, 4

• Acoustic 

button acknowledgement 

can be activated
• Backlit nameplates

 exchangeable 

from the front
• Backlit info sign for house number, 
logos, opening times, etc.

• For flush mounting with 

brushed 

stainless steel panel

Electrical voltage

Mounting,

 installation and servicing 

work on electrical devices may only 
be performed by 

a suitably qualified


electrician.

Electrostatic charging

A

s a result of electrostatic charging, 

direct contact with the circuit board 
can result in destruction of the 
device. Direct contact with the circuit 
board must therefore be avoided.

Scope of supply

• 

CAU 850-…-0 E

• 

Flush-m

ount housing

• 

This pr

oduct information

Terminal assignment

Ta, Tb

In-Home bus

Tö, Tö

Relay contact door release
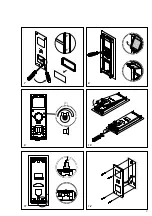
Mounting

Remove the housing front. To do 

so, loosen th

e screw on the under­

side of the housing. Open the base 
plate upwards.

Recommended mounting height 

ap

pr. 1.50 m/4.9 ft to

 centre device.

English

Remove the cardboard plaster 

protector from 

the flush­mount 

hous

ing, break out the c

able break­

through from the housing and 
thread in the cable. Reinforce the 

flush­

mount housing using the card­

board plaster protector

and grou

t the flush­mount 

ho

using flush. The pla

ster protector 

must be inserted into the housing 
to prevent deformation. It must

 not, 

under any circ

umstances, protrude 

from the wall and may be grouted 

max. 14 mm in the wall, as 

other­

wise the fixing

 screws for the front 

panel will be too short.

Install in accordance with the 

wiring diagram.

The cores may only be laid in the 

admissible installation space.

Important!

Before using the door release 
terminal(s) (door release relay con­

tact), observe the “

Door release 

actuation” information in the 

System Manual In-Home bus: Audio 
or V

ideo.

Lettering

Open the nameplate from the 

outside, for example using a flat 

b

laded screwdriver, a

nd carefully 

remove the inscription insert. To 
insert the na

meplate, lock into p

lace 

by exerting light pressure.

Info si

gn from the inside, 

e.g. 

open using flat

 blade screwdriver 

and remove inscriptio

n field. To 

insert, 

clip in the info sign exerting a 

slight pressure.

Depending on the installation 

environment, it may

 be necessary 

to change the door station speech 
volume in order to permit clear 
speech transmission.

10 

Insert the base plate at the top 

and close downwards. Tighten 
the screw on the underside of the 
housing.

11 

Carefully inse

rt the microphone 

grommet on the underside of the 
housing.

12 

Following completion of installa­

tion, mou

nt the front panel on the 

flush mount ho

using and screw into 

place. The sealing strip fastened at 
the back of the front panel must lie 

flush

 with the outside wall in order 

to guarantee an adequate seal. Do 
not use too much pressure when 
tightening the screws.

Commissioning and  
programming

13 

Programming button for the 

Siedle C

ompact door station

Door station programming mode 
(manual programming):
At the d

oor station, hold do

wn the 

top bell button for 4 seconds.  
A protracted acknowledgement tone 
is then audible which is repeated 

every 5 second

s as long as the pro­

gramming mode remains active.

Installation, commissioning and pro­
gramming are described in the rel­
evant system manual and enclosed 

with the line rectifier/server.

Dismantling

Disassembly takes place in reverse 
order. (Picture 10­12)

Specificat

ions

Contact type: contact 24 V, 2 A

Pro

tection system: IP 5

4

Ambient temperatur

e: 

–20 °C to +55 °C

Dimensions front panel (mm) 

W x H x D: 110 x 273 x 1

Dimensions housing (mm) 

W x H x D: 85 x 253 x 48

Summary of Contents for CAU 850-1-0 E

Page 1: ...oductinformatie Audio Deurstation Siedle Compact inbouw Produktinformation Audio dørstation Siedle Compact indmuret Produktinformation Audio dörrstation Siedle Compact för infälld montering Información de producto Montaje empotrado de estación de puerta con audio Siedle Compact Informacja o produkcie Podtynkowa stacja zewnętrzna audio Siedle Compact Информация о продуктах Дверная аудиопанель вызов...

Page 2: ...2 3 max 14 mm 4 13 1 6 1 50 m 4 9 feet 2 ...

Page 3: ...3 9 10 7 8 12 11 ...

Page 4: ...4 Tb Tö Tö Li Li N L1 b c ERT Ta Tb Ta Tb Ta ERT Tb Ta ERT Tb Ta ERT Tb Ta ERT ERT ERT ERT CAU 850 BNG 650 AIB 150 230 V AC BTS 850 BTC 850 BFC 850 Tö 12 V AC min 20 Ohm 5 ...

Page 5: ...fladung Durch elektrostatische Aufladung kann bei direktem Kontakt mit der Leiterplatte das Gerät zerstört werden Vermeiden Sie daher ein direktes Berühren der Leiterplatte Lieferumfang CAU 850 0 E Unterputzgehäuse diese Produktinformation Klemmenbelegung Ta Tb In Home Bus Tö Tö Relaiskontakt Türöffner Montage 1 Gehäusefront abschrauben Dazu an der Unterseite des Gehäuses die Schraube lösen Grundp...

Page 6: ...e laid in the admissible installation space Important Before using the door release terminal s door release relay con tact observe the Door release actuation information in the System Manual In Home bus Audio or Video Lettering 7 Open the nameplate from the outside for example using a flat bladed screwdriver and carefully remove the inscription insert To insert the nameplate lock into place by exe...

Page 7: ...torisée Important Avant d utiliser la les borne s Tö contact de relais gâche observer les informations Déclenchement de la gâche dans le manuel système bus In Home audio ou vidéo Marquage 7 Ouvrir l étiquette avec précau tions par le côté extérieur p ex à l aide d un tournevis pour vis à tête fendue et retirer l insert de marquage Pour la mise en place de l étiquette l encliqueter en exerçant une ...

Page 8: ...n un ambiente di installa zione approvato Importante Prima di utilizzare il i morsetto i Tö contatto relè apriporta osservare le informazioni Comando apriporta contenute nel manuale del sistema In Home Bus audio e o video Diciture 7 Aprire con cautela la targhetta del nome dal lato esterno ad esempio utilizzando un cacciavite per viti ad intaglio quindi prelevare l inserto stampato Per inserire la...

Page 9: ...ieruimte worden gelegd Belangrijk Voor het gebruik van de Tö klem men relaiscontact deuro pener de informatie Deuropener aansturing in het systeemhandboek In Home bus audio resp video lezen Belettering 7 Naambordje vanaf de buitenzijde bijv met een platte schroevendraaier voorzichtig openen en tekstinleg verwijderen Voor het plaatsen het naambordje met lichte druk op zijn plaats drukken 8 Infobord...

Page 10: ...e installationsrum Vigtigt Før Tö klemmen klemmerne relæ kontakt døråbner bruges skal infor mationerne Døråbner aktivering læses og overholdes i systemmanu alen In Home bus Audio og Video Skriftservice 7 Navneskiltet åbnes forsigtigt fra ydersiden f eks med en kærvskrue trækker og navneskiltet tages ud Navneskiltet klikkes på plads med et let tryk 8 Infoskiltet åbnes fra indersiden f eks med en kæ...

Page 11: ... det därför avsedda installationsut rymmet Viktigt Innan en eller flera Tö klämmor reläkontakt dörröppnare används beakta informationen Styrning av dörröppnare i systemhandboken In Home buss Audio alt video Påskrift 7 Öppna namnskylten försiktigt från utsidan t ex med en vanlig skruv mejsel och ta ut textremsan För att sätta i namnskylten tryck in den lite lätt tills den snäpper fast 8 Öppna infos...

Page 12: ...ión permitido Importante Antes de usar el los borne s del abrepuertas contacto de relé abrepuertas observar la informa ción Activación de abrepuertas en el manual de sistema del bus In Home Audio o vídeo Identificación 7 Abrir la placa de características desde el exterior p ej con un des tornillador de hoja plana y retirar la placa de características Para insertar la placa de características engat...

Page 13: ...dopuszczonym do instalacji obszarze Ważne Przed użyciem zacisków do elektro zaczepu drzwiowego styk przekaź nika elektrozaczepu drzwiowego należy się zapoznać z informacjami Sterowanie elektrozaczepu drzwio wego w podręczniku obsługi systemu In Home Bus Uwzględnić Audio i Video Napisy 7 Ostrożnie otworzyć od wewnątrz tabliczkę z nazwiskiem np przy użyciu śrubokręta krzyżakowego i wyjąć napis Aby z...

Page 14: ...жных винтов лицевой панели 5 Выполнить электропроводку согласно схеме соединений 6 Жилы разрешается проклады вать только в допустимом инстал ляционном помещении Важно Перед использованием зажима зажимов открывания дверей релейного контакта устройства отпирания дверей следуйте информации Активирование устройства отпирания дверей в системном руководстве для системы In Home Bus Аудио или Видео Надпис...

Page 15: ...последовательности Фото 10 12 Технические данные Тип контактов Замыкающий кон такт 24 В 2 А Тип защиты IP 54 Температура окружающей среды от 20 C до 55 C Размеры лицевой панели мм Ш x В x Г 110 x 273 x 1 Размеры корпуса мм Ш x В x Г 85 x 253 x 48 ...

Page 16: ...Telefon und Telegrafenwerke OHG Postfach 1155 78113 Furtwangen Bregstraße 1 78120 Furtwangen Telefon 49 7723 63 0 Telefax 49 7723 63 300 www siedle de info siedle de 2019 06 19 Printed in Germany Best Nr 210009161 00 ...

Reviews: