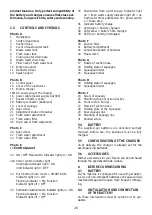
Sprintus Torana Manual Download Page 28

28

7.4 

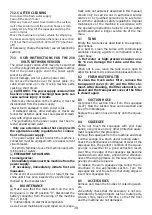
ASSEMBLY OF THE SQUEEGEE

Lower the squeegee by pressing theFoot levers 

(photo B-19).

Lightly tighten the two thumbscrews (photo H-28) on 

the squeegee (photo H-44).

Insert the squeegee into its seat on the squeegee 

holder (photo G-45) and fasten by tightening the two 

toggle screws.

Slide the suction hose of the suction device (photo 

G-27) onto the connecting piece of the squeegee.

7.5 

DISASSEMBLY OF THE SUCTION BARS

Lower the squeegee by pressing the foot lever

(Photo B-19).

Disconnect the suction hose from the squeegee 

(Photo G-27).

Screw away the two thumbscrews (photo G-45).

Lift the squeegee holder (photo H-44) and remove 

the squeegee.

7.6 

CHANGING THE SQUEEGEE LIPS


Release the squeegee from its holder

(see 7.5). Fully unscrew the knob screws (I-31) and 

remove the locksmith screws (I-24) until the (I-30) 

can be removed.

Remove the squeegee lips from the holder.

Insert the new squeegee into the plastic holder 

by pushing the plastic pins into the corresponding 

holes on the squeegee. Replace the mounting strip 

in the squeegee and fasten it by screwing on the 

thumbscrews (I-30).

Replace the squeegee onto its holder (I-31).

7.7 

 INSERTING AND REMOVING THE 

SPLASH GUARD 

- Loosen the 2 screws of the splash guard (A-12).

- Open the latch on the splash guard (A-12).

- Remove the splash guard.

7.8 

 FILLING AND EMPTYING THE FRESH 

WATER TANK


The temperature of the water or cleaning 

agent to be filled must not exceed 50 °C.

☞ 

Whenever the fresh water tank is filled, the 

waste water tank must always be emptied.

Fill:

- Remove the filler neck (A-9).

- Do not fill the tank to the brim.

- Add the required amount of cleaning agent, ob-

ser-ving the concentration specified by the manufac-

turer. The fresh water tank of your Torana holds 30 

litres.

- When using cleaning agents, make sure that these 

are suitable for the respective floor.

• 

Only use the Torana with modern, 

non-foaming cleaners. The use of other 

chemical products, such as caustic soda, ox-

idants, solvents or hydrocarbons can lead to 

damage or destruction of the machine.

- If in doubt, contact the cleaning agent manufacturer 

or Sprintus to ensure the suitability of the cleaning 

agent.

- Always put the cleaning agent into the tank already 

filled with water to prevent foam from forming.

• 

Do not leave the water hose unattended with water 

when filling the tank and guide it fully into the tank. 

Otherwise there is a risk of water penetrating to the 

electrical parts and damaging them.

7.8.1   FILL LEVEL INDICATOR OF THE 

FRESHWATER TANK

The fill level of the freshwater tank can be deter-

mined with the transparent hose attached to the 

rear of the machine (Fig. B-46).

7.8.2  EMPTYING THE FRESHWATER TANK

Emptying the tank with the cleaning liquid can be 

performed with the transparent hose located at the 

rear of the machine (Fig. B-46).

- Remove the hose from its holder and position it 

over a tank or drain. - Remove the plug used to 

seal the hose (Fig. B-46) and wait until the tank is 

completely empty.

- After emptying, seal the hose with the plug and 

insert it back into its holder.

7.9 

DRAINING THE WASTE WATER TANK

When disposing of the waste water, the regulations 

of the respective country of application must be fol-

lowed. The user is liable for observing these laws.

If the cleaning solution is used up, the waste water 

tank must be emptied completely before refilling the 

fresh water tank.

In general, the waste water tank can be emptied as 

often as desired and also during the intermediate 

phases of the work cycle.

• 

The capacity of the collecting tank is greater than 

the capacity of the cleaning solution tank, which is 

why a potential risk to the suction motor should be 

excluded. Nevertheless, for 

safety, there is a float


(F-43), which interrupts the suction flow as soon as 

the waste water level is too high.

• 

If water or foam leakage is detected under the 

tanks, stop the suction motor immediately and drain 

the waste water tank.

Emptying the tank:

Move the machine to a place suitable for draining the 

waste water, i.e. as close as possible to a toilet or 

waste water drain (follow the wastewater disposal 

laws in the country of use of the machine).

Make sure that the main switch on the control panel 

is switched off (E-32).

Remove the drain hose (A-7 / A-8) from its holder, 

hold the hose upwards and open the sealing plug.

Summary of Contents for Torana

Page 1: ...triebnahme der Maschine unbedingt Bedienungsanleitung lesen UK 22 33 Read these instructions carefully before operating the machine FR 34 46 Lire attentivement le mode d emploi avant la mise en servic...

Page 2: ...SCHEUERSAUGMASCHINE 9 21 FLOOR SCRUBBER DRYER 22 33 AUTOLAVEUSE 34 46...

Page 3: ...3 A 3 3 4 5 6 7 8 9 10 12 11 1 2 40...

Page 4: ...4 B 4 20 20 46 46 23 23 22 22 21 21 13 14 15 16B 17 18 13 19 19 16 3 3 Model AC 230V...

Page 5: ...5...

Page 6: ...6 6 E Model AC 230V Model 2 x DC 12 V 33 33 34 34 35 35 37 36 38 39 32 32 32A 13...

Page 7: ...7 F 40 41 42 43 7...

Page 8: ...8 8 G I H 28 28 44 28 28 27 45 45 44 27 24 28 29 26 25 30 31 28...

Page 9: ...HME DES SPRITZSCHUTZES 7 8 BEF LLEN UND ENTLEEREN DES FRISCHWASSERBEH LTERS 7 9 ENTLEEREN DES SCHMUTZWASSERTANKS 7 10 DOSIERUNG DES FRISCHWASSERS 7 11 FAHREN DER MASCHINE 7 12 ARBEITSWEISE 7 12 1 VORB...

Page 10: ...nd zu vermeiden die bei der Installation dem Gebrauch und der Wartung der Maschine auftreten k nnen HINWEISSYMBOL Diese Informationen sind besonders wichtig um Maschinenst rungen zu vermeiden ACHTUNGS...

Page 11: ...s sigkeiten Gase Trockenpulver S uren und L semittel z B L semittel zum Verd nnen von Lack Azeton usw oder Benzin l Treibstoff usw aufsaugen auch nicht wenn diese verd nnt sind Keine brennenden oder...

Page 12: ...Insbesondere ist zu kontrollieren dass das Batterieladekabel und der Steckverbinder in einwandfreiem Zustand sind damit eine sichere Arbeit gew hrleistet werden kann Wenn diese Teile nicht in einwand...

Page 13: ...INFORMATIONEN 5 1 BATTERIE Unabh ngig von dem Bautyp wird die Kapazit t einer Batterie in Ampere pro Stunde Ah ange geben Die Maschine ist mit Gelbatterien ausgestattet Dieser Batterietyp ist wartung...

Page 14: ...rana k nnen Sie ber den Fachhandel erwerben 6 VOR DER INBETRIEBNAHME 6 1 BATTERIE Die Maschine ist f r den Einsatz mit Gelbatterien konfiguriert Der Einsatz von nicht den Vorschriften entsprechenden B...

Page 15: ...ung Starten sie den Betrieb mit dem Foto A 2 Die B rste Padtreibteller rastet automatisch ein Die Mindestl nge der Borsten betr gt 1 cm Die Mindestst rke der Pads betr gt 1 cm Zu stark abgenutzte B rs...

Page 16: ...en Wasserschlauch zum Bef llen des Beh lters mit Wasser nicht unbeaufsichtigt lassen und voll st ndig in den Beh lter einf hren Ansonsten be steht die Gefahr dass Wasser zu den elektrischen Teilen dri...

Page 17: ...die Maschine w hrend des Betriebs langsam vorw rts Beim Loslassen des Bedienhebels wird die Drehung der B rste nach einigen Sekunden unterbrochen Vergessen sie nicht den Saugbalken vor dem R ckw rtsf...

Page 18: ...e Kabel andere Sch den oder Risse festgestellt werden sind die defekten Teile umgehend durch Originalersatzteile zu ersetzen Die Anschl sse an das Stromnetz m ssen gegen Spritzwasser gesch tzt werden...

Page 19: ...e an den Batterien d rfen nicht vorgenommen werden Nur Original Sprintus Batterien Batterieladeger te verwenden Gel Akkus erreichen erst nach wenigen Zyklen die volle Kapa zit t Gel Akkus haben KEINEN...

Page 20: ...hlie en Der Saugschlauch ist verstopft Die Verstopfung beheben Der Saugmotor ist abgeschaltet Den Motor einschalten Der Schmutzwasserbeh lter ist voll Beh lter entleeren 9 1 6 ZU GERINGE SAUGKRAFT Der...

Page 21: ...n nicht die er wartete Leistung von 100 Die Akkus erreichen ihre maximale Ladekapazi t t erst nach 20 30 kompletten Ladezyklen Wenn die LED s am Ladeger t blinken muss ein Fachmann das Ladeger t berpr...

Page 22: ...MOVING THE SPLASH GUARD 7 8 FILLING AND EMPTYING THE FRESH WATER TANK 7 9 EMPTYING THE WASTE WATER TANK 7 10 DOSING OF FRESH WATER 7 11 RUNNING THE MACHINE 7 12 MODE OF OPERATION 7 12 1 PREPARATION AN...

Page 23: ...e attached under the control panel Picture B 15 contains the following information Information of the manufacturer EC Mark Model number Model Total output Serial number identification number Weight at...

Page 24: ...serve the precautionary measures and regulations contained in the respective safety data sheets We recommend keeping the cleaning agents in a place where children are unable to access them In case of...

Page 25: ...al has been removed the accessories and batteries can be installed accord ing to the instructions given in the specific section It is recommended that all the packaging elements be retained as they wi...

Page 26: ...ction Indicator light off OFF 35 Pushbutton fresh water supply Indicator light on fresh water supply indicator light off no fresh water Press pushbutton 35 power switch 2 Brush drop 36 Indicator batte...

Page 27: ...e already been cleaned 7 OPERATION 7 1 CHARGING THE BATTERY Prepare and check the battery charger as described Follow the instructions in the battery manufactur er s user and safety manual 7 2 ASSEMBL...

Page 28: ...e cleaning agent manufacturer or Sprintus to ensure the suitability of the cleaning agent Always put the cleaning agent into the tank already filled with water to prevent foam from forming Do not leav...

Page 29: ...is not to be used the pushbutton E 34 must be pressed and the corre sponding indicator light goes out 7 12 MODE OF OPERATION 7 12 1 PREPARATION AND WARNING INSTRUCTIONS Large particles of dirt must be...

Page 30: ...or from the wiring of the machine B 17 B 18 Interventions on electrical components as well as all maintenance and repair work espe cially work not expressly described in this manual should only be car...

Page 31: ...ve brushes pads can cause the brush motor to overload When switching off the suction motor remove any obstructions 9 1 2 ERROR DISPLAYS ON THE DISPLAY Brush LED permanently on If the brush does not tu...

Page 32: ...n The alarm will reset when the charger has cooled down 9 2 THE BATTERIES WILL NOT CHARGE OR DISCHARGE TOO RAPIDLY The batteries are new and are not reaching the expected performance of 100 The batter...

Page 33: ...general condition of the machine X Make sure that the hoses or wires are not obstructed or blocked X Check the wear of the suction blades X Remove and clean the cleaning solution filter X General clea...

Page 34: ...LES CLABOUSSURES 7 8 REMPLISSAGE ET VIDANGE DU R SERVOIR D EAU DOUCE 7 9 VIDAGE DU R SERVOIR D EAU US E 7 10 DOSAGE DE L EAU DOUCE 7 11 CONDUITE DE LA MACHINE 7 12 M THODE DE TRAVAIL 7 12 1 PR PARATIO...

Page 35: ...es afin d viter des dysfonctionnements de la machine SYMBOLE ATTENTION Ces informations sont particuli rement importantes afin d viter les machines lourdes et les dommages environnemen taux SYMBOLE DA...

Page 36: ...pente sup rieure 2 La machine ne doit pas tre utilis e sur une pente Man uvrez toujours prudemment et ne tournez pas lorsque vous tes en pente Zone de transport max pente 10 Lors du transport sur des...

Page 37: ...e imm diatement arr t N utilisez pas la machine sur des sols en textile tels que des tapis des moquettes etc L utilisation de cires ou d agents nettoyants mous sants ainsi que des fuites risquent d en...

Page 38: ...e batterie qui ne sont pas d origine garantissent les propri t s du produit assur es par SPRiN TUS Seule la compatibilit parfaite de la batterie et du chargeur garantit des perfor mances haut de gamme...

Page 39: ...ICE 6 1 BATTERIE La machine est configur e pour tre utilis e avec des batteries au gel L utilisation de batteries non conformes risque de causer de graves dom mages la machine et de n cessiter des rec...

Page 40: ...l V rifiez l usure des accessoires avant de commen cer travailler jection des brosses du support de tampon Assurez vous que le moteur de la brosse et le moteur d aspiration sont teints les t moins de...

Page 41: ...s les pi ces lectriques et de les endommager 7 8 1 INDICATEUR DE NIVEAU DU R SERVOIR D EAU DOUCE Le niveau de remplissage du r servoir d eau douce peut tre d termin avec le tuyau transparent fix l arr...

Page 42: ...orrespondant s teigne Si l aspiration ne doit tre utilis e le bouton pous soir E 34 doit tre enfonc jusqu ce que le t moin de contr le correspondant s teigne 7 12 M THODE DE TRAVAIL 7 12 1 PR PARATION...

Page 43: ...extension conformes aux r gles de s curit en vigueur doivent tre utilis s pour le raccordement au secteur La prise de courant laquelle la machine est branch e doit tre quip e d un disjoncteur diff ren...

Page 44: ...ffet m moire Les appareils peuvent et doivent tre recharg s apr s de courtes p riodes de travail Une d charge profonde a des effets n gatifs sur la batterie Il doit tre vit de faire fonctionner la mac...

Page 45: ...au d aspiration n est pas raccord la poutre d aspiration Raccordez correctement Le tuyau d aspiration est obstru Retirez le bouchon Le moteur d aspiration est arr t Mettez le moteur en marche Le r ser...

Page 46: ...ues Les batteries n atteignent leur capacit de charge maximale qu apr s 20 30 cycles de charge complets Si les LED du chargeur clignotent un sp cia liste doit v rifier le chargeur 9 3 EAU DANS LE MOTE...

Page 47: ...ve CE EU e loro successive modificazioni ed alle norme EN est en conformidad con las directivas CE EU y sus sucesivas modificaciones y tambi n con la norma EN Die technischen Unterlagen befinden sich...

Page 48: ...erve the right to make modifications within the framework of technical progress Nous nous r servons le droit d apporter des modifications au cours d am liorations techniques 08 2020 SPRiNTUS GmbH Reiz...

Reviews: