42
26
19
28
20
16
STEP 7:
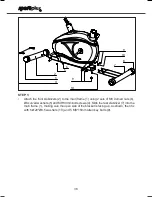
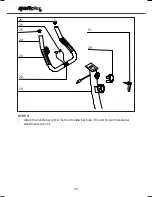
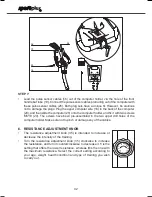
• Lead the pulse sensor cables (16) out of the computer holder, via the hole of the front
handle bar tube (19). Connect the pulse sensor cables protruding out of the computer with
these pulse sensor cables (26). Both plug sets have a unique fit. However, be cautious
not to damage the plugs. Plug the upper computer wire (16) to the back of the computer
(28), and then slide the computer (28) onto the computer holder, and fix it with two screws
M5*10 (20). The screws have been pre-assembled in the two upper drill holes of the
computer holder. Make sure not to pinch or damage any of the cables.
6. RESISTANCE ADJUSTMENT KNOB
• The resistance adjustment knob (35) is intended to increase or
decrease the intensity of the training.
• Turn the resistance adjustment knob (35) clockwise to increase
the resistance, and turn it counterclockwise to decrease it.
1
is the
setting that offers the lower resistance, whereas
8
is the one with
the maximum resistance. Select the correct setting according to
your age, weight, health condition and type of training you wish
to carry out.
LOW
HIGH
1
2 345
678
TE
NSION CONTRO
L
SP-HT-2700-DE-GB-08.indb 42
6/3/2010 5:21:56 PM

