background image

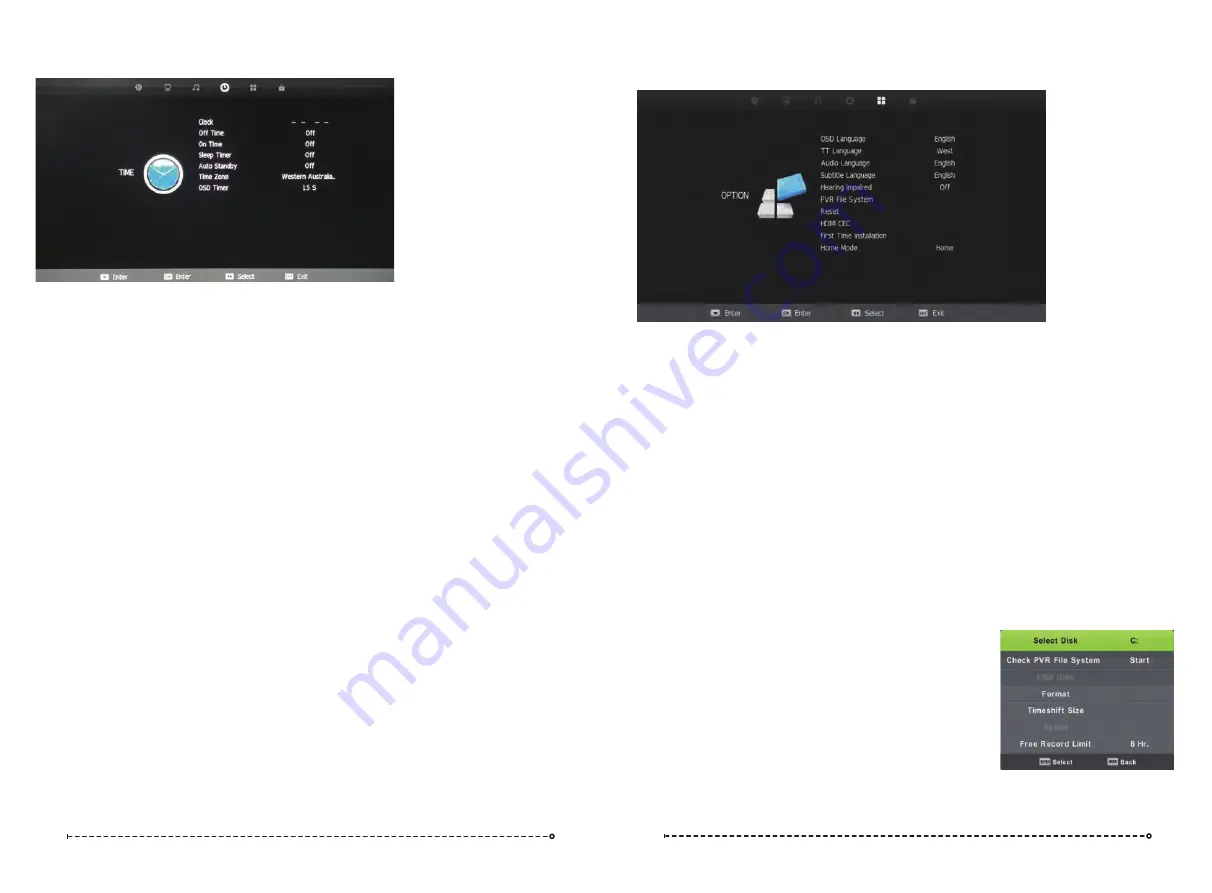
Time Menu

Option Menu

OSD Language 

Select OSD Language with the 

/


buttons then press 

OK

 to adjust the on-screen Language.

TT Language

This setting is not used in Australia & New Zealand.

Audio Languages

Press ▼/▲ to select Audio Language and press 

OK

 to enter language selection menu.  Adjust to 

preferred language by using the ◄ / ► buttons and press 

OK

 to confirm.  Press 

MENU

 to return to 

previous menu. 

Press the ▼/▲ buttons and 

OK

 to select the Reset menu.

Select Yes with the left arrow to reset the TV to its factory
settings which will erase all of the previous settings.

Select Hearing Impaired (where supported) with▼/▲ buttons and then press the◄ / ►buttons to

turn on or off.

.  

Subtitle Languages

Press▼/▲ to select Subtitle Language, press 

OK

 to enter menu, and select language with▼/▲

or ◄ / ► buttons.

Press 

OK

 button to confirm then press 

MENU

 button to return to the previous menu.

Hearing Impaired

PVR File System

To check the status of the USB drive, format a drive or change 
the maximum record/timeshift setting, select PVR File System 
with 

/


buttons and then press the 

OK

 button enter.

Reset

Clock 

The clock and date is automatically programmed from information received from DTV 
Channels. You should not need to use this sub-menu once you have received a  DTV 
signal, however this can be manually changed if required.

Off Time

This setting allows you to set a specific time to turn the TV off. Once you enter the menu, 
this function can be set to operate once only, Daily, Mon-Fri, Mon-Sat, Sat-Sun or Sunday 
only.

On Time

As with the Off Time function, this setting allows you to select a time to turn the TV on. 
In addition to the day settings, you can also select the source you would like selected when 

the TV turns on and your desired volume level.

Sleep Timer 

Select Sleep Timer with th

e ▼

/

▲ b

uttons and press the 

 button to set the sleep timer

to automatically turn the TV off in 10/20/30/60/90/120/180 or 240 minutes.

Auto Standby 

Select Auto Standby with th

e ▼

/

▲ b

uttons. Then with the 

buttons, select 3,4 or 5 hours. 

◄ / ►

The TV will turn off if there is no activity using the remote or buttons onthe TV for this period 
of time.

Time Zone

You should not need to use this sub-menu once you have received a  DTV signal, however 
this can be manually changed if required.

O

D a y l i g h t   S a v i n g

SD Timer

T

Select Daylight Saving by using the 

/

 buttons and adjust daylight saving time on or off with 

the 

◄ / ►

buttons.  With DST set to ON, the time will automatically be adjusted by setting the 

time 1 hour forward. With Daylight Saving OFF, the time will be standard time set by the selected 
time zone.

he OSD Timer sets the amount of time the on-screen menus are displayed on the TV. The

default time is 

15s

but should you wish to change this, select OSD Timer with the 

▼/▲ 

buttons.. 

Then with the 

buttons, select Always (on) or 5, 10, 15, 20, 25, 30 seconds.

◄ / ► 

◄ / ► 

Daylight Saving

Off

16

17

Summary of Contents for 7 Series

Page 1: ......

Page 2: ...Series 7 18 5 21 5 23 6 ...

Page 3: ...TO FAV A B R LIST DISPLAY REPEAT DEL REC AUDIO NICAM A2 ASPECT P MODE S MODE HOLD The Manual is applied to below models S7LED185 S7LED185BT S7LED215 S7LED215BT S7LED215BTWIFI S7LED236 S7LED236BT S7LED236BTWIFI NOTE The Bluetooth functions are only apply to these models including S7LED185BT S7LED215BTWIFI S7LED236BT and S7LED236BTWIFI The SMART TV functions are only apply to S7LED215BTWIFI and S7LE...

Page 4: ...Menu Picture Menu Sound Menu Bluetooth Time Menu Option Menu Lock Menu PVR EPG Photo Menu Music Menu Movie Menu Text Menu SMART TV Quick Start General Information Configuration Home Favorites Web Apps Settings DVD Troubleshooting Important Safety Instructions Warranty Information ...

Page 5: ...nal from Input 12 A V ONLY The output is Video only Connect the HDMI output of the accessory device to the HDMI input on the TV Select the HDMI input source using the INPUT button on the remote Power Digital Audio output for surround sound sound bars etc Coaxial Digital Audio output for surround sound sound bars etc Earphone Component Video in Mini YPbPr Connect the PC audio output of the PC to th...

Page 6: ...ough LR LL RR sound modes in ATV DTV USB mode ASPECT Select the screen aspect P MODE Select the picture mode S MODE Select the audio mode MUTE Press to mute the audio Press again or press VOL to resume SOURCE Select the TV input source OK Allows you to navigate the on screen menus and adjust the system settings to your preference MENU Access the on screen menu EXIT Exit the menu or sub menu VOL Pr...

Page 7: ...eference MENU Access the on screen menu EXIT Exit the menu or sub menu VOL Press to increase or decrease volume HOME Smart TV return to home screen MOUSE Smart TV Press to enter mouse mode there is a mouse arrow in TV interface insert a mouse to operate the TV instead of remote control CH Press to change channel NUMBER BUTTONS Press 0 9 to select a TV channel directly when watching TV The channel ...

Page 8: ...rmation T Press buttons to turn 5V antenna power on off the default setting is off This option can provide a 5V output voltage to other antenna appliance when you turn on it his displays the current signal information of the TV Signal This option can be useful to help you position your RV s antenna L 5V antenna power CN Logical Channel Number This setting makes sure that the Channels tuned in to t...

Page 9: ...n the tuning interface will be displayed Program Edit Press the buttons to select Program Edit Press the OK button to enter ress the buttons to select Auto Tuning After pressing the OK button the auto tuning interface will be displayed Auto Tuning can also be activated by pressing the AUTO TUNE Satellite Edit Press the buttons to select Satellite Edit Press the OK button to enter Satellite paramet...

Page 10: ... buttons to select Auto Volume and then press buttons to turn AVL on off Surround Sound This mode is ideal for movies and simulates multi speaker surround sound output 12 13 Picture Mode Press buttons to select Picture mode and go into next interface by pressing the button Then you can change picture mode to standard mild dynamic personal using the buttons Contrast Brightness Colour Tint Sharpness...

Page 11: ...ENU to return to previous screen scroll down to AD Volume using buttons and adjust volume using buttons 14 15 Bluetooth Press the buttons to select Bluetooth Then press the OK to enter the Bluetooth sub menu Press to activate the TV s Bluetooth Audio transmitter Bluetooth Pair Press the buttons to select Bluetooth Pair then press the OK button to select The TV will then search for available Blueto...

Page 12: ... setting allows you to set a specific time to turn the TV off Once you enter the menu this function can be set to operate once only Daily Mon Fri Mon Sat Sat Sun or Sunday only On Time As with the Off Time function this setting allows you to select a time to turn the TV on In addition to the day settings you can also select the source you would like selected when the TV turns on and your desired v...

Page 13: ...t DVD Default Source Default Source allows you to select which input source is selected when the TV is first turned on DTV Channel Type This allows you to set the default DTV channel when the TV s turned on Max Volume Max Volume limits the maximum volume that the TV can be turned up to Default Volume The Default Volume setting allows you to set the desired volume level for when the TV is turned on...

Page 14: ... the TV will display a message advising that the USB drive needs to be formatted To do this go to the Option Menu select PVR File System and follow the steps in the PVR File System sub menu to format the USB Drive Please ensure that you do not have any valuable data on the drive before you do this When watching TV you can press the Record button on the remote to start recording a programme The Pow...

Page 15: ...he button to view the next image A menu with further options will also be displayed where you an use the arrow key to make further selections 4 Press the Exit button to exit 1 Select MUSIC with the buttons and then press the OK button to enter sub_menu 2 Select C then press the OK button to select the USB drive 3 Using the arrow keys select a specific song and press the button to play press the bu...

Page 16: ... eg Facebook require a mouse to operate fully Note 2 When using the TV s remote to control the Smart TV and you need to activate the on screen keyboard if it does not come up automatically eg to sign in to a service make sure you tab down to the input area using the arrow keys on the remote Apps Apps are available for download from the Google Play store Note you need a Google Play account to downl...

Page 17: ...e control press EXIT button to remove the keyboard Then using the arrow keys on the remote scroll down to select Connect press the OK button and your Smart TV will now be connected to the Internet Next you will be presented with the Date Time screens If you are connected to the Internet this information should be automatically completed so just press the OK button on the remote to cycle through th...

Page 18: ...ayed for your convenience Simply navigate to the desired website using the arrow keys on the remote and press OK to open the selected website Apps Menu This Smart TV comes with a number of pre installed Apps You can install a new App using the Google Play store or install an apk file using the Appinstaller App When a new When App upgrade message displayed if suggest App incompatible with the TV ple...

Page 19: ...30 31 is accessed by the DVD SETUP button Up and down OK OK OK OK OK 4 ...

Page 20: ...o colour mostly seen on a White screen 2 or more Bright pixels Stuck pixels within the first 14days 4 or more Bright pixels Stuck pixels will warrant a replacement TV in the remainder of the 12Months warranty A Bright Pixel Stuck pixel is a Bright spot of either White Red Green Blue colour mostly seen on a dark screen For full Warranty terms and conditions please visit www coastrv com au www coast...

Reviews: