28
Shows
Ch
apt
er 1 U
s
e
r G
u
id
e
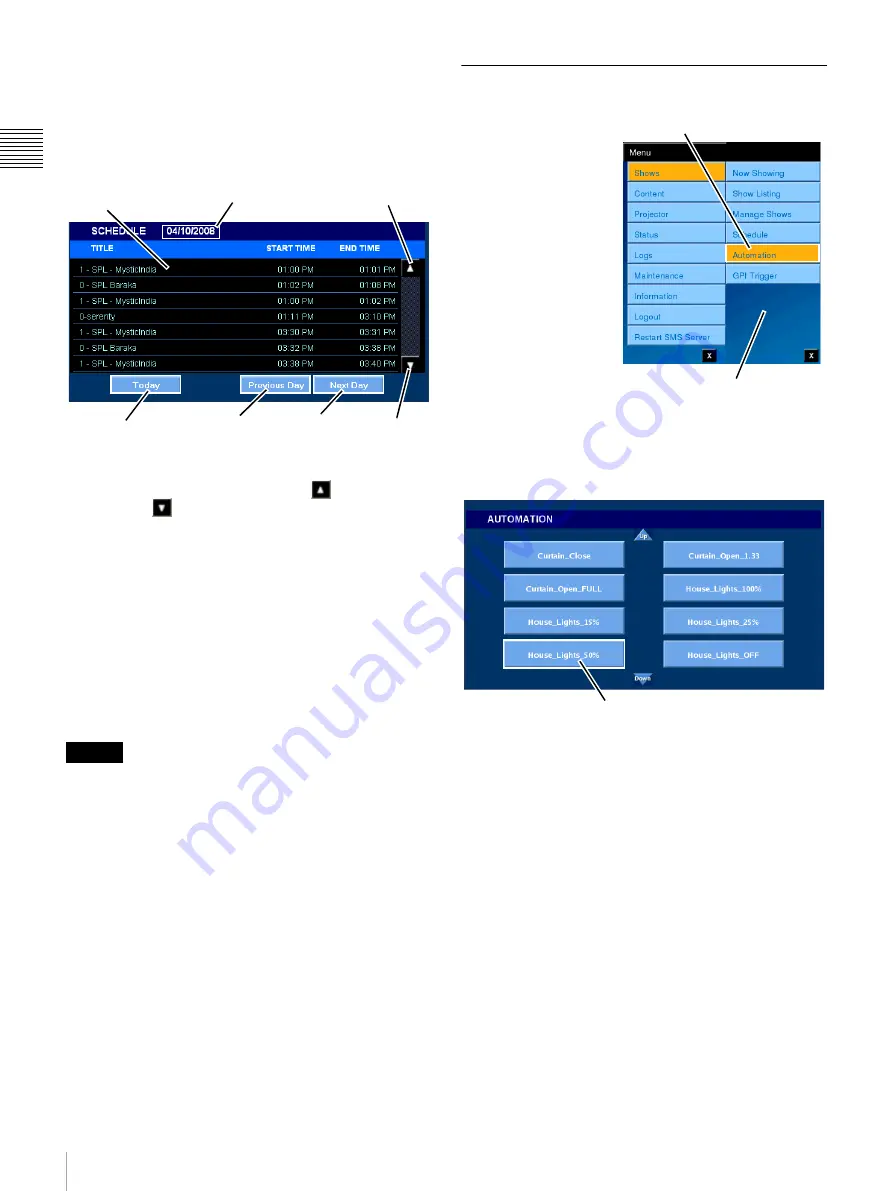
The SCHEDULE pane indicates the date of the displayed
schedule at the top-center. Each Show presented during the
day appears in the SCHEDULE list as a distinct item with
a specific Start Time and End Time. Because of the limited
amount of display space, it will likely be necessary to
scroll to see the complete schedule for any specific day.
To scroll the screen to see additional Show Schedules for
the indicated day, tap either
Scroll Up
or
Scroll Down
on the SCHEDULE pane.
View Previous Day/Next Day
When the SCHEDULE pane appears, it displays Shows
scheduled for presentation on the current day. When you
wish to view schedules for another day tap either
Previous
Day
or
Next Day
in the lower portion of the pane.
View Today
To return to viewing the Schedule for today, tap
Today
in
the lower portion of the SCHEDULE pane.
As preparations for presenting each CPL can take several
seconds, the duration of presentations may be longer than
normally expected if several CPLs exist in the Show
Playlist. As a result, some presentations may not be
finished by the time the next presentation is scheduled to
begin. In such cases, the next presentation will not begin.
Automation
From the SMS
Controller you can
create Automation
“control” events linked
to external controls for
legacy auditorium
devices. Automation
controls can be executed
from the Projectionist
Terminal.
To View and execute
Automation controls,
tap
Menu
, tap
Shows
and then tap
Automation
. The
AUTOMATION pane
appears and contains a set of labelled “buttons” which can
be used to trigger the external device.
To execute the Automation control, tap the labelled
Button
.
The control label and the electrical characteristics of the
signal output by the SMS System must be established
using the SMS Controller. Refer to the SMS Controller
User’s Guide for additional information.
In software version 2.30 and later, Z-axis auto-adjustment
and calibration functions for projectors can be executed as
Automation Controls.
The Z-axis auto-adjustment control is called
“PjCmd_AutoZAxisAdj”, and the calibration control is
called “PjCmd_Calibration”. These two Automation
Controls cannot be deleted.
The Z-axis auto-adjustment and calibration cannot be
executed using the Automation Control buttons. They are
added to SPLs for execution. For details about SPL
samples, consult your local Sony representative.
To make Z axis adjustments, tap Lamp Install in the
Projector menu.
Caution
Show Titles
Schedule Date
Go To Today
Previous
Day
Next
Day
Scroll
Up
Scroll
Down
Tap Automation
Shows Menu
Automation Control
Summary of Contents for Screen Management System
Page 81: ...Sony Corporation ...


