16
NW-A1000
8. “+X” is displayed. Main unit is fixed so that
1
of fig.1 may
become downward and press the
[ ]
u
key.
EL display
+X
9. “+Y” is displayed. Main unit is fixed so that
3
of fig.1 may
become downward and press the
[ ]
u
key.
EL display
+Y
10. “CALIB” is displayed. Press the
[ ]
u
key, G-sensor is adjusted.
Then “FIN”, “DAT NG” or “SEN NG” is displayed automatically.
(Press the
[BACK]
key, return to minor item selection screens)
EL display
CALIB
r
FIN
FIN
: Normally completing.
DAT NG : The data for performing a calibration is faulty.
SEN NG : The value acquired from the G-sensor is faulty.
11. The offset and the sensitivity of each axis are displayed by
pressing the
[ ]
u
key when normally completing in order of X,
Y and Z.
EL display
*** ##
***
: offset,
##:
sensitivity
12. Press the
[BACK]
key, return to minor item selection screen.
5-3-6. G-sensor adjustment check
This mode checks that G-sensor adjustment is performed or not
performed.
Checking method:
1. Enter the test mode.
2. Press the
[ ]
B
key to display major item, and press the
[ ]
v
/
[ ]
V
key to select the “OTHERS”.
EL display
OTHERS
3. Press the
[ ]
B
key to display minor item, and press the
[ ]
v
/
[ ]
V
key to select the “G CHK”.
EL display
G CHK
4. Press the
[ ]
u
key, “START” is displayed. Then “OK” or “YET”
is displayed automatically.
EL display
START
r
OK
5. Press the
[BACK]
key, return to minor item selection screen.
4
2
5
3
1
6
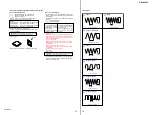
Fig.1 Axis direction of G-sensor adjustment

