background image

M

D

 – R

e

cor

d

ing

21

GB

To stop recording

Press 

x

.

To record using the Group 
Function

Press GROUP ON/OFF repeatedly until 
“GROUP ON” appears after step 2. Press  
ALBUM/GROUP – or + (or  GROUP SKIP) 
repeatedly until “New Group” or the desired 
group appears after step 4.

To record only your favorite CD 
tracks

You can record only your favorite CD tracks
using the Program Play. Between steps 2 and 3, 
perform steps 1 to 5 of “Creating your own 
program” (page 14).

About recording MP3 files

• When recording MP3 files, the files are converted to 

audio CD format. This may cause the data volume to 
increase beyond the capacity of the disc.

• To protect copyrighted music contents, the following 

restrictions are applied when recording MP3 files on 
the deck:

1) Only normal-speed CD synchro recording is 

supported.

2) The digital signal of the MP3 files is converted to 

an analog signal before it is recorded.

3) The recording level cannot be adjusted.

• During recording, the elapsed time for the CD and 

MD on the display may differ slightly. This does not 
constitute a probrem.

Notes 

• You cannot pause the recording.

• If the MD play mode is set to the Shuffle Play or 

Program Play, the play mode switches to Normal 
Play in step 5.

Tips

• For details about LP2/LP4 recording, see “Recording 

for long times” on page 29.

• For details about High-Speed CD-MD Synchro 

Recording, see page 29.

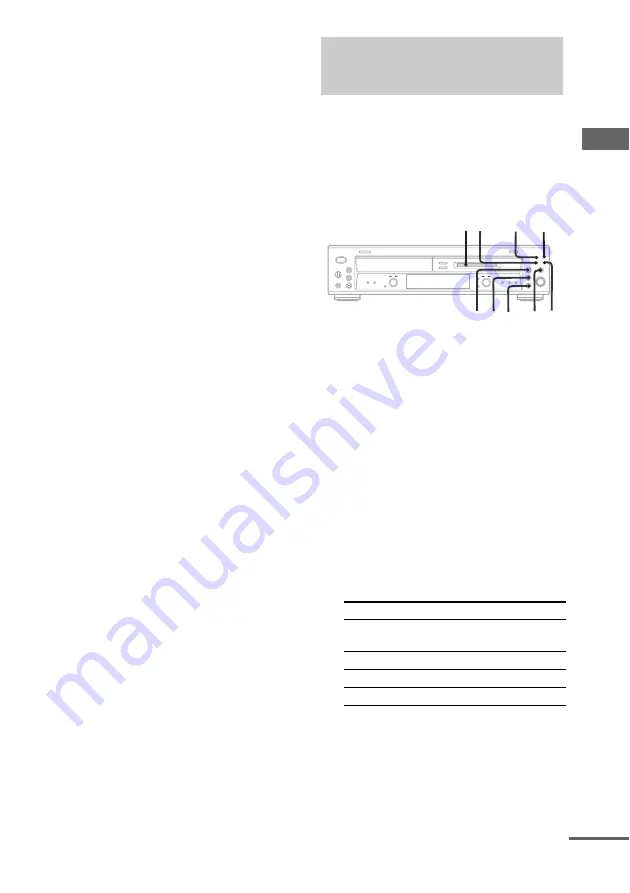
You can record just the portions you like from a 
CD, or other connected component.
When using the remote, switch the function to 
MD.

1

Load a recordable MD.

2

Press INPUT repeatedly to select the 
desired source to record.

• CD: To record from this deck’s CD 

player.

• OPT: To record from the digital 

component connected to the DIGITAL 
OPTICAL IN jack.

• ANALOG: To record from the analog 

component connected to the ANALOG 
IN jacks.

3

Press REC MODE repeatedly to select 
the recording mode.

Select the desired recording time.

*Maximum recording time using a 60-minute 

MD.

4

Press REC 

z

.

The MD deck stands by for recording.

5

Press 

H

, then start playing the 

desired source to record.

Recording on an MD 
manually

— Manual Recording

To record in

Select

Recording time*

Stereo

Blank (No 
indicator)

60 minutes

LP2 Stereo

LP2

120 minutes

LP4 Stereo

LP4

240 minutes

Monaural

MONO

120 minutes

2

3

x

X

4

5

GROUP

ON/OFF SKIP

6

continued

Summary of Contents for MXD-D400 Operating Instructions (primary manual)

Page 1: ... 2003 Sony Corporation 4 245 486 11 2 Compact Disc MiniDisc Deck Operating Instructions MXD D400 ...

Page 2: ... and found to comply with the limits for a Class B digital device pursuant to Part 15 of the FCC Rules These limits are designed to provide reasonable protection against harmful interference in a residential installation This equipment generates uses and can radiate radio frequency energy and if not installed and used in accordance with the instructions may cause harmful interference to radio comm...

Page 3: ...ecording Marking track numbers 23 Making a space between tracks 3 seconds long automatically 24 Smart Space Adjusting the recording level 25 Music Synchro Recording Recording the current CD track 27 REC IT Function Synchro Recording with an external audio equipment 27 Fading in and out 28 Fader Recording tips 29 MD Editing Editing tips 30 Registering tracks in groups 31 Group Function Labeling an ...

Page 4: ... may not be possible depending on the recording device used for recording or the disc condition CD R and CD RW discs that have not been finalized processing to allow play by a normal CD player cannot be played The deck may be unable to play MP3 format files that do not have the extender MP3 at the end of the file name Attempting to play non MP3 format files that have the extender MP3 may result in...

Page 5: ...e writing software etc 2 Multi Session This is a recording method that enables adding of data using the Track At Once method Conventional CDs begin at a CD control area called the Lead in and end at an area called Lead out A Multi Session CD has multiple sessions with each Lead in to Lead out segment regarded as a single session CD EXTRA A format in which CD DA audio data are recorded in the track...

Page 6: ...he order by number e g 01 02 then record contents onto a disc The order differs depending on the writing software Note on playback of MP3 files Depending on the encoding writing software recording device or the recording media used at the time an MP3 file is recorded you may encounter such problems as disabled playback sound interruptions and noise About the information displayed for MP3 files The...

Page 7: ...ble damage from battery leakage and corrosion Tip When the remote no longer operates the deck replace both batteries with new ones Perform the following procedures 1 to 5 to hook up your deck using the supplied cords and accessories 1 Prepare the cords Audio connection cords supplied 2 Optical cable not supplied 2 Getting Started Unpacking Hooking up REC OUT TAPE MD IN DIGITAL OPTICAL OUT OPTICAL ...

Page 8: ...ck with an optical cable not supplied Be sure to insert the plug until it clicks into place Tips If Din Unlock and C71 alternate in the display the optical cable is not connected properly Check that the connections are secure A built in sampling rate converter automatically converts the sampling frequency of various digital sources to the 44 1 kHz sampling rate of this deck This allows you to reco...

Page 9: ...o CD in CD MD select switch 2 Press PLAY MODE in stop mode repeatedly until the mode you want appears in the display 3 Press H Note You cannot change the play mode during playback CD MP3 MD Play Loading a CD When you play a 8 cm disc place it on the inner circle of the tray Playing a CD Normal Play Shuffle Play Search Play Select To play No display Normal Play The tracks on the disc in original or...

Page 10: ...he desired point Find a point quickly by observing the display High speed Search Keep pressing m or M during playback pause until you find the desired point There is no sound output during this operation Remove a disc Press OPEN CLOSE on the deck Playing an MP3 file Normal Play Shuffle Play Search Play Select To play No display Normal Play The tracks on the disc in original order ALBUM ALBUM Play ...

Page 11: ...no album CD is played while in ALBUM mode CDs are played in the same way as in Normal Play mode If you do not select an album playback starts from the first track of the first album You cannot change the play mode during playback 0 00 appears when skipping a portion of ID3 tag ver 2 at the beginning of the track Skip time changes depending ID3 tag ver 2 capacity Other operations See Other operatio...

Page 12: ...an MD Normal Play Shuffle Play Select To play No display Normal Play The tracks on the MD in original order SHUFFLE Shuffle Play All tracks on the MD in random order PROGRAM Program Play The tracks on the MD in the order you want them to be played see Creating your own program on page 14 2 1 3 m M x X Total number of track Total playing time To Do this Stop play Press x Pause Press X Press again t...

Page 13: ...s To enter a track number over 10 1 Press 10 once if it is a 2 digit track number and twice if it is a 3 digit track number 2 Enter the corresponding digits for the same number of flashing in the display To enter 0 press 10 0 Examples To enter 6 while flashes in the display press 10 0 10 0 and 6 To enter 100 while flashes in the display press 1 10 0 and 10 0 Locating a specific track AMS Function ...

Page 14: ...racks are played back repeatedly P You can make a program of up to 25 steps 1 Set to CD or MD in CD MD select switch 2 Press PLAY MODE in stop mode repeatedly until PROGRAM appears 3 Press or repeatedly or turn AMS until the desired title or track number appears AL When you select AL in MP3 Play all MP3 audio tracks in the album you have selected in original order 4 Press YES or AMS The track is p...

Page 15: ...IP repeatedly until the desired group appears 4 To start playing from a specific track in the group press or repeatedly or turn AMS until the desired track appears Proceed to step 5 when you start playing from the first track in the group 5 Press H Playback starts When the playing of the last track in the group finishes the MD deck stops automatically To Do this Cancel Program PlayPress PLAY MODE ...

Page 16: ... set the deck to turn off after a certain time so that you can fall asleep to music You can specify the time until the deck turns off by 30 minutes Press SLEEP Each time you press the button the minute display the turn off time changes cyclically as follows SLEEP OFF t 30min t 60min t 90min t 120min Other operations Falling asleep to music Sleep Timer To Press Check the remaining time SLEEP once C...

Page 17: ...elect switch 2 Press MENU NO repeatedly until Setup Menu appears 3 Press or repeatedly or turn AMS until Pfine appears then press YES or AMS 4 Press or repeatedly or turn AMS to select the desired value then press YES or AMS 5 Press MENU NO To recall the factory setting Press CLEAR while setting the value Notes The playing sound drops out momentarily when you change the fine control value The fine...

Page 18: ...ss SCROLL Press SCROLL again to pause scrolling and again to continue scroll When you load a disc with MP3 files the total playing time is not displayed Checking the remaining time and titles Press TIME during Normal Play Each time you press the button the display changes cyclically as follows x When playing a CD Current track number and elapsed playing time t Current track number and remaining ti...

Page 19: ...ck sequence track start and end point information etc are recorded in the TOC area independent of the sound information You can edit recorded tracks quickly by modifying the TOC information When recording MP 3 format files on a CD R or CD RW Only normal speed CD synchro recording is supported This is because the digital signal of the MP3 file is first converted to an analog signal before it is rec...

Page 20: ...u can record a whole CD on an MD You can select the recording time by switching the recording mode In addition to recording at normal speed you can also record at high speed approximately 4 normal speed When using the remote switch the function to MD 1 Load a recordable MD 2 Load a CD you want to record 3 Press REC MODE repeatedly to select the recording mode Select the desired recording time Maxi...

Page 21: ...onstitute a probrem Notes You cannot pause the recording If the MD play mode is set to the Shuffle Play or Program Play the play mode switches to Normal Play in step 5 Tips For details about LP2 LP4 recording see Recording for long times on page 29 For details about High Speed CD MD Synchro Recording see page 29 You can record just the portions you like from a CD or other connected component When ...

Page 22: ...ording level page 25 When recording from an FM or satellite broadcast the first few seconds of material are often lost due to the time it takes you to ascertain the contents and press the record button To prevent the loss of this material the Time Machine Recording feature constantly stores the most recent audio data in a buffer memory This lets you record the sound from 6 seconds before starting ...

Page 23: ...age 29 After recording Use the Divide Function page 40 At any point during recording Track Mark You can mark track numbers during manual recording of any source Press z during manual recording at the point you want to add a track mark Presetting to automatically mark track numbers before recording Level Synchro Recording The Level Synchro Recording Function is factory set to on so the track number...

Page 24: ...ecording from a CD For other types of recording if the Smart Space Function is on and there is no sound input for about 3 seconds or more but less than 30 seconds while recording the MD deck replaces this silence with a blank of about 3 seconds and continues recording The Smart Space Function is factory set to on Auto Cut When the Smart Space Function is on if there is no sound input for 30 second...

Page 25: ...When recording on an MD you can adjust the recording level to the desired volume You can adjust the recording level not only when making an analog recording but also when making a digital recording from a CD etc Adjusting the analog recording level can be performed using the buttons on the deck only Adjusting the recording level when making an analog recording 1 Press INPUT repeatedly until ANALOG...

Page 26: ... or repeatedly or turn AMS until CD or OPT appears then press YES or AMS 6 Press or repeatedly or turn AMS to adjust the recording level Adjust to the optimum level while making sure that OVER does not appear in the display at the loudest portion 7 Press MENU NO 8 Stop playing the sound source Tips You can also adjust the recording level during recording Once adjusted the recording level is mainta...

Page 27: ... used instead During MP3 playback REC IT Recording cannot be made For details about the MP3 recording See When recording MP 3 format files on a CD R or CD RW on page 19 By using the MUSIC SYNC button on the remote you can automatically start recording in sync with a CD in the deck or the signal input from the program source connected to the deck 1 Do steps 1 to 4 see Recording on an MD manually on...

Page 28: ... position where you want to start fade in recording b flashes and the deck performs the fade in recording until the counter reaches 0 0s Fade out recording During recording pause press FADER at the position where you want to start fade out recording B flashes and the deck performs the fade out recording until the counter reaches 0 0s Tip You can set the duration of fade in and fade out recording i...

Page 29: ...ording mode press REC MODE repeatedly High Speed CD MD Synchro Recording When recording an entire CD as is or in the programmed track order you can record at higher speed than normal approximately 4 normal speed If you cannot use High Speed CD MD Synchro Recording A reading failure has occurred and the deck is trying to read the data again If the retry was successful the deck continues with High S...

Page 30: ... MD in Shuffle or Program Play mode To quit while editing Press MENU NO Operation buttons for Editing After editing Press EJECT to remove the MD or press 1 power to turn off the deck TOC starts flashing The TOC is updated and editing is completed Before pulling out the mains lead MD editing is completed when the MD Table of Contents TOC is updated The TOC is updated when you eject the MD or press ...

Page 31: ...tarting recording with 6 seconds of prestored audio data page 22 Labeling a group page 32 Registering recorded tracks into a new group page 35 Releasing group registrations page 35 Note MDs recorded using the Group Function of this deck can be used with other deck that supports the Group Function However note that the Group Function operations of other deck may differ from the operations for this ...

Page 32: ...order The new group is added after any existing groups with tracks registered When you newly record a track into an existing group the new track is added after any existing tracks in the group Up to 99 groups can be registered on a single MD When you newly record a track into an existing group the track numbers following the newly recorded track may change when the Group Function is turned off If ...

Page 33: ...the display and press AMS 3 Turn AMS to select Disc to label an MD or to specify the track or group to label While recording go to step 5 4 Press AMS or YES A flashing cursor appears in the display The deck starts playing and you can name a track while monitoring the sound 5 Press TIME to change the type 6 Turn AMS to select the character The selected character flashes Letters numbers symbols and ...

Page 34: ...ress or repeatedly or turn AMS until Nm Erase appears then press YES or AMS 4 Press or repeatedly until Disc to erase the disc title the track title or the group title appears 5 Press YES or AMS Complete appears Note You cannot erase the title of a group that does not have any tracks registered The Create Function allows you to create a new group without registering any tracks or to create a new g...

Page 35: ...corded on a deck that does not support the Group Function These functions allow you to release group registrations simply by specifying the group for which you want to release the registrations In addition you can also release the registrations of all groups on an MD at once For details on the group management information see Registering tracks in groups on page 31 Releasing a single group Group R...

Page 36: ...tent The three options for erasing recordings are Erasing a single track Track Erase Function Erasing all tracks All Erase Function Erasing a portion of a track A B Erase Function Erasing a single track Track Erase Function When you erase a track the total number of tracks on the MD decreases by one and all the tracks following the erased one are renumbered Example Erasing track 2 As the track num...

Page 37: ...y the tracks within the group but all the tracks on the MD are erased Erasing a portion of a track A B Erase Function You can specify a portion within a track and erase the portion with ease You can shift the desired portion by frame minute or second intervals This function is convenient to erase the unneccessary parts recorded from satellite broadcast or radio programs 1 frame is 1 86 second Exam...

Page 38: ...ntervals You can shift the point by 2 frame intervals in Monaural mode and LP2 stereo mode or by 4 frame intervals in LP4 stereo mode You can use this function to change the order of any track on the disc When you move tracks the tracks are automatically renumbered Example Moving track 3 to position 2 1 Set to MD in CD MD select switch 2 Press MENU NO 3 Press or repeatedly or turn AMS until Move a...

Page 39: ...S Complete appears for a few seconds Playback of the track starts Notes When you combine two tracks that are registered into different groups the second track is reregistered into the group containing the first track In addition if you combine a track that is registered to a group with a track that is not registered to a group the second track takes the same registration setting as the first track...

Page 40: ...t to be divided Rehearsal appears and the portion to be divided is played repeatedly 6 Press YES or AMS again if the point to be divided is correct Complete appears for a few seconds and the newly created track starts playing If the point to be divided is incorrect press m or M repeatedly to flash minute second or frame indication then press or or turn AMS You can shift the point by 1 86 second 1 ...

Page 41: ...hanging the overall recording level 1 Set to MD in CD MD select switch 2 Press MENU NO 3 Press or repeatedly or turn AMS until S F Edit appears then press YES or AMS 4 Press or repeatedly or turn AMS until Tr Level appears then press YES or AMS Playback starts 5 Press or repeatedly or turn AMS until the track number you want to change the recording level appears then press YES or AMS Level 0dB app...

Page 42: ...n AMS to change the Fade in or Fade out recording time The deck plays the portion that will be recorded over using Fade in or Fade out Recording You can set the time at any value between 1 0 second and 15 0 seconds in 0 1 second steps You cannot set the time longer than the track 7 Press YES or AMS Edit OK appears 8 Press YES or AMS again The deck starts recording over the existing track S F Edit ...

Page 43: ...r recorded tracks or erase unnecessary tracks There has been a power failure or the AC power cord has been disconnected during recording Data recorded to that point may be lost Repeat the recording procedure The deck does not edit Press PLAY MODE repeatedly until both PROGRAM and SHUFFLE disappear Remove the MD and slide the tab to close the slot page 20 The sound has a lot of static Strong magnet...

Page 44: ... the MD once then insert it again C14 TOC Error The MD deck cannot read the disc information properly cReplace the MD cErase all the recorded contents of the MD using the All Erase Function page 37 C41 Cannot Copy The digitally dubbed material cannot be recorded digitally page 47 C71 Din Unlock The digitally dubbed material cannot be recorded digitally page 47 A moment s lighting is due to the sig...

Page 45: ...ke an impossible editing operation page 30 Incomplete Adjustment of the recording level after recording or Fade in and Fade out procedures have failed since the deck was either subject to vibration or there is a damaged or dirty disc in the tray Initialize flashing when you turn on the deck The power was off for a long time so the deck is initializing itself Name Full The title capacity of the MD ...

Page 46: ...Before playing clean the disc with a cleaning cloth Wipe the disc from the center out Do not use solvents such as benzene thinner commercially available cleaners or anti static spray intended for vinyl LPs Do not expose the disc to direct sunlight or heat sources such as hot air ducts nor leave it in a car parked in direct sunlight Do not use discs encircled with a protection ring This may cause a...

Page 47: ... when you use A B Erase Function or Combine Function This happens when you have edited the same track many times This is due to a technical limitation of the MD deck and is not a mechanical error The total recorded time and the remaining time on the MD do not add up to the maximum recording time Recording is done in minimum units of 2 seconds each no matter how short the material The recorded cont...

Page 48: ...you make a first generation copy CD player section System Compact Disc digital audio system Laser Semiconductor laser λ 780 nm Frequency response 20 Hz 20 kHz 0 5 dB Wow and flutter Below measureable limit 0 001 W PEAK MD deck section System MiniDisc digital audio system Disc MiniDisc Laser Semiconductor laser λ 780 nm Emission duration continuous Sampling frequency 44 1 kHz Frequency response 20 ...

Page 49: ... 10 12 14 30 REC LEVEL qd 25 REC MODE 8 20 21 23 29 REC z qs 21 25 26 STANDBY indicator ef 8 TIME qk wk 18 YES w 14 17 24 25 26 33 34 35 36 37 38 39 40 41 42 1 power standby 1 8 20 30 H play qf wl 9 11 12 15 20 27 X pause qh e 10 12 x stop qg ea 10 12 21 22 23 27 List of button locations and reference pages How to use this page Use this page to find the location of buttons and other parts of the d...

Page 50: ...9 40 41 42 MUSIC SYNC 9 27 NAME EDIT SELECT 6 33 number buttons 7 13 15 33 PLAY MODE 3 9 10 12 14 30 REC MODE 2 20 21 23 29 REC IT 0 27 REPEAT qh 14 SCROLL wh 18 34 SLEEP qg 16 T REC qd 23 TIME 4 18 YES 5 14 17 24 25 26 33 34 35 36 37 38 39 40 41 42 skip qk 10 11 12 13 14 15 17 24 25 26 33 34 36 37 38 39 40 41 42 1 power standby 1 8 20 30 m M search qj 10 12 33 H play w 9 11 12 15 20 27 X pause qa...

Page 51: ...Additional Information 51GB ...

Page 52: ...Sony Corporation Printed in Malaysia ...

Reviews: