Mi
sc
el
la
ne
ou
s
Precautions
51
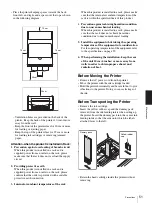
• Place the printer keeping spaces towards the back,
front, left, and right, and a space over the top as shown
in the following diagram.
– Ventilation holes are provided on the back of the
printer. Keep the back of the printer 10 cm or more
away from the wall.
– Keep the front of the printer clear for 20 cm or more
for loading or ejecting paper.
– Keep the top of the printer clear for 25 cm or more
for loading ink cartridges or removing jammed
paper.
Attention-when the product is installed in Rack:
1. Prevention against overloading of branch circuit
When this product is installed in a rack and is
supplied power from an outlet on the rack, please
make sure that the rack does not overload the supply
circuit.
2. Providing protective earth
When this product is installed in a rack and is
supplied power from an outlet on the rack, please
confirm that the outlet is provided with a suitable
protective earth connection.
3. Internal air ambient temperature of the rack
When this product is installed in a rack, please make
sure that the internal air ambient temperature of the
rack is within the specified limit of this product.
4.
Prevention against achieving hazardous condition
due to uneven mechanical loading
When this product is installed in a rack, please make
sure that the rack does not achieve hazardous
condition due to uneven mechanical loading.
5. Install the equipment while taking the operating
temperature of the equipment into consideration
For the operating temperature of the equipment, refer
to the specifications on page 59.
6. When performing the installation, keep the rear
of the unit 10 cm (4 inches) or more away from
walls in order to obtain proper exhaust and
radiation of heat.
Before Moving the Printer
• Remove the AC power cord from the printer.
• Move the printer with the ink cartridge loaded.
• Hold the printer horizontally and be careful not to give
vibrations to the printer. Doing so causes leakage of
the ink.
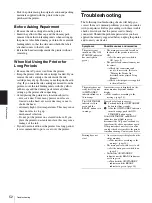
Before Transporting the Printer
• Remove the ink cartridge.
• Insert the yellow rubber cap and the dummy pack
removed from the ink feeding inlets when setting up
the printer. Insert the dummy pack into the center ink
feeding inlets so that the side onto which the labels
attached faces to the left.
• Retain the head cartridge inside the printer without
removing.
10 cm
10 cm
10 cm
20 cm
25cm
Dummy pack
Yellow rubber
cap


