background image

51 

GB

Making various printing  (MONITOR OUT mode)

Digital Photo Printer -DPP-FP50_GB_UC2/CED/CEK/AU_

 2-599-949-11(1)

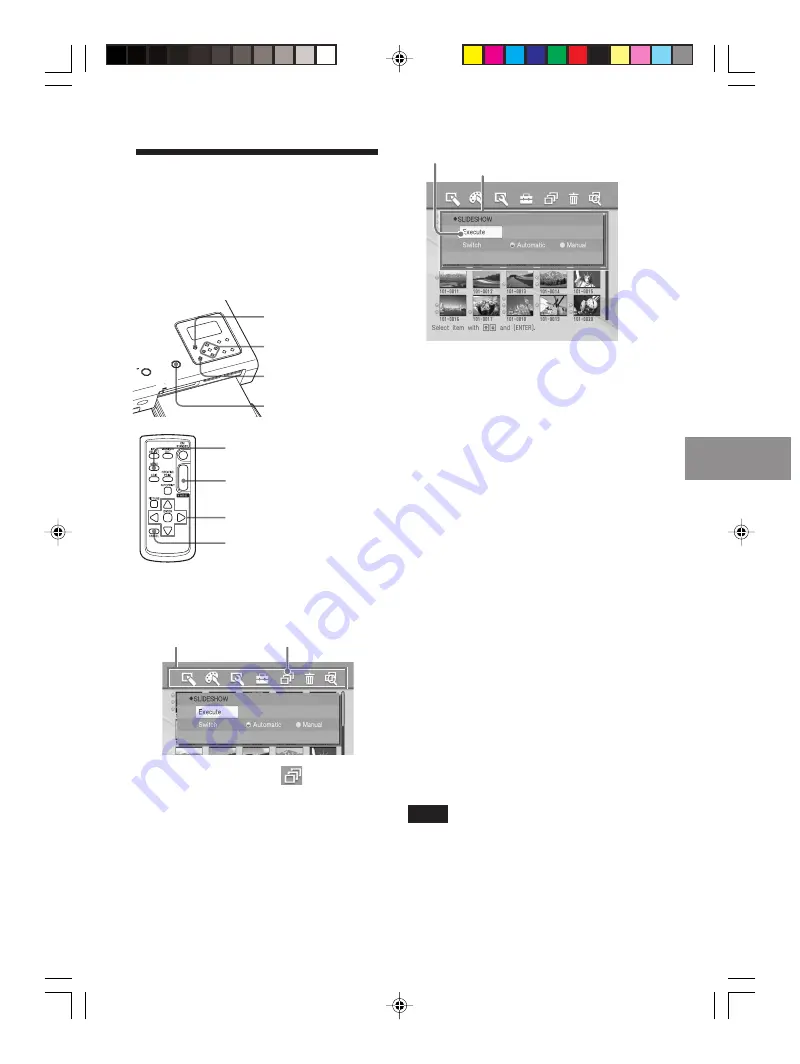
Viewing a slideshow

You can perform a slideshow of the
images saved in a memory card or an
external device. You can also  manually
print an image being displayed.

Buttons to be used in this section

MENU

g

/

G

/

f

/

F/

ENTER

CANCEL

PRINT

MENU

PRINT

g

/

G

/

f

/

F/

ENTER

CANCEL

1

Press MENU.

The menu bar is displayed.

           Menu bar         Slideshow menu icon

2

Press 

g

/

G

 to select 

 (Slideshow)

and then press ENTER.

The Slideshow menu is displayed.

       Cursor
                 Slideshow menu

3

Press 

f

/

F

 to select “Switch”,  and

press 

g

/

G

 to select “Automatic”

to switch images automatically or
“Manual” to switch them
manually. Then press ENTER.

4

Press 

g

/

G

/

f

/

F

 to select “Execute”,

and press ENTER.

• When “Automatic” is selected:  The

images in the memory card or an
external device are displayed
automatically one after another.

• When “Manual” is selected:

The image with the cursor in the
image list  is displayed.  To switch
images, press 

g

/

G

/

f

/

F

.  The

image to the left, right, above, or
below the current image in the
image list will be displayed.

To stop slideshow

Press CANCEL.

Printing a displayed image

While playing the slideshow manually,
you can print a displayed image by
pressing PRINT.

Notes

• Depending on the image, it may take time to

be displayed.

• You cannot display the images that are not

displayed as thumbnails because they are
damaged or for some other reason.

001GBFP5009TV4-UC/CED.p65

3/11/05, 4:23 PM

51

Summary of Contents for DPP-FP50 Fall 2005

Page 1: ...r please read this manual thoroughly and retain it for future reference Digital Photo Printer DPP FP50 Before you begin Preparations Making basic printing Printing using the printer s LCD display Making various printing Printing from a PictBridge camera Printing from a PC Troubleshooting Additional information 001GBFP5001COV UC CED p65 3 11 05 4 22 PM 1 ...

Page 2: ...equipment into an outlet on a circuit different from that to which the receiver is connected Consult the dealer or an experienced radio TV technician for help The shielded interface cable recommended in this manual must be used with this equipment in order to comply with the limits for a digital device pursuant to Subpart B of Part 15 of Fcc Rules If you have any questions about this product you m...

Page 3: ...s and copyrights VAIO is the trademark of Sony Corporation Microsoft and Windows are registered trademarks or trademarks of Microsoft Corporation in the United States and other countries IBM and PC AT are registered trademarks of International Business Machines Corporation Pentium is the registered trademark of Intel Corporation Memory Stick MagicGate Memory Stick Memory Stick Duo Memory Stick PRO...

Page 4: ...val from Sony Corporation IN NO EVENT SHALL SONY CORPORATION BE LIABLE FOR ANY INCIDENTAL CONSEQUENTIAL OR SPECIAL DAMAGES WHETHER BASED ON TORT CONTACT OR OTHERWISE ARISING OUT OF OR IN CONNECTION WITH THIS MANUAL THE SOFTWARE OR OTHER INFORMATION CONTAINED HEREIN OR THE USE THEREOF By breaking the seal of the envelope of the CD ROM package you accept all the terms and conditions of this agreemen...

Page 5: ...Viewing a slideshow 51 Deleting images 52 Deleting selected images 52 Formatting a Memory Stick 53 Searching for an image 53 Changing the printer preferences OPTION 55 Printing from a PictBridge camera PictBridge mode Printing images from the digital camera 57 Printing from a PC PC mode Installing the software 58 System requirements 58 Installing the printer driver 59 Installing the PictureGear St...

Page 6: ...device Memory Stick CompactFlash card or SD card You can print using a TV monitor You can select and print an image page 22 You can make a variety of printings pages 31 to 47 You can change print and printer settings pages 48 to 56 You can print using the printer s LCD display pages 27 to 30 You can print from a PictBridge compliant camera page 57 You can print from a PC page 58 001GBFP5003WHT UC ...

Page 7: ...g conditions data stored in an image file of an Exif 2 21 compliant camera to adjust and print it with improved quality page 49 xRed eye phenomenon reduction brightness hue and other corrections or adjustments enable high quality printing page 34 Convenient printing operations xHigh speed CPU allows you to process preview and print an image quickly xPaper tray allows you to print up to 20 sheets o...

Page 8: ...CTURE button page 23 0 Access indicator page 19 qa ON STANDBY button page 17 qs ON STANDBY indicator page 17 qd PRINT button page 23 qf PictBridge CAMERA connector page 20 qg Remote sensor page 16 qh CompactFlash card eject button page 19 qj CF CompactFlash CARD insertion slot pages 19 qk Memory Stick Memory Stick Duo insertion slot page 19 ql SD CARD insertion slot page 19 w Memory card slot Pape...

Page 9: ...regions 3 5 x 5 inch size print paper is not sold And the tray adaptor is not supplied 2 Paper eject tray page 13 3 Paper tray lid page 13 Remote commander 1 MONITOR OUT button page 21 27 2 INPUT SELECT button page 21 27 3 MENU button pages 31 39 48 4 EDIT button page 31 5 AUTO PRINT button pages 26 29 6 PICTURE button page 23 7 CANCEL button page 25 8 ON STANDBY button page 17 9 PRINT button page...

Page 10: ... plug shape and specifications of the AC power cord differ depending on the region you purchased the printer Video connecting cable 1 Cleaning cartridge 1 Clamp filter 1 CD ROM 1 Sony DPP FP50 Printer Driver Software for Windows XP Professional Windows XP Home Edition Windows XP Media Center Edition Windows 2000 Professional Windows Millennium Edition Windows 98 Second Edition PictureGear Studio V...

Page 11: ... mix cartridges and paper of different types printing may not be possible The side without the imprinting is the printing surface Inferior print quality may result if the printing surface is contaminated with dust or fingerprints Be careful to avoid touching the printing surface Do not bend the paper or tear it off at the perforations before printing Do not print on used sheets of print paper or a...

Page 12: ... error indicator Notes Use the print cartridge contained in the same box with the print paper Do not touch the ink ribbon or place the print cartridge in a dusty location Fingerprints or dust on the ink ribbon may result in imperfect printing Ink ribbon 3 Loading the print cartridge 1 Pull and open the cartridge compartment lid 2 Insert the print cartridge to the back in the arrow direction until ...

Page 13: ...direction of the arrow to remove the slack Do not remove the print cartridge while printing Notes on storing the print cartridge Avoid placing the print cartridge in a location subject to high temperatures high humidity excessive dust or direct sunlight When you are going to store a partially used cartridge store it in its original bag 4 Inserting the print paper 1 Open the eject paper tray 2 Slid...

Page 14: ...imprint to the paper feeding direction Insert the protective sheet together with paper You can set up to 20 sheets of print paper Release the lock To attach the tray adaptor to the tray Put the projections of the tray adaptor into the lock holes of the front of the tray 1 and then slide down the adaptor until its back lock clicks into place 2 x To use 3 5 x 5 inch size print paper Keep the tray ad...

Page 15: ...r Do not attach sticker or stamps on the print paper Do not hold or bend the print paper When adding print paper to a partially full tray make sure that the total number of sheets does not exceed 20 for the print paper Do not print on the used print paper Printing an image twice on the same paper will not make the printed image thicker Use the print paper for this printer only Do not use the print...

Page 16: ...un out 1 Push in the tab 1 and then slide out the battery compartment lid 2 2 Remove the used battery and then insert a new lithium battery CR2025 into the compartment with the and properly aligned Lithium battery 3 Slide the battery compartment lid back into the commander until it clicks into place WARNING Battery may explode if mistreated Do not recharge disassemble or dispose of in fire Notes T...

Page 17: ...let even if the unit itself has been turned off The print paper emerges from the paper outlet a few times during printing Do not block the paper outlet with the AC adapter or AC power cord Be sure to use the AC adapter supplied with the printer Do not use other AC adapter as this may cause malfunction In case the cord of the AC adapter is disconnected or damaged never use it any longer as this may...

Page 18: ...g Do not block the paper outlet with the video connecting cable Inserting a memory card To print an image stored on a Memory Stick CompactFlash card or SD card insert it into the relevant card slot For the types of the memory card that you can use with the printer see pages 92 through 94 On using a memory card Do not attempt to insert a memory card forcibly into or out of the slot If you do so the...

Page 19: ...emory card Insert it so that the b mark is on the upper left corner You can also insert a Memory Stick Duo with its b mark facing the upper left corner without using an adapter To eject a Memory Stick Push the Memory Stick lightly into the insertion slot After it pops back out remove it slowly Inserting a CompactFlash card Insert a CompactFlash card into the CF CARD slot until it fits into place E...

Page 20: ... USB Connect 2 Connect a camera or an external device to the PictBridge CAMERA connector of the printer Use the USB connecting cable supplied with the digital camera Open the cover and to the PictBridge CAMERA connector USB A TYPE To USB connector Camera or other external device Notes The type of USB connecting cable you should use may differ depending on the digital camera Use a USB connecting ca...

Page 21: ...ory card The list of the images on the selected media are displayed on the TV monitor image list Making basic printing MONITOR OUT mode Displaying the images on a TV monitor This section explains how to display the images of a memory card or an external device to be printed on a TV monitor Before you begin You need preparations 1 through 6 pages 10 to 17 and the following Connecting to a TV monito...

Page 22: ...rotect indications Associated file indication The image in addition to the displayed image has an associated file such as a motion file or a miniature e mail image file DPOF indication The image is DPOF preset with a digital camera Protect indication The image is protected with a digital camera To display another page When multiple pages exist you can switch pages To display the next page move the...

Page 23: ...ter remove it and resume printing from the step 1 The print paper may emerge a few times during printing Do not touch nor pull the emerged paper Wait for the print paper to be fully ejected after printing ends Make sure to spare enough space behind the printer during printing Selected input media Memory card or external device Number of the selected images Total number of images in the selected me...

Page 24: ...em in the image list To display the image list again Press PICTURE Note The displayed picture on a TV monitor is not identical with the printed picture because phosphor methods or profiles of each TV monitor differ Please regard the displayed picture as just a reference Printing multiple images This section explains how to select multiple images specify print quantity for each of them and print th...

Page 25: ... cancelled 5 When printing is complete and the print paper automatically emerges remove the printed paper from the paper tray Making AUTO printing INDEX DPOF ALL AUTO automatic printing allows you to print multiple images stored on a memory card or an external device at one time The printer provides the following three AUTO printing methods INDEX printing You can print a list index of all the imag...

Page 26: ...anceled Note You cannot cancel the selection of the DPOF preset images 2 Press PRINT Printing starts During printing the printing process is displayed on the TV monitor To stop printing Press CANCEL When you are printing multiple copies the next printing after the one currently printing will be cancelled 3 When printing is complete and the print paper automatically emerges remove the printed paper...

Page 27: ...ITOR OUT mode is selected is displayed on the LCD display Press MONITOR OUT to display the main menu on LCD display LCD mode 2 Press INPUT SELECT repeatedly to select the memory card or an external device containing the images that you want to print Each time you press the button Memory Stick SD CF or External Device will be displayed on the LCD display When no external device is connected Externa...

Page 28: ...he paper tray For the notes during printing see page 23 2 Press f F to select Selected Image and then press g The main menu is displayed again 3 Press PRINT Image numbers and print quantity for the images stored in the selected memory card or external device are displayed Image number Print quantity Tip You can display the Select Image window by pressing G in step 2 2 4 Press f F to select the ima...

Page 29: ...POF or ALL 2 Press PRINT Printing starts During printing PRINT is displayed in the LCD display To stop printing Press CANCEL When you are printing multiple copies the next printing after the one currently printing will be cancelled 3 When printing is complete and the print paper automatically emerges remove the printed paper from the paper tray To resume the normal printing mode Press AUTO PRINT r...

Page 30: ... To return to the main menu Press g Auto Fine Print 3 You can select or disable automatic picture adjustment for printing Photo Vivid Off Exif Print You can turn on or off the automatic adjustments of the images shot by an Exif Print Exif 2 21 compliant digital camera to its optimum picture quality On Off Borders You can select border or borderless prints Yes No Date Print You can select whether o...

Page 31: ...remote commander The menu bar is displayed When you press EDIT the Edit menu on the step 3 is displayed Edit menu icon Menu bar To exit the menu mode Press MENU again The previous window is displayed 3 Press g G to select Edit and then press ENTER The Edit menu is displayed Cursor Edit menu Items Procedures Increases or reduces the size of an image or item Moves an image or item Rotates an image o...

Page 32: ... F to select Position and then press ENTER The image frames become yellow and you can move an image 3 Move the image with g G f F The image moves to the selected direction 4 Press ENTER The image is fixed to the position Rotating an image 1 Display the Edit menu page 31 2 Press g G f F to select Rotate and then press ENTER The Rotate menu is displayed Rotate menu Rotate tool 3 Press f F to select ...

Page 33: ... to lighten the colors Sharpness Press f to sharpen the outlines or F to reset them 5 Press ENTER The adjustment takes effect To reset the adjustment Press g G f F to select Reset and then press ENTER The image resets to the status before the adjustment is added Adding a special filter to an image 1 Display the Edit menu page 31 2 Press g G f F to select Filter and then press ENTER The Filter menu...

Page 34: ... adjustment frame Make the red eye reduction adjustment for the right and left eyes separately To move the adjustment frame 1 Press g G f F to select Position and press ENTER 2 Move the frame with g G f F The frame moves in the selected direction 3 Press ENTER The frame is fixed in the current position To adjust the size of the adjustment frame Press g G f F to select Enlarge or Reduce and press E...

Page 35: ...or You can change font and color in the middle of input procedures The changed font and color will be applied to all the input characters 4 Select a color The characters are input in the color displayed next to COLOR To apply different color do the following 1 Press g G f F to select COLOR and press ENTER The color selection window is displayed 2 Press g G f F to select the desired color and press...

Page 36: ...te you cannot move or delete the characters To correct characters in the input box To delete a character before the cursor in the input box Press g G f F to select BS Back Space and press ENTER Each time you press ENTER a character before the cursor is deleted To insert a character among the input characters Press g G f F to select B or b on the window and then press ENTER repeatedly until the cur...

Page 37: ...G f F to select LOAD SAVE and press ENTER The dialog box to register and save messages is displayed 3 Press g G to select Save and then press ENTER The message selection screen is displayed 4 Press f F to select the message box that you want to save the characters in and press ENTER The input characters are registered as a message To load a registered message In step 3 above select Load to display...

Page 38: ...select the number and press g G to select the day month or year Then press ENTER The image is saved The dialog box to notify the new file number is displayed 3 Press ENTER Note While saving the image do not turn off the printer or remove a memory card from the printer The memory card may be damaged Printing an image 1 Press PRINT The dialog box to specify the print quantity is displayed 2 Set the ...

Page 39: ... Print menu on the step 3 is displayed The menu bar is displayed Creative Print menu icon Menu bar To exit the menu mode Press MENU The previous window is displayed 2 Press g G to select Creative Print and then press ENTER The Creative Print menu is displayed Exiting the Creative Print menu Press MENU in the middle of the operations and select Creative Print Complete Display the preview image and ...

Page 40: ... size then press ENTER The wallpaper selection window is displayed 4 Press g G f F to select the desired wallpaper then press ENTER If you do not want to place wallpaper on the image select No Wallpaper The preview window of the selected wallpaper is displayed Selected wallpaper 5 Press g G f F to select Image and press ENTER The frame selection window is displayed 6 Press g G f F to select the de...

Page 41: ...ime you press ENTER the image rotates 90 clockwise Each time you press ENTER the image rotates 90 counterclockwise 9 Press g G f F to select Execute and press ENTER The window used for adjusting the framed image size and position is displayed 10 Adjust the size and position of the framed image For information on adjustment see step 8 11 Press g G f F to select Execute and press ENTER The framed im...

Page 42: ...wallpaper To change the wallpaper press g G f F to select Wallpaper and press ENTER The wallpaper election window is displayed Follow the step 4 on page 40 x Adding a message 1 Press g G f F to select Message and press ENTER The message selection window is displayed 2 Press g G f F to select the desired message then press ENTER The character color selection window is displayed 3 Press g G f F to s...

Page 43: ... the day of the week placed furthest left in the calendar Press g G to select Sunday or Monday Then press ENTER Color of Day Set the color of Sunday and Saturday to be displayed in the calendar Press G and then f F to select the desired color for Sunday and Saturday Then press ENTER 4 Press g G f F to select Execute and then press ENTER The window used for adjusting the calendar size and position ...

Page 44: ...es repeat the procedures below to select an image for each area 1 Press g G f F to select an image area then press ENTER The image list is displayed page 41 2 Press g G f F to select the desired image then press ENTER The window used for adjusting the image size and position is displayed 3 Adjust the size and position of the image For information on adjustment see step 8 on page 41 4Press g G f F ...

Page 45: ...Image area Message area Characters input area Tip You can select and set an area in any order 5 Select an image When you select a template with multiple images repeat the procedures below 1Press g G f F to select the image area then press ENTER The image list is displayed page 41 2 Press g G f F to select the desired image then press ENTER The window used for adjusting the image size and position ...

Page 46: ...ter you enter and adjust the characters press f F to select Execute then press ENTER The characters are fixed to the image 9 Check the preview then save and print your Creative print For saving and printing an image see page 38 Making split images You can make a print with 2 split 4 split 9 split 13 split or 16 split images The 13 split and 16 split images are available only with the Postcard size...

Page 47: ... desired area and press ENTER The window for selecting an image is displayed page 41 6 Press g G f F to select the desired image and then press ENTER The window used for adjusting the image position is displayed 7 Adjust the size and position of the image For information on adjustment see step 8 on page 41 8 Press g G f F to select Execute and press ENTER The preview image is displayed 9 Check the...

Page 48: ...ER CANCEL 1 Press MENU The menu bar is displayed Set Up menu icon Menu bar To exit the menu mode Press MENU The previous window is displayed 2 Press g G to select Set Up and then press ENTER The Set Up menu is displayed Cursor Set Up menu Note Setting items which cannot be changed are displayed in gray and cannot be selected 3 Press f F to select the desired setting item and press g G to change th...

Page 49: ...ity over the setting here In the LCD and PictBridge modes this setting holds effective Off Prints an image without any corrections Exif Print On Adjusts an image shot by an Exif Print Exif 2 21 compliant digital camera to its optimum picture quality Note The image data is not corrected Off Prints an image without any adjustments Borders Yes Prints an image with borders around the image Note Depend...

Page 50: ...gher you set the level the more reddish the picture becomes as if it receives red light The lower you set the level the darker the picture becomes as if light blue is added G Adjusts the green and purple elements The higher you set the level the more greenish the picture becomes as if it receives green light The lower you set the level the darker the picture becomes as if red purple is added B Adj...

Page 51: ...ages automatically or Manual to switch them manually Then press ENTER 4 Press g G f F to select Execute and press ENTER When Automatic is selected The images in the memory card or an external device are displayed automatically one after another When Manual is selected The image with the cursor in the image list is displayed To switch images press g G f F The image to the left right above or below ...

Page 52: ... Memory Stick all the files including the image files will be deleted You cannot delete an image of an external device You cannot format a memory card other than the Memory Stick Deleting selected images You can select and delete images on a memory card 1 Press MENU The menu bar is displayed Menu bar Delete Format menu icon To exit the menu mode Press MENU The previous window is displayed 2 Press ...

Page 53: ...You can format a Memory Stick 1 Press MENU The menu bar is displayed 2 Press g G to select Delete Format and then press ENTER The Delete Format menu is displayed 3 Press f F to select Memory Stick Format and press ENTER The confirmation dialog box is displayed 4 Press g G to select OK and press ENTER The Memory Stick is formatted Note When you format a Memory Stick all the images inside are delete...

Page 54: ...e number in both the boxes When you select By Date Specify the starting and ending dates of the files that you want to search for Starting date Ending date Tip To search for images of a specific day enter the same date in both the boxes When you select By Folder NO Specify the folder number of the images you want to search for 5 Press ENTER Searching starts When the search is complete the search r...

Page 55: ...ENU g G f F ENTER CANCEL 1 Press MENU The menu bar is displayed Option menu icon Menu bar To exit the menu mode Press MENU The previous window is displayed Continued 2 Press g G to select Option and then press ENTER The Option menu is displayed Cursor Option menu 3 Press f F to select the desired setting item and press g G to change the option Then press ENTER Note Items which cannot be changed ar...

Page 56: ...il miniature image used as index data will be displayed as an icon Generate In the image list window the images without thumbnail miniature image used as index data will be displayed as its original image Image data display On In the image list window image information file type shooting conditions etc will be displayed Off In the image list window no image information will be displayed Language Y...

Page 57: ... STANDBY to turn on the printer page 17 The ON STANDBY indicator of the printer lights in green 4 Connect a PictBridge compliant digital camera to the PictBridge CAMERA connector of the printer page 20 When you connect a PictBridge compliant digital camera to the printer The printer is being connected to PictBridge camera is displayed on the LCD display of the printer 5 Operate the digital camera ...

Page 58: ... herein may be the trademarks or registered trademarks of their respective companies Furthermore and are not mentioned in each case in this manual Installing the software System requirements To use the supplied printer driver and PictureGear Studio your PC must meet the following system requirements OS Microsoft Windows XP Professional Windows XP Home Edition Windows XP Media Center Edition Window...

Page 59: ...he PC and then click Cancel in the dialog box 2 Turn on your computer and start Windows When installing or uninstalling the software in Windows 2000 Professional log on to Windows as Administrator or Power user When installing or uninstalling the software with Windows XP Professional Windows XP Home Edition Windows XP Media Center Edition log on using a Computer administrator user account Notes Be...

Page 60: ...og box is displayed 7 Click Install The Printer connection dialog box is displayed Windows PC To USB connector To USB connector B TYPE 8 Connect the printer to the AC power source page 17 9 Press ON STANDBY to turn on the printer page 17 The ON STANDBY indicator of the printer lights in green 10Click Next 11Connect the USB connectors of the printer and your computer Note The print paper emerges fr...

Page 61: ...he PictureGear Studio software click Installing the PictureGear Studio and follow the procedures on pages 62 Notes If the printer driver CD ROM is prompted during the installation specify the following directory When using the Windows 98SE Me D Driver Win98 me When using the Windows 2000 XP D Driver Win2000 me D stands for the CD ROM drive of your PC and may differ depending on the system The supp...

Page 62: ...o close all running programs before installing the software The dialog boxes in this section are those in Windows XP Professional unless otherwise specified The installation procedures and the dialog boxes shown differ depending on the operation system 2 Insert the supplied CD ROM into the CD ROM drive of your computer The setup starts automatically and the installation window is displayed Notes I...

Page 63: ...ngs from the menu displayed 3 Add or clear the check mark for Starts the Media Watcher when you log on Widows To do registration check the option To cancel registration clear the check box 7 To display the Readme file check View Readme File and then click Finish When you check View Readme File the Readme file is displayed When you close the Readme file the PictureGear Studio Setup dialog box is al...

Page 64: ...lete dialog box is displayed 5 Click Finish Tips You can also remove the software from the Control Panel Select Add Remove Programs from the Control Panel Then select PictureGear Studio and click Remove Printing photos from the PictureGear Studio PictureGear Studio allows you to carry out a series of procedures for handling a still image capturing managing processing and outputting You can use the...

Page 65: ... be reflected 6 Click Sony and then select the DPP F series paper size of the paper you use DPP F series 4 x 6 Postcard size SVM F40P F80P DPP F series 3 5 x 5 SVM F40L Notes In some regions 3 5 x 5 inch size print paper SVM F40L DPP F series is not sold If you select paper other than the DPP F series paper you cannot obtain proper printing results When you use the supplied printing pack select DP...

Page 66: ... if you uncheck the item Color reproduction Picture quality is still set to Auto Fine Print 3 To change the Color reproduction Picture quality settings follow the Properties steps Properties Specifies orientation picture quality and other details When you click Properties the document properties dialog box for the selected printer is displayed 8 In the Paper Output tab specify the paper size Items...

Page 67: ...larged or reduced with the upper left corner as the reference point You need to use this option when using some types of applications In case printing does not complete satisfactorily with the option unchecked select this option Print preview Check this option to display a preview of an image before printed 9 In the Graphics tab set the color reproduction and picture quality Items Functions Color ...

Page 68: ...e red eye reduction has been correctly processed to the image Items Functions Red eye phenomenon will be detected automatically and it may not be corrected If red eye phenomenon is not corrected use the PictureGear Studio correction function Red eye reduction is enabled only when you have installed the software from Setup exe in the supplied CD ROM For the details see the Readme txt Print settings...

Page 69: ...dge or paper may become stuck If this happens turn the printer off and then on and resume printing from the beginning The print paper may emerge a few times during printing Do not touch nor pull the emerged paper Wait for the print paper to be fully ejected after printing ends Make sure to spare enough space behind the printer during printing To stop printing 1 Double click on the printer icon on ...

Page 70: ...lect Full page photo print or a similar option Set a larger value in the Enlarge Reduce text box in the Paper Output tab of the Sony DPP FP50 Properties dialog box If borders remain on the right and bottom sides of a printed image even after you set a larger value check Upper left reference In either case make sure to display and check the preview image before printing Orientation setting Dependin...

Page 71: ... Device will be displayed on the TV monitor page 21 cPress MONITOR OUT to display the images or the printer status on the TV monitor page 21 cFollow the directions of the messages if any and try to solve the problem page 86 cInsert a memory card or an external device properly pages 18 to 20 cInsert a memory card or an external device that contains the recorded images Troubleshooting Check Is the P...

Page 72: ...CF Design rule for Camera File system it may not be printed with the printer even if it is displayed on the PC monitor cIf the mark shown on the left is displayed the image may be a JPEG file created with your computer or the thumbnail data is not contained Select the mark and press PICTURE If a preview image is displayed you can print the image If the same mark is displayed again the image is of ...

Page 73: ...ictBridge mode to display and handle the remaining images cWhen you name or rename an image file on your computer and its file name includes characters other than alphanumeric characters the file name may not be displayed correctly or the image may not be displayed on the printer read error cOnce you have selected images in the Printing multiple images procedures you cannot print an image with whi...

Page 74: ...ck Symptom Paper does not feed Printing Check Is the print paper properly set in the paper tray Are you using print paper that was not designed for the printer Cause Solutions cIf print paper is not properly loaded the printer may develop trouble Check the following Is the correct set of print paper and print cartridge loaded page 11 Does the print paper is loaded in the correct direction in the t...

Page 75: ... print preview image data Did you print an image whose size width or height is smaller than 480 dots Is the following mark displayed in the image list Did you use the Edit menu to enlarge the image Cause Solutions cDepending on the type of digital camera used preview images may be displayed along with the primary images in the thumbnail list The printed quality of the preview images will not be as...

Page 76: ... file format it may use the JPEG file to print an image A RAW file can be printed from a PC For details see the operating instructions of the digital camera you are using What is a RAW file A RAW file is an original image file format to save uncompressed unprocessed still image data captured from a digital camera For whether or not a digital camera can capture an image in the RAW file format see t...

Page 77: ... the image when it was shot with the digital camera Cause Solutions c Because of differences in the phosphor method or profiles of a TV monitor please regard the image being displayed on the screen as just a reference To adjust picture quality do either of the following Menu Set Up Color Setting page 50 Menu Edit Adjust page 33 cBecause of the differences in the printer s internal processing and P...

Page 78: ...eas Even if you print it with Borders set to No you cannot eliminate the borders on both sides of a print To print without borders edit and save an image with Borders set to No page 49 cSet Borders to Yes to print the whole area of an image page 49 cDepending on the type of digital camera used the image may be stretched vertically if it has been rotated or processed using your digital camera This ...

Page 79: ...on by selecting Menu Edit Red eye reduction page 34 cSet the size of the adjustment frame to be two to seven times as large as the eye page 34 cRed eye reduction may not work properly if other editorial operations such as enlarging reducing the size of rotating or moving an image Perform these editorial operations first and then perform red eye reduction Settings Symptom The Borders Yes No setting...

Page 80: ...k ROM Cause Solutions cRelease the protection and try saving again cSlide the write protect switch to the write enable position page 93 cDelete unnecessary images page 52 or replace it with a new memory card with sufficient free memory space Save the image again c Release the protection and try printing again c Release the DPOF preset with your digital camera cSlide the write protect switch to the...

Page 81: ...ve the slack page 13 cTurn off the ON STANDBY button and then turn it on After the motor sound stops try to remove the cartridge If this does not solve the problem contact Sony service facilities or your Sony dealer cPaper is jammed See If paper jams page 89 and remove jammed paper from the printer If jammed paper cannot be removed contact the Sony service facilities cThe data size of an image is ...

Page 82: ...mepage for the digital camera you are using cThe message is not displayed while the printer is in the Edit Creative Print or other menu modes Exit the menu and then connect the cable again cDisconnect the digital camera and the printer and then connect them again Or turn off and then on the printer and the digital camera Set the USB setting of your camera to the PictBridge mode cConnect the cable ...

Page 83: ...iver from the Customer support home page page 96 Or contact your Sony dealer cFollow the procedures in the operating instructions to install the driver page 59 If an error occurs restart your computer and do the installation procedures again cExit all applications and then install the driver again cDouble click My Computer and then the CD ROM icon in the open window Follow the procedures in the op...

Page 84: ...Administrator user account c If there is no trouble displayed on the Windows desktop check the printer s LCD display If the printer shows trouble do the following Turn off the ON STANDBY button and then turn it on again Disconnect the power cable wait for 5 to 10 seconds and then connect the cable again Restart your computer If these do not solve the problem consult with your Sony dealer or servic...

Page 85: ...The Exif Print setting in the Color reproduction Picture quality section supports the PictureGear Studio only To print from other application uncheck Exif Print cThe ICM setting may be valid only when you are using an ICM compliant application Check to see if the application software you are using supports ICM cThe print settings adjusts the printer itself and cannot influence the preview image cS...

Page 86: ...ernal device pages 19 20 cA protected Memory Stick is inserted To save or edit the images with the printer cancel protection of the Memory Stick cA Memory Stick Compact Flash card SD card or an external device that the printer does not support are inserted Use a compatible media pages 92 to 94 cThere are no image files in the memory card or an external device that the printer can handle Connect a ...

Page 87: ...ze Postcard 3 5 x 5 inch appears set a print cartridge of the specified size If cleaning is displayed set the cleaning cartridge page 89 Error messages Protected Release the protect and retry deleting Protected Release the protect and retry formatting Protected Cancel protect then try again The Memory Stick CompactFlash card is full The Memory Stick CompactFlash card SD card External Device has tr...

Page 88: ...e print size you specified in the Creative Print menu does not match the print cartridge actually loaded in the printer Set a print cartridge and print paper of the displayed size pages 12 to 15 Meaning Solutions cThere is no print paper in the printer The paper tray is not set in the printer The print paper is not set in the paper tray The print paper has run out In either case set the print pape...

Page 89: ...nter If white lines or periodical dots are printed on the pictures use the cleaning cartridge supplied and the protective sheet of the supplied printing pack to clean inside the printer Tip You can also use the protective sheet supplied in the optional printing pack 1 Open the cartridge compartment lid and if there is a print cartridge remove it page 13 2 Insert the supplied cleaning cartridge int...

Page 90: ...d protective sheet together for future cleaning With a protective sheet you can carry out cleaning for the maximum of about 20 times When cleaning ends Set the print cartridge and print paper into the printer Notes Carry out cleaning only when there are white lines or dots on the print When you can obtain proper printing performances cleaning will not improve the printed picture quality The maximu...

Page 91: ...is may cause overheat or a malfunction In case the cord of the AC adaptor is disconnected or damaged never use it any longer as this may cause danger On moisture condensation If the printer is brought directly from a cold location to a warm location or placed in an extremely warm or humid room moisture may condense inside the unit In such cases the printer will probably not work properly and may e...

Page 92: ...It can be used with all the Memory Stick compatible devices Data transfer speed depends on the Memory Stick compatible device MagicGate Memory Stick MagicGate Memory Stick employs the MagicGate copyright protection technology Memory Stick ROM Memory Stick ROM is the read only Memory Stick storing the data You cannot save or delete its data Memory Stick with memory select function Memory Stick with...

Page 93: ...ice employ the technology The MagicGate compliant device and the MagicGate Memory Stick attest that each other supports the MagicGate technology and encode the data they exchange The printer does not support the MagicGate standards and cannot read or write the data subject to the MagicGate copyright protection Notes on use When you slide the write protect switch to the write protect position you c...

Page 94: ...the CompactFlash card slot of the printer you can use CompactFlash Storage Card Type I Type II and CF Card Type I Type II compatible CompactFlash Storage Card With the SD card slot you can use SD memory card and MMC standard memory card With the CompactFlash card slot you can also use xD picture card or smart media by using a commercially available CompactFlash card adaptor Not all the memory card...

Page 95: ...r to the operating instructions of the CompactFlash card adaptor Avoid inserting or removing the xD Picture Card or Smart Media card into or out of the CompactFlash card adaptor while the CompactFlash card adaptor is inserted in the printer The data may be rendered unreadable or erased Specifications x Printer Printing method Dye sublimation printing Yellow Magenta Cyan 3 pass Resolution 300 H x 3...

Page 96: ... 6 oz paper tray Supplied accessories See Checking the contents of the package on page 10 x AC adapter AC S24V1 Power requirements AC 100 to 240 V 50 60 Hz 1 6 to 0 7 A Rated output voltage DC 24 V 2 5 A Operating temperature 5 C to 35 C 41 F to 95 F Dimensions Approx 60 x 30 x 130 mm 2 3 8 x 1 3 16 x 5 1 8 inches w h d excluding protruding parts Mass Approx 270 g 10 oz Design and specifications a...

Page 97: ...7 8 inch 1 728 dots 127 mm 5 inch 1 500 dots 83 9 mm 3 3 8 inch 992 dots 89 mm 3 1 2 inch 1 050 dots 122 mm 4 7 8 inch 1 450 dots Border print range Borderless print range Perforations The above illustrations are those when an image with a 2 3 aspect ratio is printed The printing range differs for a border or a borderless print Note In some regions 3 5 x 5 inch size print paper is not sold 001GBFP...

Page 98: ... printing A digital camera supporting Exif Print stores the data relevant to the conditions of shooting as each shot is taken The printer utilises the Exif Print data stored in each image file to ensure the printed result matches the original shot as closely as possible 1 1 When the Auto Fine Print 3 is enabled and an image JPEG file is shot by an Exif Print Exif 2 21 compliant digital camera the ...

Page 99: ...outlet 17 TV monitor 18 Creative Print 39 D Date print 50 DC IN jack 17 DCF Design rule for Camera File system 98 Deleting an image 52 Displaying Images on the TV monitor 21 Preview image 23 DPOF 22 25 29 E Edit 31 Eject lever 12 Enlarge reduce 32 67 Error messages 86 Exif Print 49 66 68 98 F Features 7 Filter 33 Finish 49 Formatting Memory Stick 53 Frame 40 Free layout print 40 I ICM 68 Image inf...

Page 100: ...d image numbers 27 Split image 46 Using the LCD display 27 Printing pack 11 Printing range 97 Printing surface 14 76 Protect indication 22 R Red eye reduction 34 68 Remote commander 9 16 Replacing batteries 16 Restrictions on duplication 91 Rotating an image 32 S Saving an image 38 SD card Inserting removing 19 Notes on use 94 Types 94 Searching an image 53 Selecting an image 41 Selecting the pape...

Reviews: