background image

64

 GB

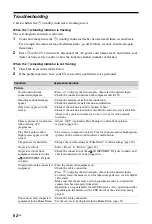
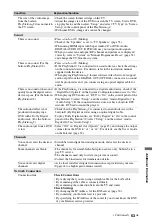
No server is found, no list is 
retrieved, and playback fails.

• Once server settings are changed, turn the TV off and on by pressing 

1


on the TV.

• Run “Server Diagnostics” (page 31).

When using a PC as the server

• Check if the PC is turned on. Do not turn off the PC while accessing it.
• If the PC has security software installed, allow connections from 

external devices. For details, refer to the manual supplied with your 
security software.

• Stop the server application and restart it if the server is experiencing 

instability. If the server remains instable, restart the PC.

• Reduce the number of applications running on the PC; the server may be 

overloaded.

• Reduce the amount of content; the server may be overloaded.

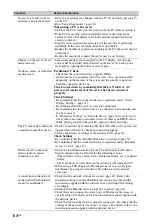
Changes on the server are not 
made correctly.

• Sometimes changes are not applied to the TV display even though 

content has been added and/or deleted on the server. Go back up one 
level and try opening the folder or server again.

No photo, music, or video files 
are displayed.

Preliminary Check

• Check that the connected device supports DLNA.
• Operations are not guaranteed for all servers. Also, operations differ 

depending on the features of the server and the content in question.

• Turn the connected device on.

Check connections by examining that the LAN cable or AC 
power cord (mains lead) of the server has been connected 
properly.
Check Settings

• By examining that the connected device is registered under “Server 

Display Settings” (page 31).

• By checking if that the server is correctly configured.
• By examining that the selected device is connected to the network and 

can be accessed.

• If “IP Address Settings” in “Network Set-up” (page 56) is set to “Auto”, 

it may take some time to recognise devices if there is no DHCP server.

• When playing content from your PC, adjust its firewall settings.

The TV cannot be found from 
a renderer-compatible device.

• Check connections by examining that the LAN cable or AC power cord 

(mains lead) of the device has been connected properly.

• Check connections or settings of the wireless LAN (page 28).

Check Settings

• By confirming that the “Renderer Function” is activated (page 57).
• By confirming that the connected device is registered under “Renderer 

Access Control” (page 57).

Wireless LAN connection 
fails or radio reception 
conditions are bad.

• Check the installation location for the TV and wireless LAN router. 

Signal condition may be affected for the following reasons.
– Other wireless devices, microwaves, fluorescent lights, etc., are placed 

nearby.

– There are floors or walls between the wireless LAN router and TV.

• When using a USB Wireless LAN Adapter, move it to avoid signal 

interference by using an extension cable with base unit (optional 
accessory).

A connection to the network 
of the built-in PlayStation

cannot be established.

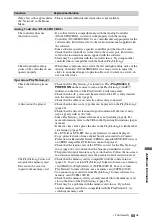
• Check that the network settings are correct (page 42). Refer to the 

information from your broadband Internet service provider and the 
instructions supplied with the software in use, and adjust the settings 
accordingly.

• Check that the Ethernet cable is properly connected (page 42).
• Check that you are using the correct type of Ethernet cable (cross or 

straight cable). For details, refer to the instruction manual supplied with 
the network device.

• Check that the network device is properly connected. Also check that the 

settings of the network device in use are correct. For details, refer to the 
instruction manual supplied with the network device.

Condition

Explanation/Solution

Summary of Contents for BRAVIA 4-256-733-F2(1)

Page 1: ...4 256 733 F2 1 LCD Digital Colour TV Operating Instructions GB KDL 22PX300 ...

Page 2: ...ust be registered in order to play DivX Video on Demand VOD content To generate the registration code locate the DivX VOD section in the device setup menu Go to vod divx com with this code to complete the registration process and learn more about DivX VOD Manufactured under license from Dolby Laboratories Dolby and the double D symbol are trademarks of Dolby Laboratories BRAVIA and are trademarks ...

Page 3: ...nc with Control for HDMI 26 Using Home Network Features Connecting to the Network 27 Wireless LAN Ready 28 Enjoying BRAVIA Internet Video 29 Enjoying Photo Music Video Files via the Network 30 Checking the Network Connection 30 Adjusting the Server Display Settings 31 Using PlayStation 2 About Advanced Operations of the PlayStation 2 32 Part Names 32 Setting Up the PlayStation 2 35 Playing Content...

Page 4: ...able 42 Displaying the Main Menu 43 Using Menu Functions Navigating through TV Home Menu XMB 46 TV Settings Menu 47 Additional Information Specifications 58 Troubleshooting 62 Index 68 Before operating the TV please read Safety Information page 8 Retain this manual for future reference ...

Page 5: ... 1 To insert batteries into the remote 1 Connecting an antenna aerial Set Top Box recorder e g DVD recorder Connecting a Set Top Box recorder e g DVD recorder with SCART Connecting a Set Top Box recorder e g DVD recorder with HDMI Push and lift the cover to open Set Top Box recorder e g DVD recorder Set Top Box recorder e g DVD recorder ...

Page 6: ...screw hole of the TV 3 Tie the wood screw and the machine screw with a strong cord not supplied 3 Organising the AC power cord mains lead 4 Performing the initial set up 1 Connect the TV to your AC power outlet mains socket 2 Press 1 on the TV When you switch on the TV for the first time the Language menu appears on the screen 3 Follow the instructions on the screen ...

Page 7: ...nd that you select Quick Scan for quick tuning Set Frequency and Network ID according to the information supplied from your cable provider If no channel is found using Quick Scan try Full Scan though it may take some time Full Scan may not be available depending on your region country For a list of compatible cable providers refer to the support web site http support sony europe com TV DVBC Progra...

Page 8: ...ull on the mains lead itself when disconnecting the mains lead Do not connect too many appliances to the same mains socket Do not use a poor fitting mains socket Prohibited Usage Do not install use the TV set in locations environments or situations such as those listed below or the TV set may malfunction and cause a fire electrical shock damage and or injuries Location Outdoors in direct sunlight ...

Page 9: ...ct polarity when inserting batteries Do not use different types of batteries together or mix old and new batteries Dispose of batteries in an environmentally friendly way Certain regions may regulate the disposal of batteries Please consult your local authority Handle the remote with care Do not drop or step on it or spill liquid of any kind onto it Do not place the remote in a location near a hea...

Page 10: ...ace the console or accessories on surfaces that are unstable tilted or subject to vibration Do not expose the console or accessories to high temperatures high humidity or direct sunlight use in an environment where temperatures range from 5 C to 35 C 41 F to 95 F Do not place the console in locations of poor ventilation such as small enclosed areas directly against a wall or on a thick carpet or b...

Page 11: ...is may take several hours If the console still does not operate properly contact the appropriate PlayStation customer service helpline which can be found within every PlayStation and PlayStation 2 format software manual Cleaning For safety reasons before cleaning the console or connected accessories 1 turn off the console 2 disconnect the mains power plug for the console from the electrical outlet...

Page 12: ...dby Press to turn on the TV or to enter standby mode When you turn the TV off the TV and the built in PlayStation 2 enter standby mode 2 1 Power Press to turn on the TV or to enter standby mode To disconnect the TV turn off the TV then unplug the AC power cord mains lead from the AC power mains When you turn the TV off the TV and the built in PlayStation 2 enter standby mode 3 PlayStation2 POWER O...

Page 13: ...I Device Selection If you turn the TV off Theatre Mode is also turned off When you change the Scene Select setting Theatre Mode turns off automatically Control for HDMI BRAVIA Sync is only available for the connected Sony equipment that has the BRAVIA Sync or is compatible with Control for HDMI 6 DIGITAL ANALOG Press to switch between digital and analogue mode When viewing pictures from connected ...

Page 14: ...nels For channel numbers 10 and above press the next digit quickly PlayStation 2 function Press to enter a chapter number In Text mode Press to enter a page number qd Text Press to display text information page 17 This button is unavailable for PlayStation 2 qf 2 Volume Press to adjust the volume qg Mute Press to mute the sound Press again to restore the sound qh Input select Text hold In TV mode ...

Page 15: ... Press to enter confirm a highlighted item ws OPTIONS Press to display a list of convenient functions and menu shortcuts The menu items vary based on the current input and or content This button is unavailable for PlayStation 2 wd Subtitle setting TV function Press to turn subtitles on or off when the feature is available PlayStation 2 function Press to turn subtitles on or off when the feature is...

Page 16: ...eives signals from the remote Do not put anything near the sensor doing so may affect its function 3 Picture Off Timer Lights up in green when you select Picture Off in Power Saving of Eco page 48 Lights up in orange when you set the timer page 48 Lights up and or blinks in orange during a software upgrade 4 1 Standby Lights up in red when the TV is in standby mode PC power saving mode or during a...

Page 17: ...ble Digital Text Radio service Scrambled Subscription service Multiple audio languages available Subtitles available Subtitles available for the hearing impaired c Reminder Recommended minimum age for current programme ages from 4 to 18 For Spain only ages from 4 to 18 and X Parental lock To access Text Press Each time you press the display changes cyclically as follows Text and TV picture t Text ...

Page 18: ...est mode to suit the broadcast If 720p 1080i or 1080p source pictures are displayed with black borders on the screen edges select Smart or Zoom to adjust the pictures Smart Enlarges the picture to fill a 16 9 screen preserving the original picture as much as possible 4 3 Displays the 4 3 picture in its original size Side bars are shown to fill the 16 9 screen Wide Stretches the 4 3 picture horizon...

Page 19: ...your preferred programmes for any categories Timer list Set a programme to be displayed on the screen when it starts Item Description 1 Information Box Shows information about the highlighted programme 2 Video Window Displays the last viewed programme before you entered the guide 3 Programme Listing Grid Select a programme to watch or to be set as a reminder 4 Channel Information Displays a channe...

Page 20: ...d press to expand it into a full view z A slideshow automatically starts when a folder of photos is selected By selecting the Recently Viewed stack of items in the Favourites screen you can display a history of content you have recently viewed The Recently Viewed list is erased whenever the TV is powered off z Recently Viewed items are displayed in a stack list Press F f to move between the items ...

Page 21: ...e displayed in a stack list of items Press to expand the selected item into a full view The Recommendations feature may not be available depending on your region country and broadcasting conditions You can add remove your favourite items through the XMB or while you are displaying content on the screen 1 Press OPTIONS after selecting the desired item on the XMB 2 Select Add to Favourites or Remove...

Page 22: ...sed all digital audio video interface between this TV and any HDMI equipped audio video equipment In addition when you connect the equipment that is compatible with Control for HDMI communication with the connected equipment is supported Be sure to use only an authorised HDMI cable bearing the HDMI logo If connecting a digital audio system that is compatible with Audio Return Channel ARC technolog...

Page 23: ...listen to TV sound on the connected Home theatre system with digital input 9 USB USB cable You can enjoy photo music video files stored in USB device page 24 Connecting other equipment Connect to Connect with Description 3 PC IN PC cable with ferrites audio cable It is recommended to use a PC cable with ferrites such as the Connector Mini D sub 15 ref 1 793 504 11 available in Sony Service Centre ...

Page 24: ...to Playback Auto Start Photo playback automatically starts when you connect a USB storage device after turning on the TV and Slideshow or Thumbnail View is selected in the USB Auto Start settings page 48 When connecting a Sony digital camera to the TV with a USB cable USB connection settings on your camera need to be set to Auto or Mass Storage mode Video files are located in the following folder ...

Page 25: ... photograph is displayed on the screen To set the duration of displaying a photograph Press OPTIONS then select Duration and press Then select the duration and press The counter appears on the screen If the photograph is selected from a USB device it must remain connected to the TV If Sleep Timer is activated the TV automatically will switch into standby mode To display a photomap By connecting a ...

Page 26: ...the input to that equipment when you select it from the Home Menu or Sync Menu Automatically turns the TV on and switches the input to the connected equipment when the equipment starts to play Automatically turns the connected equipment off when you switch the TV to standby mode AV Amplifier Automatically turns the connected AV amplifier on and switches the sound output from the TV speaker to the ...

Page 27: ... a DLNA compatible device VAIO Cyber shot etc is necessary as a server Make either the wired connection see the following Connecting to the Network or wireless connection see Wireless LAN Ready on page 28 In addition when you connect your TV to the Internet you can enjoy displaying a photograph that shows its location on the map page 25 or enjoy Internet video page 29 You will need to contract wit...

Page 28: ...ure the following Network Set up and Secured Network without Wi Fi Protected Setup WPS The start up screen of Network Set up allows you to select a setting procedure according to your network environment View Network Status Select to confirm your network status Wired Set up Use to connect to a wired network Wireless Set up Use to connect to a wireless network The WPS standard makes security of a w...

Page 29: ...deo content including movies and cartoons Be sure to connect your TV to the broadband Internet and complete the initial set up and Network Set up page 56 To Use Internet Video You can seek forward or seek backward in the video content This feature is available depending on Internet content services 1 Press INTERNET VIDEO 2 Press F f G g to select the desired video icon to be displayed and press To...

Page 30: ...reen by directly operating the target device The network device should also be renderer compatible 1 Press HOME 2 Press G g to select Settings 3 Press F f to select Network and then set Renderer Function Renderer Access Control and Renderer Set up in Renderer if necessary page 57 4 Play back media files by using the network devices Checking the Network Connection Enter the respective alphanumeric ...

Page 31: ...server you want to display on the Home Menu and adjust the settings If you cannot connect to your home network The TV detects if the server is being correctly recognised when you cannot connect it to your home network If the diagnostic results indicate a failure check possible causes and network connections and settings 1 Press HOME 2 Press G g to select Settings 3 Press F f to select Network then...

Page 32: ... the Analog Controller DUALSHOCK 2 into a controller port of the PlayStation 2 page 35 3 USB connector You can connect various USB devices to the built in PlayStation 2 but not all are compatible Refer to the instructions supplied with the USB device for more information You cannot play photo music video files using the PlayStation s USB connector 4 Disc cover Press the OPEN button and the cover s...

Page 33: ...cting the PlayStation 2 to a broadband network page 37 To enjoy BRAVIA home network features connect to LAN of the TV using an Ethernet cable page 42 2 DIGITAL AUDIO OUT OPTICAL You can listen to the built in PlayStation 2 sound on a Home theatre system connected via digital input 1 2 Continued ...

Page 34: ...analog stick L3 button z The left analog stick and L3 button function only in analogue mode indicator red The L3 button function when the analog stick is pressed 6 ANALOG mode button Switch between digital mode and analogue mode 7 Mode indicator Digital mode Lights off Analogue mode Lights up in red z Depending on the software you may not be able to switch modes even if you press the ANALOG mode b...

Page 35: ...tandby Sleep Timer PC Power Management Reminder On Timer Picture Frame Do not access the memory card when a warning message such as the TV will soon turn off appears Playing Content You can play games DVD Videos and audio CDs on the PlayStation 2 1 Press the OPEN button to release the disc cover lock 2 Slide the disc cover to the left then place the disc with the label side facing up 3 Close the d...

Page 36: ...ard sold separately You can also delete game data or copy game data from one memory card to another Memory card types There are two types of memory cards Select the memory card type suitable for the software in use Memory card for PlayStation 2 SCPH 10020 E Compatible software PlayStation 2 format software Amount of memory Approximately 8 MB Memory card SCPH 1020 E This product is no longer manufa...

Page 37: ...ine Games You can play online games by connecting the built in PlayStation 2 to a network Items you will need A network compatible PlayStation 2 game Broadband Internet service A commercially available Ethernet cable A memory card 8MB for PlayStation 2 sold separately Creating a Network Configuration When playing online games insert a commercially available Ethernet cable into the network connecto...

Page 38: ...Watching a DVD You can play DVDs on the built in PlayStation 2 To start a DVD Insert a disc to start DVD playback Operating the DVD Player Press the SELECT button on the Analog Controller then select an icon ...

Page 39: ... Parental Control level audio etc Time Display Displays the current title or chapter number elapsed time etc Help Displays the direct button functions of the Analog Controller DUALSHOCK 2 0 9 Go to Chapter Used to enter the number of a chapter you want to play Previous Next Returns skips to the beginning of the current previous or next chapter Search Fast reverses forwards playback Slow Changes to...

Page 40: ...the button Press the SELECT button on the Analog Controller and then enter the number 7444 Compatible Software DVD PlayStation 2 format DVD ROM DVD ROM DVD Video DVD R DVD RW DVD R DVD RW Video mode VR mode CD PlayStation 2 format CD ROM PlayStation format CD ROM CD DA Audio CD Some discs may not be playable due to scratches dust or recording problems The audio CD playback feature of this product ...

Page 41: ... 2 game Broadband Internet service A commercially available Ethernet cable A memory card 8MB for PlayStation 2 sold separately z You cannot play online games using a dial up or ISDN connection USB connectivity from the External Network Device to the USB connector is not supported There are two types of Ethernet cables straight through cable and crossover cable Ensure that you use the correct type ...

Page 42: ...Connect the Ethernet cable to the NETWORK connector on the rear 2 Connect the Ethernet cable to the network device Do not plug the AC power cord mains lead for the built in PlayStation 2 into the electrical outlet until you have made all other connections Do not connect Ethernet cables or telephone cords of the following types to the network connector too much electrical current may pass through t...

Page 43: ...e various settings You can also move to the following screens from the main menu The main menu is displayed when you turn on the console without a disc inserted Browser screen page 43 System Configuration menu page 44 1 Press PlayStation 2 POWER ON on the TV s remote The main menu is displayed Note that it may take some time for the main menu to be displayed z If you press PlayStation 2 POWER ON o...

Page 44: ... becomes active and can be selected 4 Select the desired setting and then press button For details see the instructions for each menu item pages 44 to 45 z The default setting for each menu item is underlined in the explanations below Changes to each setting are saved and remain in effect even after you turn off or reset the console Clock Adjustment You can set the date and time Use the directiona...

Page 45: ...ge You can use this option to select the language displayed on the main menu Browser screen System Configuration menu and Version Information screen On Select this option when you want to output signal through the DIGITAL OUT OPTICAL connector Off Select this option when you do not want to output signal through the DIGITAL OUT OPTICAL connector Gameplay Function On Select this option when operatin...

Page 46: ...Media category icon Description Settings Contains all of the necessary configurations to customise your TV settings page 47 Photo You can enjoy photo content via USB devices or the network including Internet content services page 24 30 Music You can enjoy music content via USB devices or the network including Internet content services page 24 30 Video You can enjoy video content via USB devices or...

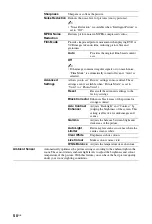
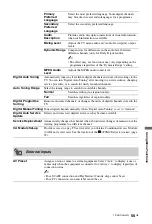
Page 47: ...y viewed channel As the signal condition changes the level indicator on the screen rises or falls The signal condition is unavailable for analogue channels and external inputs System Settings Scene Select Optimises picture and sound quality by selecting the following options When you set Theatre Mode to On Scene Select is automatically set to Cinema Cinema Optimises picture scenes and sound just l...

Page 48: ...elect the cursor speed for navigating through menu options from Fast Scroll Slow Scroll or No Auto Repeat Recommendation Searches for and shows programmes you may like under Recommendations in Favourites Quick Start Turns the TV on faster than usual by pressing the power button on the remote Up to three time periods can be set When you set Smart Mode to On the TV turns on at the time of day when y...

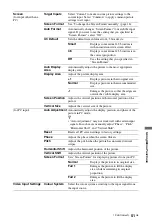
Page 49: ...s Game Standard For standard picture suitable for games Game Original Adjusts the game picture according to your preference Graphics Optimises picture quality for viewing graphics Photo Vivid Enhances contrast sharpness and colour of photographs Photo Standard For standard viewing of photographs Photo Original Enhances the visual warmth of photographs Photo Custom Adjusts the detailed settings for...

Page 50: ... Vivid or Photo Vivid Reset Resets all the advanced settings to the factory settings Black Corrector Enhances black areas of the picture for stronger contrast Adv Contrast Enhancer Adjusts Backlight and Contrast by judging the brightness of the screen This setting is effective for dark images and scenes Gamma Adjusts the balance between bright and dark areas of the picture Auto Light Limiter Reduc...

Page 51: ...e so that the edges are outside the visible display area Screen Position Adjusts the vertical position and horizontal position of the picture Vertical Size Adjusts the vertical size of the picture for PC input Auto Adjustment Automatically adjusts the display position and phase of the picture in PC mode z Auto Adjustment may not work well with certain input signals In such cases manually adjust Ph...

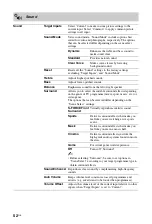
Page 52: ...ending on the genre of TV programme movie sport music etc or video game The options that can be selected differ depending on the Scene Select settings S FORCE Front Surround Virtually reproduces realistic sound Sports Delivers surround effects that make you feel like you are watching a live sports event Music Delivers surround effects that make you feel like you are in a music hall Cinema Delivers...

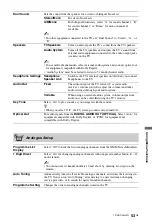
Page 53: ... audio receiver s volume control to adjust the volume and other audio settings through your audio system Variable When using an external audio system volume output from audio out can be controlled using the TV s remote Key Tone Select On to play sounds as you navigate with the remote z When you select Off the TV start up sound is also turned off Optical Out For audio signals from the DIGITAL AUDIO...

Page 54: ...ually System Select a TV broadcast system Channel Select S for cable channels or C for terrestrial channels AFT Allows you to fine tune the selected channel manually if you feel that a slight tuning adjustment may improve picture quality When On is selected fine tuning adjustments are made automatically Audio Filter Improves the sound of individual channels when distortion occurs in mono broadcast...

Page 55: ...wly launched channels Auto Tuning Range Select the tuning range to search for available channels Normal Searches within your region country Full Searches regardless of region country Digital Programme Sorting Removes unwanted channels or changes the order of digital channels stored in the TV Digital Manual Tuning Tunes digital channels manually when Digital Auto Tuning is set to Antenna Digital Au...

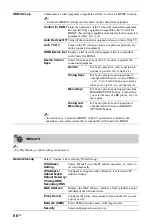
Page 56: ...and operation of channel related buttons such as PROG or 0 9 etc Useful when you control a tuner or set top box etc via the remote Menu Keys For basic operations and operation of the HOME OPTIONS buttons Useful when you select menus of a BD player etc via the remote Tuning and Menu Keys For basic operations and operation of channel related buttons and HOME OPTIONS buttons You cannot use Control fo...

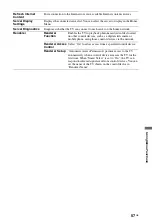
Page 57: ...ables the TV to playback photo music video files located on other control devices such as a digital still camera or mobile phone using those control devices via the network RendererAccess Control Select On to allow access from a specified control device Renderer Set up Automatic Access Permission permits access to the TV automatically when a control device accesses the TV for the first time When S...

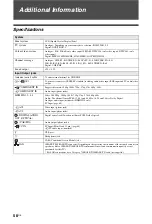
Page 58: ...put COMPONENT IN Supported formats 1080p 1080i 720p 576p 576i 480p 480i COMPONENT IN Audio input phono jacks HDMI IN1 2 3 4 Video 1080 24p 1080p 1080i 720p 576p 576i 480p 480i Audio Two channel linear PCM 32 44 1 and 48 kHz 16 20 and 24 bits Dolby Digital Analogue audio input minijack HDMI IN 4 only PC Input page 60 AV2 Video input phono jack AV2 Audio input phono jacks DIGITAL AUDIO OUT OPTICAL D...

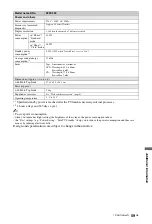
Page 59: ...L 22PX300 Power and others Power requirements 220 V 240 V AC 50 Hz Screen size measured diagonally Approx 54 8 cm 22 inches Display resolution 1 366 dots horizontal 768 lines vertical Power consumption in Home Standard mode 39 0 W in Shop Vivid mode 90 0 W Standby power consumption 1 0 9 W 13 W when Quick Start is set to On Average annual energy consumption 2 57 kWh Laser Type Semiconductor contin...

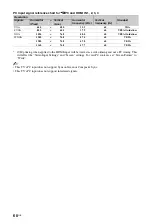
Page 60: ...PC contents set Screen Format to Wide This TV s PC input does not support Sync on Green or Composite Sync This TV s PC input does not support interlaced signals Resolution Horizontal frequency kHz Vertical frequency Hz Standard Signals Horizontal Pixel Vertical Line VGA 640 480 31 5 60 VGA SVGA 800 600 37 9 60 VESA Guidelines XGA 1024 768 48 4 60 VESA Guidelines WXGA 1280 768 47 4 60 VESA 1280 768...

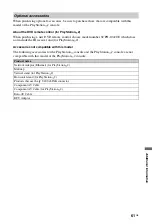
Page 61: ...IR receiver unit for PlayStation 2 Accessories not compatible with this model The following accessories for the PlayStation console and the PlayStation 2 console are not compatible with this model of the PlayStation 2 console Optional accessories Product name Network Adaptor Ethernet for PlayStation 2 Multitap Vertical stand for PlayStation 2 Horizontal stand for PlayStation 2 Products that use th...

Page 62: ...three to five years for normal use one to two years at the seaside location There is picture or sound noise when viewing a TV programme Adjust AFT Automatic Fine Tuning to obtain better picture reception page 54 Tiny black points and or bright points appear on the screen The screen is composed of pixels Tiny black points and or bright points pixels on the screen do not indicate a malfunction The p...

Page 63: ...yStation 2 select Setup and then select Audio Digital Out in Audio Setup If the connected device does not have a built in DTS decoder DTS audio cannot be played The surround effect is not produced when playing a DVD with a Dolby Digital audio track For the built in PlayStation 2 Check that the PlayStation 2 is connected to an audio device with a built in Dolby Digital decoder using an optical digi...

Page 64: ... Network Set up page 56 is set to Auto it may take some time to recognise devices if there is no DHCP server When playing content from your PC adjust its firewall settings The TV cannot be found from a renderer compatible device Check connections by examining that the LAN cable or AC power cord mains lead of the device has been connected properly Check connections or settings of the wireless LAN p...

Page 65: ...A disc cannot be played Check that the disc is of a type that can be played on the PlayStation 2 page 40 Check that the disc is clean and in good condition If the disc is dirty wipe it gently with a soft cloth Some PlayStation format software may not perform properly For more information refer to the URL in the Operating Instructions paper manual If the disc has a label place the disc in the PlayS...

Page 66: ...reset intentionally by the manufacturer Because the PlayStation 2 plays DVDs according to the settings on the disc some functions may not be available even if you follow the procedures in this manual Some settings cannot be changed during playback or resume play In the control panel of the PlayStation 2 select x Stop to stop playback and then select x Stop again to clear resume play General Poor p...

Page 67: ...Selection Check that your equipment is compatible with Control for HDMI the value of Control for HDMI is On You cannot select Off in Control for HDMI You cannot select Off for any audio system compatible with Control for HDMI If you want to change the audio output to the TV speaker select TV Speakers in the Speakers menu page 53 The Parental Lock password of the TV setting menu has been forgotten ...

Page 68: ...anguage 48 Manual Programme Preset 54 Music 24 30 Network connection 30 Network Set up 56 Optical Out 53 PAP 24 Parental Lock 48 Photo 24 30 GPS 25 Picture 49 Picture Frame 25 Picture Off indicator 16 PIP 24 Power indicator 16 Power 1 switch 12 Programme Labels 54 Programme List Display 53 Programme Sorting 53 R Z Radio Display 48 Refresh Internet Content 57 Remote control 12 inserting batteries 5...

Page 69: ......

Page 70: ......

Page 71: ......

Page 72: ... 2010 Sony Corporation 4 256 733 F2 1 For useful information about Sony products ...

Reviews: