Quick Start Guide for HARMONi G3
11.
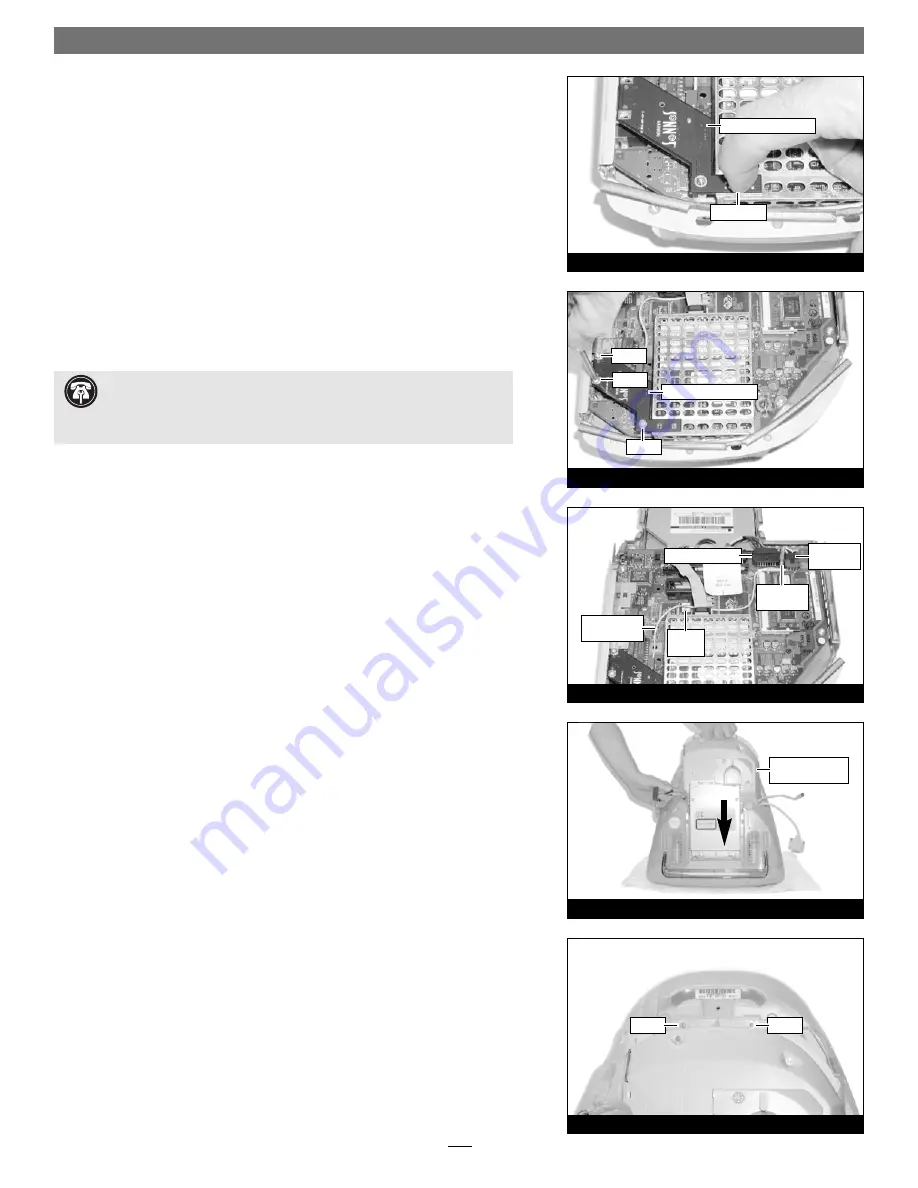
Verify the connectors on the adapter card and the HARMONi processor card
are aligned, then gently press down on the adapter card above the connec-
tors until the connectors are completely coupled
(Figure 31)
.
12.
Secure the adapter card to the side panel brackets and to the support standoff
with the three supplied screws
(Figure 32)
.
13.
Remove the protective backing sheet from the wire clamp, then press the
wire clamp onto the logic board as shown
(Figure 33)
.
14.
Route the adapter card’s power cable around the shield, position the crimp
connector between the 4-pin connector and the Video connector, and secure
the power cable with the wire clamp.
(Figure 33)
.
Reassemble Computer
1.
Pick up the logic board/drive assembly by the handle with one hand and
support the opposite side of the assembly with the other, then slowly lower
the assembly into the computer
(Figure 34)
. If there is any resistance, pull
the assembly back out, make sure all cables and connectors are routed prop-
erly, then lower the assembly into the computer again.
2.
Carefully tilt the computer to check and verify that the CD-ROM drawer is
aligned properly in the opening in the front of the iMac. Secure the logic
board/drive assembly to the computer with the two screws you removed pre-
viously
(Figure 35)
.
9
Figure 33
Figure 32
Figure 31
Figure 34
Support Note:
Before reassembling the computer, make sure that its
cables are routed properly. Also, when reinstalling the logic board/drive
assembly, verify that the guide pins on each side of the assembly slide behind
the plastic rails in the computer case as you lower the assembly into the case.
FireWire adapter card
press here
screw
screw
screw
FireWire adapter card
Video connector
adapter card
power cable
4-pin
connector
logic board/drive
assembly
crimp
connector
wire
clamp
Figure 35
screw
screw


