background image


5-4 

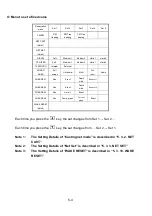
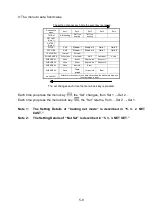
II: Menu to set a fixed value 
 

Reservation 

menu 

Set 1 

Set 2 

Set 3 

Set 4 

Set 5 

TM/RM 

RM 

Heading 

RM True 

bearing 

TM True 

bearing 


NET CAST 

(Note 1) 


NET SET 

(Note 2) 


DISCRI   

Soft 

Medium 1 

Medium 2 

Hard 1 

Hard 2 

PP FILTER   

Soft 

Medium 1 

Medium 2 

Hard 1 

Hard 2 

TX SYNCRO 

Internal 

External 


SONAR   

AREA 

Full 

screen 

Horizontal     

Multi


Fish 

finder   


Audio


SUB AREA 1 

Non 

Event 

Depth 

wind 

Shortcut 1 


SUB AREA 2 

Non 

Event 

Depth 

wind 

Shortcut 2 


SUB AREA 3 

Non 

Net info. 

Event


SUB AREA 4 

Non 

Temp. graph 

Current   

graph


Event


WAKE RESET 

(Note 3) 


Each time you press the 

  key, the set changes from Set 1 → Set 2 … 

 
Each time you press the 

  key, the set changes from … Set 2 → Set 1. 


Note 1: 

The Setting Details of “Casting net mode” is described in “5. 3. 2. NET 
CAST.”   

Note 2: 

The Setting Details of “Net Set” is described in “5. 3. 3. NET SET.”   

Note 3: 

The Setting Details of “WAKE RESET” is described in “5. 3. 18. WAKE 
RESET.”   

Summary of Contents for KCS-3500

Page 1: ...Model KCS 3500 Color Scanning Sonar Operation Manual Ver 1 6...

Page 2: ......

Page 3: ...symbol means if you mishandle the instrument the possibility of causing death or a serious injury is anticipated The symbol means if you mishandle the instrument the possibility of causing a moderate...

Page 4: ...ommunicate with each other at any time Caution Caution about installation location 1 Avoid using the instrument at a location where the temperature becomes 50 or more such as a location where the inst...

Page 5: ...cer of this sonar system is filled with castor oil inside This castor oil may steep from the transducer cable due to outside temperature change but it does not affect the performance For preventing da...

Page 6: ...a standard When the battery is used under a high temperature the life becomes shorter Exchange method As to the exchange of a battery make contact with our service personnel Batteries are valuable and...

Page 7: ...ing power supply is shut off by executing the emergency stop To execute the emergency stop press both keys of and at the same time Caution When executing the emergency stop the whole system power supp...

Page 8: ...ase read this instruction manual carefully and make good use of the fine performance of this instrument Features The entire circumference can be searched at the same time Medium frequency and high res...

Page 9: ...ist unit as to how to perform manual operation 1 2 Basic operation 1 2 1 On Off of power supply 1 Apply the power supply Push the power key at the operating portion It takes about 2 to 3 minutes for t...

Page 10: ...nsducer the storage operation of the transducer is automatically performed by the Automatic ascending operation After storing the transducer up to the upper limit the power supply is automatically shu...

Page 11: ...e hoist unit to store the transducer During the ascent of transducer the length of the hoisting amount display bar located in upper right of the screen is reduced and the upper lamp of the ascending k...

Page 12: ...TVG and if the distance is increased the sensitivity is automatically increased By doing so fish schools at both long and short distances are displayed similarly on the screen 1 2 5 Depression angle a...

Page 13: ...tantaneous cutting of the power supply the whole system power supply is cut by pushing both key and key at the same time 7 Sensitivity key 11 Event erasing key 13 Menu back key 2 Power off key 3 Ascen...

Page 14: ...indicated in the cross cursor position three types the maximum 10 for each mark is also used when selecting a menu 11 Event erasing key Older event marks are erased in the order of hexagon round and...

Page 15: ...n HARD 2 However an interference removal level that is too strong results in bad smoothing of the image Normally the mode should be set to SOFT b Mode Key This key is used to change the screen c Sonar...

Page 16: ......

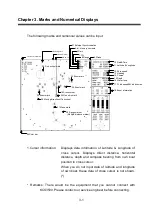
Page 17: ...s There would be the equipment that you cannot connect with KCS3500 Please contact our service engineer before connecting Multiple distance marker 2 Bearing mark 3Audio marker 4 Bowl ine 8 Range 7 Til...

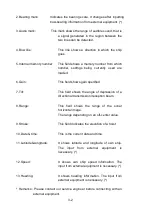
Page 18: ...lt This field shows the angle of depression of a directional transmission reception beam 8 Range This field shows the range of the sonar horizontal image The range depending on an off center value 9 S...

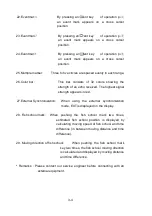
Page 19: ...deviation latitude longitude Relative shows horizontal distance depth and compass angle Deviation shows deviation distance and deviation speed Latitude longitude shows these of event mark but input f...

Page 20: ...of an echo received The highest signal strength appears in red 27 External Synchronization When using the external synchronization mode EXT is displayed on the display 28 Fish school mark When pushing...

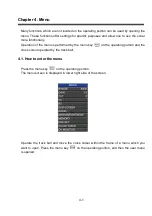
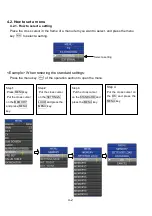
Page 21: ...of the menu is performed by the menu key on the operating portion and the cross cursor operated by the track ball 4 1 How to enter the menu Press the menu key on the operating portion The menu screen...

Page 22: ...storing the standard settings Press the menu key of the operation section to open the menu Step 1 Press MENU key Put the cross cursor on the MEMORY and press MENU key Step 2 Put the cross cursor on th...

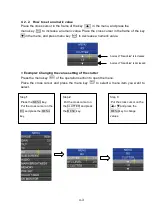
Page 23: ...he value setting of the clutter Press the menu key of the operation section to open the menu Place the cross cursor and press the menu key to select a menu item you want to select Step 1 Press the MEN...

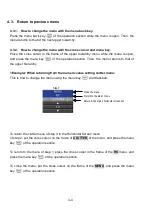
Page 24: ...hierarchy Example When returning from the numeric value setting clutter menu This is how to change the menu using the menu key and trackball To return the clutter menu of step 3 to the Horizontal Scre...

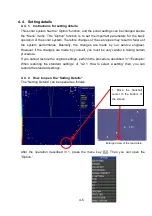
Page 25: ...e by our service engineer However if the changes are made by yourself you must be very careful in taking certain procedure If you cannot restore the original settings perform the procedure described i...

Page 26: ......

Page 27: ...set menu items To check the preset menu items press the menu key of the operation section to open the menu and select Preset Preset menus To register these preset menu items as shortcuts there are two...

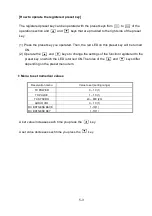
Page 28: ...ion you want to register with the cursor and press a key from the preset keys to of the operation section to register the function When the registration is completed the registered preset key appears...

Page 29: ...turned ON 2 Operate the and keys to change the settings of the function registered to the preset key on which the LED is turned ON The roles of the and keys differ depending on the preset menu item I...

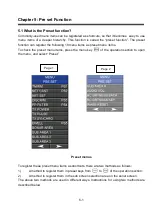
Page 30: ...Audio SUB AREA 1 Non Event Depth wind Shortcut 1 SUB AREA 2 Non Event Depth wind Shortcut 2 SUB AREA 3 Non Net info Event SUB AREA 4 Non Temp graph Current graph Event WAKE RESET Note 3 Each time you...

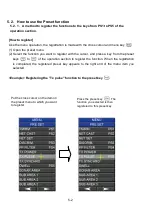
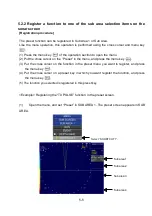
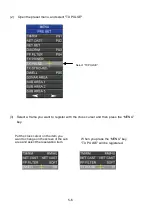
Page 31: ...cross cursor on the Preset in the menu and press the menu key 3 Put the cross cursor on the function in the preset menu you want to register and press the menu key 4 Put the cross cursor on a preset...

Page 32: ...ame you want to register with the cross cursor and then press the MENU key Put the cross cursor on the item you want to change on the screen of the sub area and select the reservation item When you pr...

Page 33: ...edium 1 Medium 2 Hard 1 Hard 2 TX POWER Any value from 0 to 10 can be set TX PULSE Any value from 1 to 10 can be set TX SYNCRO Internal External TX CYCLE Any value from 40 to 800 can be set SONAR AREA...

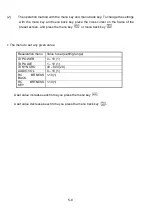
Page 34: ...he preset screen and press the menu key or menu back key I The menu to set any given value Reservation menu Value to set setting range TX POWER 0 10 1 TX PULSE 1 10 1 TX SYNCRO 40 800 20 AUDIO VOL 0 1...

Page 35: ...e Event Depth wind Shortcut 2 SUB AREA 3 None Net info Event SUB AREA 4 None Temp graph Current info Event WAKE RESET Whenever menu key or menu back key pushed the wake mark drawn on the scan image is...

Page 36: ...the ship turns as the ship changes its courses The reflected image of the fish school moves around on the screen relative to the movement of the ship 3 TM CU In this mode the top of the screen always...

Page 37: ...of the ship c To erase the red flag press again the preset key in which NET CAST is registered Note This operation is enabled only while the red LED on the registered preset key is turned OFF If this...

Page 38: ...ered The ring mark then appears on the screen c To erase the ring mark press the preset key again in which the NET SET is registered Note This operation is enabled only while the red LED on the regist...

Page 39: ...can be set in the OPTION VALUE SET or NET LENGTH The net length can be set in the range of 0 to 2000 m in increments of 50 m The size of the ring mark is the same as the circle having the circumferen...

Page 40: ...elimination will be the strongest If you use a filter of higher performance for eliminating the noise the smoothness of the images may deteriorate so it is recommended to use the SOFT under normal con...

Page 41: ...us for these SUB AREA 5 3 15 AUDIO VOL You can adjust the AUDIO VOL When you set the volume to 0 no audible sound can be heard When you set the volume to 10 the audible sound will be at its loudest 5...

Page 42: ...l drawn wake mark back again Operation Procedure When this function is used after it is registered in the two touch key on the remote controller a Register WAKE RESET function to any preset keys of to...

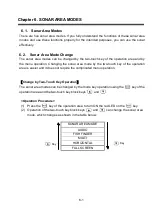
Page 43: ...the sonar area mode by the two touch key of the operation area is easier and it does not require the complicated menu operation Change by Two Touch Key Operation The sonar area modes can be changed b...

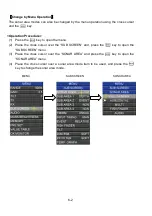
Page 44: ...ress the key to open the menu 2 Place the cross cursor over the SUB SCREEN and press the key to open the SUB SCREEN menu 3 Place the cross cursor over the SONAR AREA and press the key to open the SONA...

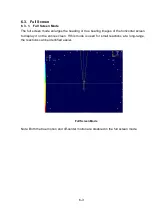
Page 45: ...g or true bearing images of the horizontal screen to display it on the entire screen If this mode is used for small reactions at a long range the reactions can be identified easier Note Both the true...

Page 46: ...ng the cross cursor to anywhere on the screen and pressing the key or the key of the operation area Adjustment by Menu Operation The gain can be adjusted by the menu operation using the cross cursor a...

Page 47: ...rsor to anywhere on the screen and pressing the key or the key of the operation area Adjustment by Menu Operation The tilt can be adjusted by the menu operation using the cross cursor and the key Oper...

Page 48: ...re on the screen and pressing the and keys of the operation area Adjustment by Menu Operation The range can be adjusted by the menu operation using the cross cursor and menu key When changing the rang...

Page 49: ...6 7 6 4 Horizontal Screen 6 4 1 Horizontal Screen Mode The horizontal screen mode displays a 360 degree horizontal image Sub Screen 1 Sub Screen 2 Sub Screen 3 Sub Screen 4...

Page 50: ...the menu operation using the cross cursor and the key For more details refer to 6 3 2 6 4 3 Tilt Adjustment The tilt in the horizontal screen mode can be adjusted by the tilt key operation using the...

Page 51: ...ion using the cross cursor and the key Adjustment by Range Key Operation The range in the horizontal screen mode can be adjusted by moving the cross cursor to anywhere on the screen and pressing the a...

Page 52: ...can be displayed in the lower part of the screen starting from the left to the right Up to four multiple screens can be displays at a time and fifth sub screen of the multiple screens renews the olde...

Page 53: ...sub screen input setting renewing timing of the multiple screens can be changed The timing can be selected from five 5 input settings MANUAL AUTO 2 4 and 8 Operation Procedure 1 Press the key to open...

Page 54: ...screen of multiple screens is displayed AUTO A sub screen of multiple screens is renewed each time the area with the set mark is transmitted 2 4 8 These figures decide transmission times of the area w...

Page 55: ...lt Selection 1 Press the key to open the menu 2 Place the cross cursor over the SUB SCREEN and press the key to open the SUB SCREEN menu 3 Place the cross cursor over the TILT and press the key to ope...

Page 56: ...ormed This is also for changing an angle set by the auto tilt mode each time the transmission is performed For example when the tilt is 0 and 2 in the auto tilt mode the tilt continually changes each...

Page 57: ...isplayed with a sonar image on the same screen At a place that is too small to install both the sonar and fish finder this function is useful to view images of the sonar and fish finder simultaneously...

Page 58: ...ey Adjustment by Menu Operation The gain can be adjusted by the menu operation using the cross cursor and the key Operation Procedure 1 Press the key to open the menu 2 Place the cross cursor over the...

Page 59: ...or the key Adjustment by Menu Operation The range can be adjusted by the menu operation using the cross cursor and the key Operation Procedure 1 Press the key to open the menu 2 Place the cross curso...

Page 60: ...ode can be used for viewing the history of fish movement 6 7 2 Audio Bearing Change The audio bearing can be changed by pressing the key or the key of the operation area It can be changed in all 360 d...

Page 61: ...dth is used to change the cut area of the audio image Operation Procedure 1 Press the key to open the menu 2 Place the cross cursor over the AUDIO and press the key to open the AUDIO menu 3 Place the...

Page 62: ......

Page 63: ...7 1 Chapter 7 Operation and Maintenance of the Hoisting System 7 1 Each part of Hoist unit M 97 Note The dimension is for hoist unit LL size...

Page 64: ...e upper and lower limits of the hoisting operation The hoisting operation stops when this switch is turned ON 7 Guide ring It reduces the load on the hoist pipe caused by movement resistance or ibrati...

Page 65: ...is connected only for the half round system 3 An inclinometer is installed in the systems that have the stabilize function Electromagnetic Switch for Hoisting Operation Thermal Relay 1 Inclinometer 3...

Page 66: ...ctual display may differ slightly Upper Limit Lower Limit HOIST 00 HEX 7F HEX Right Limit Center Limit Left Limit BEARING F8 HEX 00 HEX 08 HEX 0 deg 90 deg TILT 00 DEC 90 DEC 20 deg 0 deg 20 deg ROLL...

Page 67: ...s reached its limit E 00 01 A code setting error of the rotary switch the combination of the type and the stroke of the hoist unit is not correct E 00 02 Communication is established because the compu...

Page 68: ...Note If the emergency stop button is pressed in AUTO operation hoisting operation stops To restart the hoisting operation re press the up down switch of the indicator In MANU operation if the emergen...

Page 69: ...ge hoist part moves up and down when inserting the handle to the handle guide hole of the upper lead screw and turn to the right or the left Turn the handle until the hoist reaches the desired positio...

Page 70: ...7 8...

Page 71: ...n 6 1 2 Greasing the hoist unit 3 9 1 Apply grease once a month to the circled areas shown in the figure to the left Remove old grease before applying new grease If the hoist unit will not be in use f...

Page 72: ...from the position mentioned in b by approx 10 cm keep pressing the UP switch and at the same time activate the upper limit switch by hand to confirm that the hoist stops ascending Similarly lower the...

Page 73: ...er to C below A The hoist does not ascend or descend when the UP or DOWN switch is pressed 6 Is the upper or lower limit switch malfunctioning can the click sound be heard when pushed by hand Adjust t...

Page 74: ...ch is activated and the motor is stopped similarly when the hoisting pipe descends the lower limit switch is activated and the motor is stopped 2 Mounted positions Two positions at the upper side and...

Page 75: ...le to the ship s bottom shall be not larger than the outside diameter of the skirt 5 mm The distortion caused by the welding of the skirt to the ship s bottom shall be 2 mm 1 3 Adjustment of the gap b...

Page 76: ...in manual and electronic operation is smooth With the transducer protruding downward from the boat s bottom push the transducer in a horizontal direction using your hand and check that its looseness...

Page 77: ...also available A mouse track ball can be connected to the connector panel of the processor Note Your mouse track ball can be connected to the processor however additional wiring work is required if t...

Page 78: ...ble tilt adjustment that can be performed with the wheel 1 Move the cross cursor to the bottom of the screen and press RC 17 menu key to open the Option 2 Position the cross cursor over the Basic Opti...

Page 79: ...8 3 8 1 2 Tilt Adjustment Method The tilt can be adjusted upward and downward by moving the wheel backward and forward as shown below Tilt Upward Adjustment Tilt Downward Adjustment...

Page 80: ...etting How to enable the event display function that can be performed by the button operation 1 Move the cross cursor to the bottom of the scrren and press RC 17 menu key to open the Option 2 Position...

Page 81: ...ay the Event press the right button to display the Event and press the wheel button to display the Event These Events cannot be deleted by the mouse track ball Use the event delete key of the RC 17 Op...

Page 82: ...nu key of RC 17 can display the Event and pressing the right button or the menu back key of RC 17 can display the Event Note that the menu operation is disabled How to open the menu 1 Position the cro...

Page 83: ...Vertical Single Screen Vertical Dual Screen and Expanded Vertical Screen Audio Screen Sonar Screen Position the cross cursor inside these areas and press the left button of the mouse trackball or the...

Page 84: ...en the Option menu in the full screen display 1 Move the cross cursor to the bottom right edge of the display area 2 Press the left button of the mouse track ball or the menu key of RC 17 to open the...

Page 85: ......

Page 86: ......

Page 87: ......

Page 88: ......

Page 89: ......

Page 90: ......

Page 91: ......

Page 92: ......

Page 93: ......

Page 94: ......

Page 95: ......

Page 96: ......

Page 97: ......

Page 98: ......

Page 99: ......

Page 100: ......

Page 101: ......

Page 102: ......

Reviews: