1-7
CCU-TX7 (E)/V1
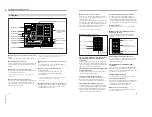
WHITE AUTO/PRE/MANUAL (white balance
auto/preset/manual) switch
Use this switch to select the white balance adjustment
mode. This switch does not function while the ATW
function is being used (while the ATW button is lit).
AUTO: This sets auto adjustment mode. It enables
the white balance to be automatically adjusted
using the WHITE/BLACK switch.
(When a DXC-637 series video camera is
connected: this also sets auto adjustment mode
for the black balance. The black balance can be
automatically adjusted even while the ATW
function is being used.)
PRE: This sets preset mode. The white balance is
maintained at the preset value.
(When a DXC-637 series video camera is
connected: this also sets auto adjustment mode
for the black balance. The black balance can be
automatically adjusted even while the ATW
function is being used.)
MANUAL: Sets manual adjustment mode. It
enables the white balance to be manually adjusted
using the WHITE knob (red) and WHITE knob
(blue).
(When a DXC-637 series video camera is
connected: this also sets manual adjustment mode
for the black balance. The black balance can be
adjusted manually even while the ATW function
is being used.)
ATW (auto tracing white balance) button
Press this button (which lights up when pressed) to
have the white balance adjusted automatically when
lighting conditions change.
BLACK (black balance) knob (red)
When the BLACK AUTO/MANUAL switch is set to
MANUAL, this knob can be used to adjust the black
level of the R signal.
BLACK (black balance) knob (blue)
When the BLACK AUTO/MANUAL switch is set to
MANUAL, this knob can be used to adjust the black
level of the B signal.
WHITE (white balance) knob (red)
When the WHITE AUTO/PRE/MANUAL switch is
set to MANUAL, this knob can be used to adjust the
gain of the R signal.
WHITE (white balance) knob (blue)
When the WHITE AUTO/PRE/MANUAL switch is
set to MANUAL, this knob can be used to adjust the
gain of the B signal.
5
KNEE switch
Use this switch to adjust the knee setting.
AUTO: Knee is automatically adjusted
PRESET: Knee is adjusted to preset value
6
MASTER BLACK knob
This adjusts the master black (master pedestal level)
setting. The click position of the knob provides a
typical setting.
7
GAIN switch
Use this switch to set any of three video amp gain
levels (HIGH, MID, or LOW). The gain value
corresponding to these levels can be set using a menu
on the video camera.
8
TLCS (total level control system) switch
Press this switch to turn the total level control system
on or off. The switch lights when it is turned on. When
this switch is on, settings made with the GAIN switch
and SHUTTER switch are ignored.
(This function cannot be used when a DXC-637 series
video camera is connected.)
9
M. GAMMA (master gamma) knob
Use this knob to adjust the gamma curve. The click
position of the knob provides a typical setting.
(This function cannot be used when a DXC-637 series
video camera is connected.)
0
SKIN DETAIL switch
Use this switch to turn the skin detail correction
function on or off.
(This function cannot be used when a DXC-637 series
video camera is connected.)
!¡
DETAIL knob
Use this knob to adjust the detail level. The click
position of the know proides a typical setting.
12
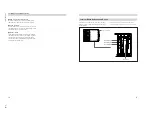
Location and Function of Parts
!™
IRIS control section
IRIS AUTO/MANUAL switch
Use this switch to select between AUTO and
MANUAL iris adjustment modes. Be sure that the
IRIS switch on the video camera is set to AUTO.
AUTO: Iris is automatically adjusted.
MANUAL: Iris is adjusted with the iris adjustment
knob.
Iris adjustment knob
When the IRIS AUTO/MANUAL switch is set to
MANUAL, this knob can be used to manually adjust
the iris.
When the IRIS AUTO/MANUAL switch is set to
AUTO, this knob can be used to manually fine-tune
the automatic iris adjustment.
IRIS
AUTO
MANUAL
IRIS AUTO/MANUAL switch
Iris adjustment knob
!£
DIP switch
Use the four switches numbered 1 to 4 to make the
following settings.
No.1 OFF/No.2 OFF Standard color matrix setting
(This setting has no effect when a
DXC-D30 series video camera is
connected.)
No.1 ON/No.2 OFF
No.1 OFF/No.2 ON
Color matrix set for fluorescent
lighting (FL).
(This setting has no effect when a
DXC-D30 series video camera is
connected.)
No.1 ON/No.2 ON
Color matrix set for color emphasis
(H.SAT).
(This setting has no effect when a
DXC-D30 series video camera is
connected.)
No.3 ON
EVS function set on for the shutter.
(Has priority over the SHUTTER
switch setting on the camera
operation unit.)
No.4 ON
Date and time display set on for the
output picture.
13


