SOMFY Chronis Smart RTS Operating And Installation Manual Download Page 4

Copyright © 2008 Somfy SAS. All rights reserved.

2.2 Operating

Somfy recommends that at least one control point is located close to the product or group of 


-

products. 
Do not allow children to play with the 

 xed control points. Keep remote controls out of the reach 


-

of children.
Monitor the product (especially roller shutter/awning/garage door/gate) while it is moving, espe-


-

cially during commissioning of the Chronis Smart RTS, and keep people at a distance until the 

product is completely closed.
Make sure the power supply to the product is turned off before any maintenance operation in the 


-

vicinity of the product (for example, when cleaning windows near your awning).
Avoid  moving  the  product  if  ice  has  formed  in  it,  unless  the  motor  is 

 tted  with  anti-freeze 


-

protection.
Do not immerse or soak the Chronis Smart RTS in any liquid.


-

Only use maintenance products recommended by Somfy.


-

Frequently check the product (e.g. awning) to detect any defects in balance or any signs of 


-

wear. Do not use the product if a repair or adjustment is required.

2.3 Environment

Damaged electrical or electronic products, such as used batteries, should not be disposed of with 

household waste. Please take them to a collection point or an approved centre to ensure they 

are recycled correctly.

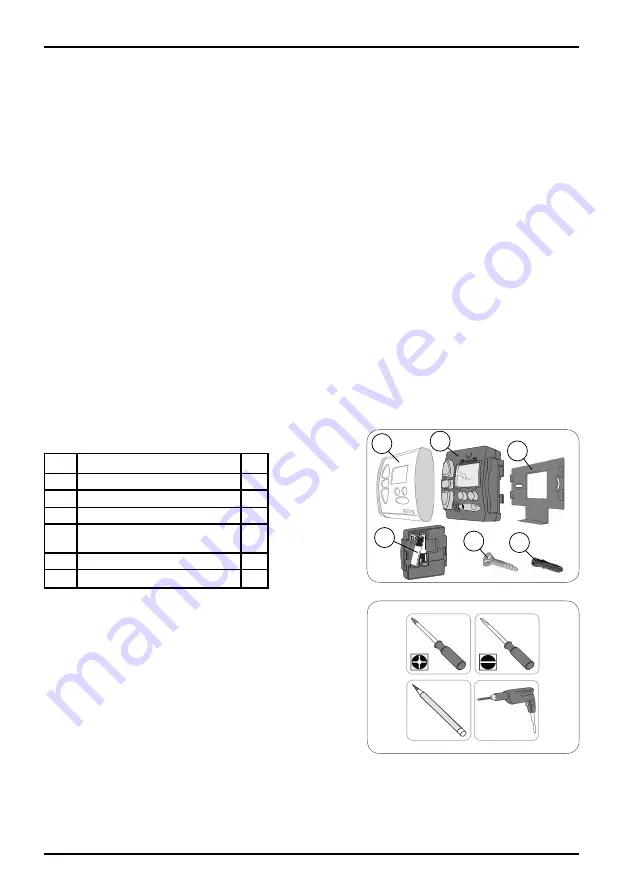
3. Content of the kit and tools required

3.1 List of parts

Before starting installation and commissioning of the Chronis Smart RTS, check that all parts 
listed in the table below are present in the correct quan-

tity (Q):

No.

Components

Q.

1

Front cover

1

2

Timer

1

3

Wall support

1

4

Battery: 1.5 V DC (type AAA 

LR03)

2

5

M3 x 20 mm screw

2

6

6 mm plug 

2

3.2 Tools required

•  Appropriate screwdriver for the screws to be used

Insulated 

 athead electricians screwdriver

• 

Drill and drill bit

• 

Pencil

• 

Chronis Smart RTS

4

3

5

1

2

4

6

Summary of Contents for Chronis Smart RTS

Page 1: ...www somfy com Chronis Smart RTS Operating and installation guide Ref 5054476A ...

Page 2: ... point 7 6 3 Point with Up STOP Down buttons 9 6 4 Timer 10 6 5 Situo control point 11 6 6 Telis 1 RTS Telis Soliris RTS remote controls 12 6 7 Telis 4 RTS Telis 4 Soliris RTS remote controls 13 7 Replacing a lost or broken control point 13 7 1 Sole control point lost or broken 13 7 2 One lost or broken control point amongst others 13 8 Mounting the Chronis Smart RTS 14 8 1 Before mounting the Chr...

Page 3: ...ed times For example the Chronis Smart RTS may open the roller shutters at 7 30 in the morning during the week and at 10 00 on a Sunday The Chronis Smart RTS also enables automatic closing as soon as it gets dark even if there is nobody at home Any linked products can also be opened and closed manually from the Chronis Smart RTS The Chronis Smart RTS is used as an individual control to control a s...

Page 4: ...the Chronis Smart RTS in any liquid Only use maintenance products recommended by Somfy Frequently check the product e g awning to detect any defects in balance or any signs of wear Do not use the product if a repair or adjustment is required 2 3 Environment Damaged electrical or electronic products such as used batteries should not be disposed of with household waste Please take them to a collecti...

Page 5: ...TS 5 1 Turning the Chronis Smart RTS on If the front cover 1 of the Chronis Smart RTS is fitted to the timer Gently press the up and down buttons never press the screen to release the timer from the front cover Take the timer 2 and turn it over Remove the plastic strip preventing battery contact The standard display appears The time shows 0 00 5 2 Setting the current time and date 5 2 1 Setting the...

Page 6: ...al control point 6 1 1 Installation recommendations To add a Chronis Smart RTS use the control point linked to the product which only controls this product pressing the Up or Down button only causes movement of the product to which the new Chronis Smart RTS must be linked Caution If there is no longer a control point linked to the product all the control points are broken or have been lost contact...

Page 7: ... 6 7 6 2 One touch point Move close to the product to install the new Chronis Smart RTS 6 2 1 Identifying the model Check that the original control point has an elongated button Bring the product to the midway position Remove the front cover from the one touch point One touch point with a white and grey front cover Gently remove the front cover with a flat pointed tool such as a flathead screwdriver...

Page 8: ...One touch point with a white and grey front cover Insert the mounting lugs into their notches on one side of the front cover Press on the other side until it clicks to fix the front cover in its bracket One touch point with a white front cover Refit the front cover on its bracket Model B Remove the battery from the original control point using a flathead screwdriver Press on the centre section of the...

Page 9: ...utton is located next to the battery b Caution If after removing the front cover no PROG button is found this means that the control point is not compatible the Chronis Smart RTS cannot be linked to the product 6 3 2 Adding the Chronis Smart RTS Switch the mains power supply back on or reconnect the battery to the motor Press the PROG button b on the original control point until the product moves ...

Page 10: ...n this location If one or more products do not move move the Chronis Smart RTS and check the operation If it still does not work refer to Problems with the Chronis Smart RTS 8 2 Mounting and fitting Mount the wall bracket 3 Place the bracket against the wall with the retaining bracket at the bottom Mark the two holes with a pencil The two holes must be 50 mm apart and horizon tally aligned Drill th...

Page 11: ...grammed times By default opening is set to 07 30 during the week and 08 00 on weekends Closing is set for sunset Cosmic mode 9 1 2 Mode without Program Timer In this mode the Chronis Smart RTS is used as a control point with Up STOP Down buttons Automatic control of the products is deactivated Caution The Chronis Smart RTS only operates in manual mode and all program timer functions are inhibited ...

Page 12: ...the lowered closed position To move from the up to the down direction and vice versa it is not necessary to press the Stop button B Operating mode for venetian blinds The default operation for the Chronis Smart RTS is standard and is intended for roller shutters in particular To enable the adjustable slats on venetian blinds inte rior or exterior to be controlled a parameter must be changed For fu...

Page 13: ...ith identical specifications placing the in the direction indicated on the base of the housing Replace the timer 2 on the wall bracket 3 with the screen located above the Menu and Sub menu buttons Slide the timer downwards into the guide rails until it reaches the retaining plate Refit the front cover Insert the front cover on the timer allowing the buttons to come through their housings Fit the fro...

Page 14: ...ted during the week see paragraph 10 4 5 deactivated for one or more days during the week see paragraph 10 4 6 based on the same set time every day or different depending on the day of the week with a maximum random difference of or 15 minutes controlled by the vacation mode see paragraph 10 5 1 What is the Cosmic mode The Cosmic mode is programmed to coincide with nightfall between 16 30 and 21 3...

Page 15: ... menu button All days of the week 1234567 flash The programmed time flashes Press the button to set the time The opening time is changed for all days of the week Note Once time has been changed the Chronis Smart RTS remembers the change even if the sub menu button is not used to confirm so if an incorrect time has been entered the process must be started again Press the Sub menu button several times ...

Page 16: ... button to return to the standard display 10 3 3 No automatic opening for the week This program enables automatic opening of the product to be deactivated for the week On the standard display press the menu button until CLOC is displayed Press the Menu button several times to select the Opening time parameter UP is displayed Press the Sub menu button All days of the week 1234567 flash The programme...

Page 17: ...ween 23 59 and 00 00 OFF is displayed Automatic opening of the product is deactivated for that day Note Once time has been changed the Chronis Smart RTS remembers the change even if the sub menu button is not used to confirm so if an incorrect time has been entered the process must be started again Press the Sub menu button several times to return to the UP display and confirm the settings The progr...

Page 18: ...ode Press the Menu button to return to the standard display 10 4 2 Cosmic mode with programmed time difference This program enables the product to be automatically closed in Cosmic mode with a time difference in rela tion to the pre set time The Cosmic mode only applies to a full week so the programmed time difference will be applied to every day of the week On the standard display press the menu ...

Page 19: ...e set time during the week On the standard display press the menu button until CLOC is displayed Press the Menu button several times to select the Closing time parameter dn is displayed Caution The closing time may be set following setting of the opening time FROM the UP display press the Menu button to display dn Press the Sub menu button tImE flashes program timer mode is activated If COS flashes ...

Page 20: ...234567 flash The programmed time flashes Press the Sub menu button to select the day of the week for which the closing time is to be changed for example Tuesday Number 1 which corresponds to Monday flashes The programmed time flashes EACH time the Sub menu button is pressed briefly the number of the following day flashes as well as the time which can then be set Number 2 Tuesday flashes The programmed ti...

Page 21: ... been changed the Chronis Smart RTS remembers the change even if the sub menu button is not used to confirm so if an incorrect time has been entered the process must be started again Press the Sub menu button several times to return to the dn display and confirm the settings OFF is displayed instead of the time Press the Menu button to return to the standard display 10 4 6 No automatic closing on ce...

Page 22: ...tarted again Press the Sub menu button several times to return to the dn display and confirm the settings The programmed time for the current day is displayed ti dn 2000 t ti 1 2 3 4 5 6 7 1432 27 t 21 S 3 2000 t ti 1 dn 27 t 21 Programmed time for the current day Timer mode Time deactivated 2000 t ti 2 Day to be deactivated Chronis Smart RTS 26 Press the Menu button to return to the standard displ...

Page 23: ...agraph Replacing the battery The product does not make a brief movement or does not emit any beeps Contact the Somfy assistance service The new Chronis Smart RTS cannot be used after following the procedure step by step The Chronis Smart RTS is too far away from the product s to be controlled Move the Chronis Smart RTS near to the product and press a button If the Chronis Smart RTS still does not ...

Page 24: ...stems Inc Tel 1 0 609 395 1300 Website www somfy com nam index cfm language en us Where to find us Somfy SAS capital 20 000 000 Euros RCS Bonneville 303 970 230 04 2008 Somfy hereby declares that this product conforms to the essential requirements and other relevant provisions of Directive 1999 5 CE A Declaration of Conformity is available at www somfy com ce For use in the European Union the Swiss...

Reviews: