18
Removing the oven door
Important!
Switch the oven off at the isolating switch
before removing the door.
•
Do not lift the oven door by its handle. Doing so may
damage the door.
•
Make sure the oven and the door are cool before you
begin to remove the door.
•
Before removing the door, make sure there is a large
enough clear, protected surface in the kitchen to rest
the door on.
•
Take care, the oven door is heavy!
Proceed as follows:
•
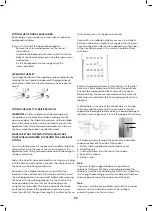
Open the door to the full extent (Fig. 1);
•
Open the lever A completely on the left and right side
hinges (Fig. 2);
•
Hold the door in position as shown (Fig. 3);
•
Gently close the door until left and right hinge levers
A are hooked to part B of the door (Fig. 4);
Fig. 1
Fig. 2
Fig. 3
Fig. 4
Removing the chrome side racks
Important!
Switch the oven off at the isolating switch
before removing the side racks.
•
Ensure that the oven has completely cooled down
before starting.
•
Open the oven door.
•
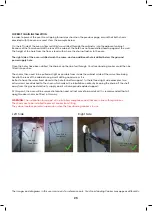
Remove all shelves for either the oven (Fig. 5)
•
Slightly squeeze the bottom two row of the runner
under the screw (Fig. 6).
•
Whilst squeezing the bottom two rows, pull the runner
away from the side of the oven chamber (Fig. 6).
•
To refit the runners follow these steps in reverse order.
Fig. 5
Fig. 6
18 page
•
•
•
•
how to remove the door
Unhooking the doors.
For a more thorough clean,you have to remove the oven door.Choose the removal and assemble
method according to different structure of oven door purchased.
Proceed as follows:
Open the door to the full extent (Fig.1);
Open the lever A completely on the left and right hinge (Fig.2);
Hold the door as shown (Fig.3);
Gently close the door until left and right hinge levers A are hooked to part B of the door (Dig.4);
Fig.1
Fig.2
Fig.3
Fig.4
A
B
Reassemble the door by following the above procedures backwards.
How to remove the side racks
18 page
1.
2.
Open the oven door.
To fit the runners follow the steps in reverse order.
Check the oven is cool and switched off.
3.
Remove all shelves for either the oven (Fig. 8.3)
4.
Slightly squeeze the bottom two row of the runner
under the screw. The oven (Fig. 8.4)
5.
Whilst squeezing the bottom two row, pull the runner
away from the side of the oven chamber (Fig. 8.4).
6.
Fig. 8.3
Fig. 8.4
Cleaning & Maintenance (Continued)


