background image

11 


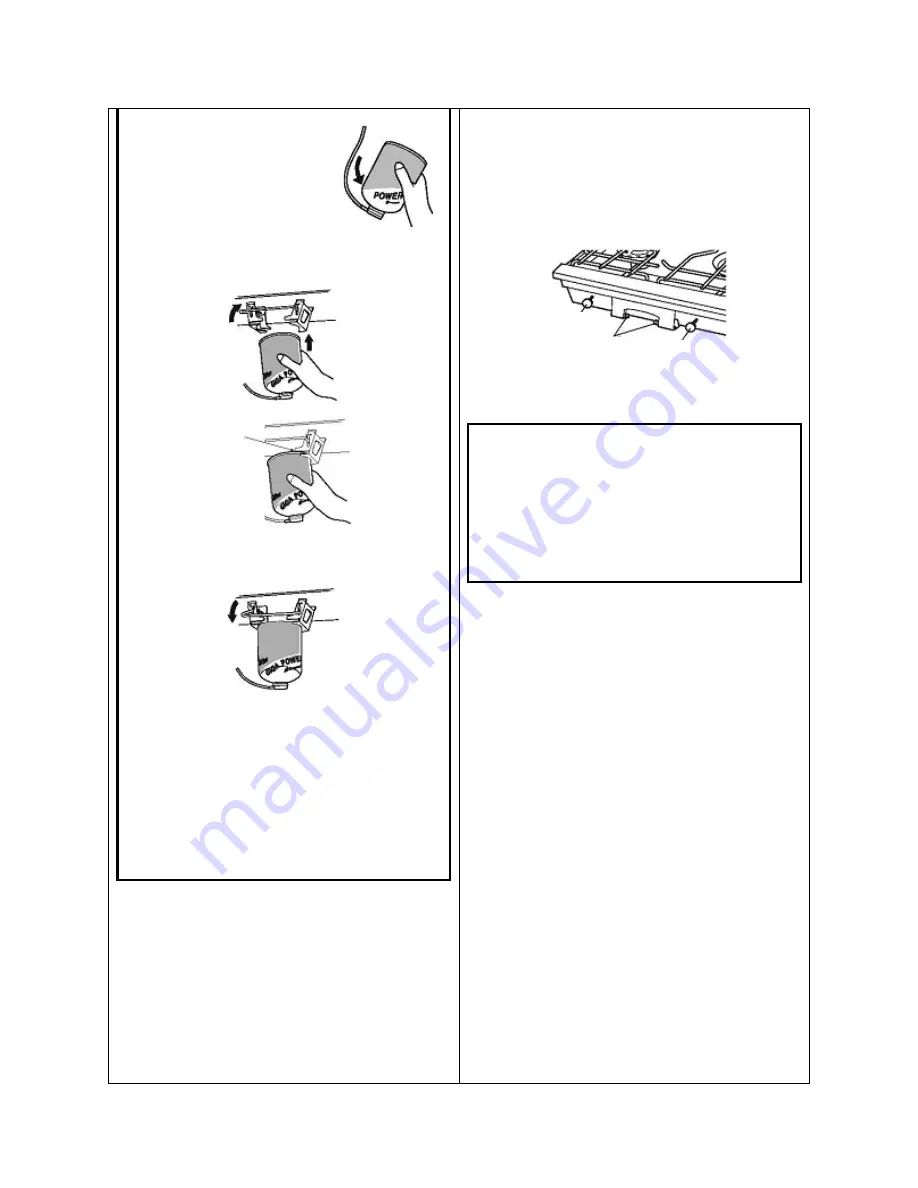
(3)  Slowly  turn  the  fuel  canister 
connected  to  the  connection  tube 
upside down. 


(4) Gently press the bottom of the fuel canister into the lock 
arms. 


(5)  Finally,  lower  the lock  bar  into  the  lower  ends of  the 
arm slits to lock the fuel canister into place. 


If the connection tube is twisted after the fuel canister has 
been locked into place, rotate the canister until the twist is 
gone. 
 
(6)  To  detach  a  fuel  canister,  confirm  that  the  entire 
assemblage  has  sufficiently  cooled  down  after  the  flame 
has  been  extinguished,  and  then  follow  the  above 
procedure in reverse. 
The canister and arm may wobble, but are structured such 
that the canister will not fall. 


6. Ignition and adjusting and extinguishing the flame 
 
(1) Ignition 
Confirm that the auto-igniters are discharging properly two to 
three times. 
Slowly  turn  the  heat  adjustment  knobs  counterclockwise  (to 
the  left,  when  viewed  from  the  front),  and  press  the  auto-
igniter buttons after discharging a small amount of gas. 


Slightly rotate the heat adjustment knobs to discharge a small 
amount of gas, allowing for smooth ignition. 
 

For GS-230 

 
If  there  is  no  ignition  after  more  than  two  seconds 
following  gas  discharge,  stop  using  the  auto-igniters  and 
allow to ventilate until there is no odor of gas. 
We recommend using a long lighter if the auto-igniters are 
not working well. 
Caution is particularly needed in igniting the GS-230, since 
the fuel is discharged in liquid form. 


If using a lighter or matches, only rotate the  heat adjustment 
knobs after ignition. If ignition is not working,  briefly rotate 
the heat adjustment knobs clockwise to turn the gas off. 
If you try to ignite the flame with gas still turned on, a large 
flame could be generated. 
 
CAUTION:  Always ignite from  the LO setting. The internal 
pressure  of  the  fuel  canister  can  increase,  particularly  in  hot 
environments, which can generate a large flame immediately 
after ignition. If this happens, temporarily extinguish the flame 
and either allow the canister to cool down or replace it with a 
cool canister before igniting again from the LO setting. 
CAUTION:  Ensure  that  there  are  no  easily  combustible 
objects in the vicinity when igniting. 
Do not place your face or hands over the burner heads. 
The auto-igniters may not work properly in certain weather or 
moisture conditions, or in high-altitude regions. Always bring 
matches or a lighter, just in case. 


Press 

Heat adjustment knob 

Heat adjustment knob 

Auto-igniter 

Summary of Contents for GigaPower GS-220

Page 1: ...r Double Burner Stove Liquid Injection GS 230 Instructions and precautions that are specific to this product are displayed in boxes outlined with thick solid lines like this GigaPower Double Burner St...

Page 2: ...GS 230 Turning the canister upside down results in the liquefied petroleum gas inside being injected as is in liquid form for combustion Unlike devices designed to extract and combust the fuel in gas...

Page 3: ...ted High Power Designated Exclusive Snow Peak Products GigaPower Gas 500 Iso Fuel GP 500 White background with silver band GigaPower Gas 500 ProIso Fuel GP 500G White background with gold band Please...

Page 4: ...RNING For GS 230 Attachment and detachment of the fuel canister is done in an upright connector on top vertical position Never overtighten Liquid remaining in the valve will release when the canister...

Page 5: ...oss multiple stoves Reason If one large cooking tray or pot is heated on multiple stoves the whole assemblage will become extremely hot due to the combined radiant heat causing the stoves and fuel can...

Page 6: ...ter for a long period of time or are moving the stove detach the canister and place the cap on it Reason The heat adjustment knobs on the front of the unit may be accidentally turned on causing a gas...

Page 7: ...ed with precision Modifying them will not only decrease their performance but could also lead to incomplete combustion or gas leakage Consult the store where you purchased this product or Snow Peak re...

Page 8: ...t Double burner main unit Trivet 2 Stand 2 Cover with windscreen Fuel canister valve shield Cover Trivet Stand Auto igniter Heat adjustment knob Stand Fuel canister valve shield Lock spring Trivet Sto...

Page 9: ...sides You can easily remove them by gently pulling them outwards 2 Attaching the stands 1 Remove the trivets stored inside the stove The trivets are detached from the stove There is the risk of the t...

Page 10: ...mage 1 Turn the heat adjustment knobs on the front of the unit clockwise to close the gas valves 2 Detach the connection tube stored on the back surface by releasing it from the hook and rotating the...

Page 11: ...ur hands 4 To detach a fuel canister follow the above procedure in reverse 5 Attaching and detaching the fuel canister and the stove GS 230 Only use designated exclusive Snow Peak fuel canisters Do no...

Page 12: ...r more than two seconds following gas discharge stop using the auto igniters and allow to ventilate until there is no odor of gas We recommend using a long lighter if the auto igniters are not working...

Page 13: ...the stove as well as incomplete combustion If you use a tray on trivets in the low position the protrusions on the trivet will cause tray instability 1 Set the trivets to the high position Remove one...

Page 14: ...ogged due to boil over etc can result in incomplete combustion If you are disassembling a burner head be careful not to twist the generator pipe GS 230 model or the end of the igniter If the generator...

Page 15: ...in low lying areas In the unlikely event that a gas leak occurs do not use until the area has been sufficiently ventilated 14 Remove the fuel canister when the stove is not being used 15 If the ignite...

Page 16: ...uish How to handle Attach the fuel canister according to the instruction manual Use exclusive Snow Peak fuel canisters Replace with a new fuel canister Request inspection Check the attachment of the f...

Page 17: ...BL Designated pot diameter 23cm or lower Volume 8 0L or lower GigaPower Standard Double Burner Stove GS 220 Materials Stainless steel anodized aluminum brass Size When stored 500 110 360mm with windsc...

Page 18: ...and additional damage 1 Turn the heat adjustment knobs on the front of the unit clockwise to close the gas valves 2 Detach the connection tube stored on the back surface by releasing the hook and rot...

Page 19: ...P 500S or GP 500BL CAUTION Always attach and detach fuel canisters only when they are in an upright position connector on top Snow Peak Inc 958 Sanganji Sanjo shi Niigata ken 955 8616 TEL 0256 38 1110...

Page 20: ...pinched while performing these tasks 1 Lower the lock bar and open the locks on the left and right Only open and close the lock with the lock bar Forcefully opening or closing the lock arm could preve...

Page 21: ...AUTION Hold the fuel canister tightly and do not let go when attaching or detaching The impact of a fall or the load on the connection tube from the weight of the fuel canister could cause damage Pres...

Reviews: