Visual Inspection Device
Snap-on
Visual Inspection Device
Snap-on
14
Snap-on
15
Snap-on
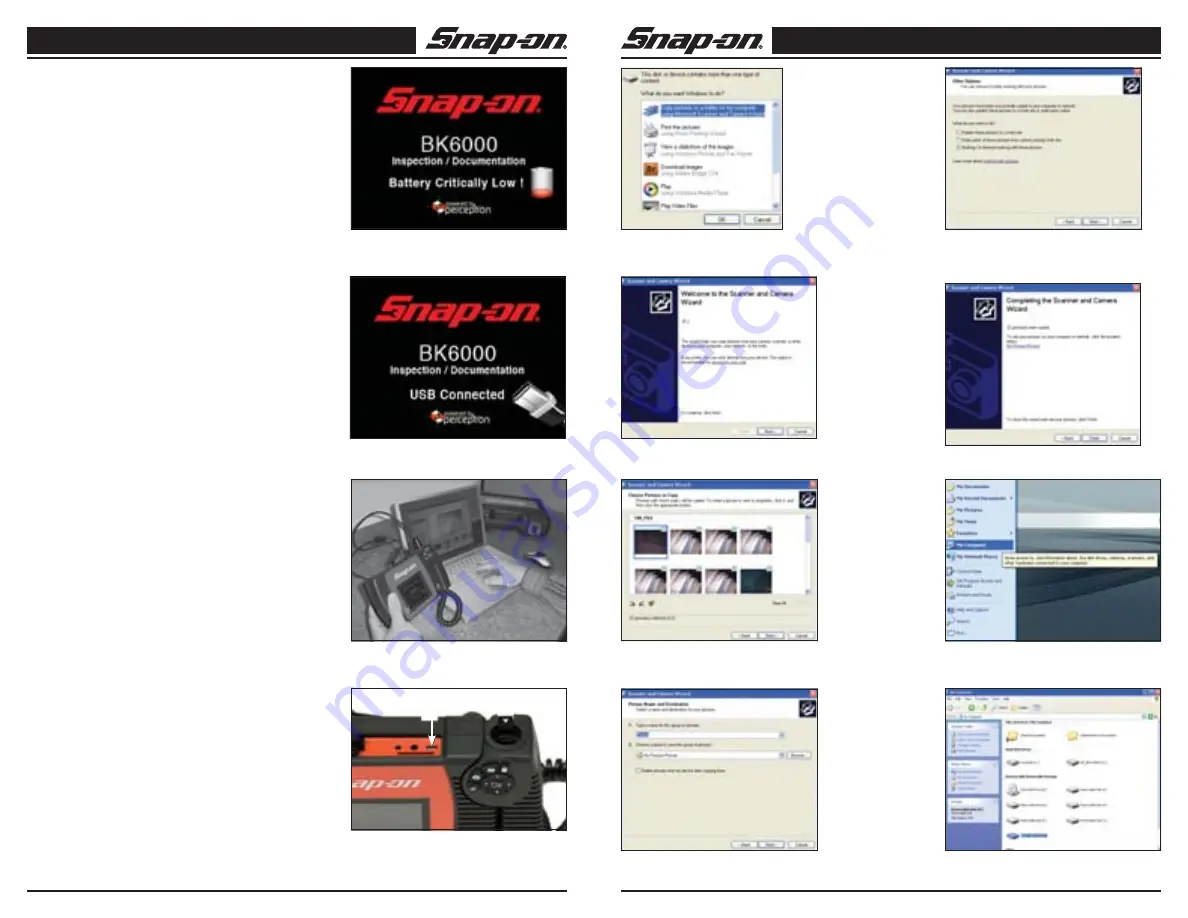
8. Fill in the name for this group of pictures and choose
a location to save the files (Fig. 44). To select an
alternate saving location, click “Browse” and select
a drive and folder. Press “Next”.
9. The pictures and the videos will save to the chosen
location.
10. Click “Next” when the screen shown in Figure 45 is
displayed.
11. Click “Finish” on the screen shown in Figure 46 to
finalize the saving process.
Manually Saving Images to Your Computer’s Hard
Drive.
1. Use the USB cable to connect the BK6000 to the
computer as shown in Figure 39.
2. Place the small side of the USB cable into the mini
USB port in BK6000 (Fig. 40), and the larger end
into an open USB port in your computer.
3. Turn the BK6000’s power ON.
4. A splash screen saying “USB Connected” will appear
on the BK6000’s screen.
5. Click on the “My Computer” icon on your desktop.
(Fig. 47)
6. Click on the new “Removable Storage Device.” (Fig.
48)
NOTE!
You may also delete content from the BK6000
from this screen. Use caution, as the contents will be
permanently removed. The BK6000 is equipped with in-
ternal storage but can be expanded by inserting an SD
card. SD cards can be purchased from your local elec-
tronics retailer. When you insert an SD card, the device
will automatically configure the card and present an icon
indicating that the card has been recognized and is ready
for storage.
7. Open the DCIM folder. (Fig. 49)
8. Open the 100_file folder. (Fig. 50)
9. Select the image you want by right clicking on it and
selecting copy from the drop-down menu. (Fig. 51)
10. Open a folder where you would like to save the
image.
11. Right click in that folder and press paste.
Transportation & Storage
1. Avoid exposing the unit to continuous vi
bration or
extreme hot and cold temper atures.
2. Always store the visual inspection device in doors in
the case it came with.
3. Always remove the batteries if the unit will not be
used for an extended period of time.
Figure 39 – Image Transfer
Figure 38 – USB Interface
Figure 40 – USB Port
USB port
Figure 41 — Copy Pictures Window
Figure 43 — Image Select Screen
Figure 42 — Scanner and Camera Wizard
Figure 44 – Save Location Window
Figure 45 – Other Option Window
Figure 47 – My Computer Icon
Figure 48 – Available Drive Window
Figure 46 – Finished Window
Figure 37 – Critical battery
Summary of Contents for BK6000
Page 1: ...User Manual Part ZBK6000 Visual Inspection Device BK6000 Video and Still Image Capture ...
Page 2: ...User Manual Part ZBK6000 Visual Inspection Device BK6000 Video and Still Image Capture ...
Page 11: ...Sichtprüfungsgerät BK6000 Video und Einzelbilderfassung ...
Page 58: ...Sichtprüfungsgerät BK6000 Video und Einzelbilderfassung ...


