Visual Inspection Device
Snap-on
Visual Inspection Device
Snap-on
8
Snap-on
9
Snap-on
Cleaning Instructions
Unplug charger before cleaning. Do not use any water
or chemicals to clean charger or batteries to reduce
the risk of electrical shock.
1. If present, remove charger from battery.
2. Remove any dirt or grease from the exterior of the
charger and battery pack with a cloth or soft non-
metallic brush.
Standard Equipment
The visual inspection device comes with the fol lowing
items, as shown in Figure 4:
1. Hand held display base and removable stylus
2. Imager head and cable
3. Accessories (Mirror and Magnet)
4. Hook
5. Charger
6. USB Cable
Assembly
NOTICE:
Be sure to read Battery Precautions section on
page 3.
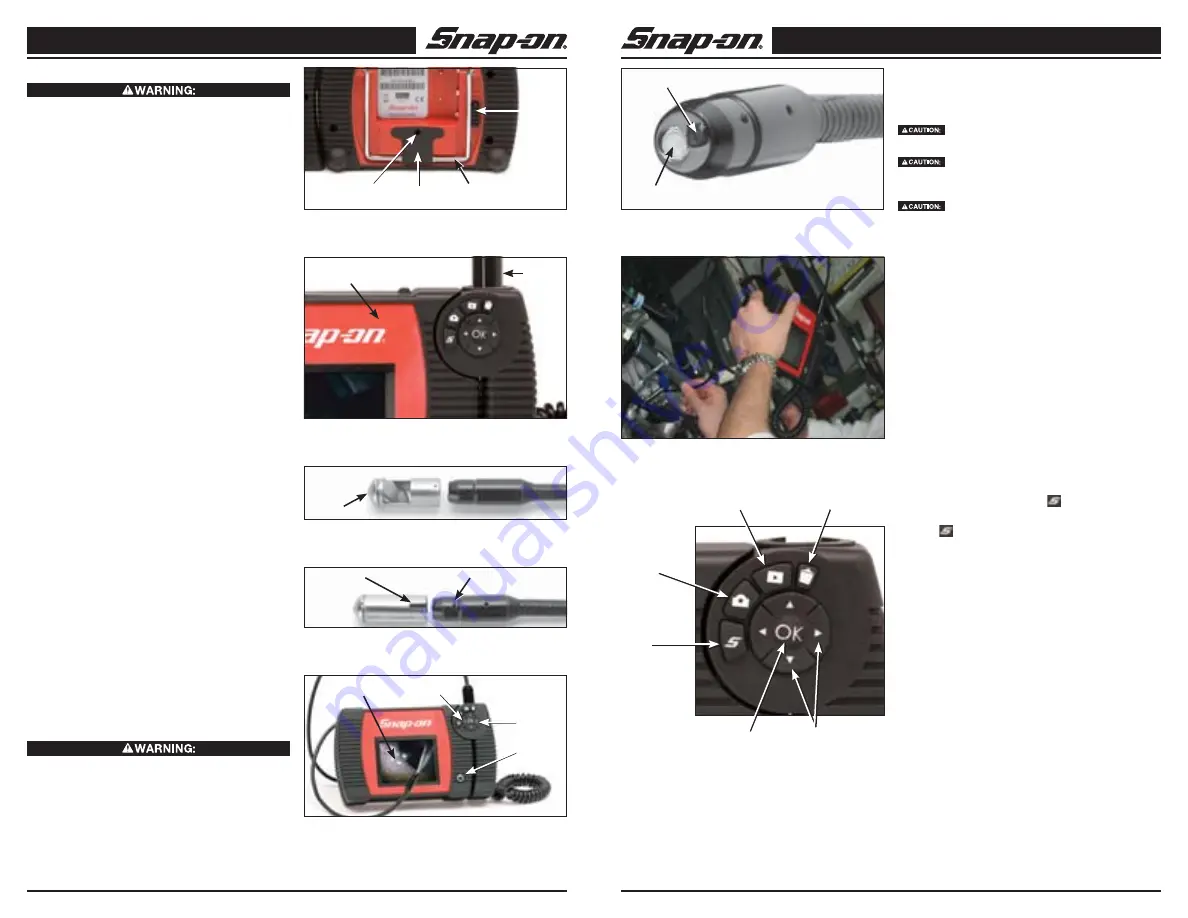
To Install Battery:
Confirm that the battery release (Fig. 5) is in the “down”
position. Line the battery pack up with the slots on the
left side of the battery window and insert into place. Push
down along the right edge of the battery until the release
is engaged, locking the battery in place. To remove the
battery, slide the release into the “down” position and re-
move the battery by pulling up and out.
To Connect the Cable to the Unit:
To connect the cable to the handheld unit, make sure the
keys and slots are properly aligned. Insert the cable into
the slots until it clicks into place (Fig. 6). If the cable does
not immediately click into place, simply realign the keys.
To remove the cable, push the release button in to re-
lease and pull out (Fig. 5).
To Install an Accessory:
The two included accessories, (mirror and magnet) (Fig.
4) attach to the imager head the same way.
To connect the mirror (Fig. 7), match up the slot in the
mirror (Fig. 8) with the boss on imager head and push
together to lock in place.
Tool and Work Area Set-Up
To prevent serious injury, proper set-up of the tool
and work area is required. The following procedures
should be followed:
1 Review General Safety Information sec tion of this
manual (Page 3).
2. Check work area for: adequate lighting,
fl
ammable
liquids, vapors or dust that may ignite.
3. Follow tool set-up according to speci
fi
c tool opera-
tor’s manual.
Operating Instructions
Do not use excessive force to in sert or bend
the cable.
Do not use the cable or imager head to modify
surroundings, clear pathways or clogged areas, or as
anything other than an in spection device.
The hand-held display unit is not water re-
sistant. The imager head and its cover ing are water
resistant, but are not acid-proof or fireproof. Petroleum-
based products will ruin the imager cable’s protective
plastic covering over time. Avoid submersing the imager
head into corrosive, oily places.
Using The Imager
To turn the unit on, hold the viewer with the LCD screen
facing you (Fig. 9). Push the ON/OFF switch to turn on
the screen. To adjust the brightness of the LED light (Fig.
10) press the LEFT/RIGHT arrow key. (Fig. 9)
Typical Applications
The Snap-on Visual Inspection Device is designed as a re-
mote inspection device. Typical applications may include
automotive inspection (Fig. 11), boat/aircraft inspection,
etc. It can be used for valve, cylinder bore, HVAC and a
rear-differential inspection, just to name a few.
User Button Interface
(Fig. 12)
MENU
• Pressing the MENU button
from Preview screen
will open the Main Menu.
• The
button always allows the user to back out of
the current screen.
CAMERA/VIDEO
• Pressing the CAMERA button from the Preview/Live
Image will allow user to choose between Still Image
capture and Video Capture.
PLAYBACK
• Pressing the PLAYBACK button from the Preview/
Live Image allows the user to view image captures
or play videos.
DELETE
• When reviewing in Full Screen/Playback Mode,
pressing the DELETE button allows the user to
delete any captured data.
CAPTURE/OK
• Pressing the “OK” button will capture a still image or
start/stop the video recorder. In Playback Mode, the
“OK” button will start/stop the playback.
• In the menu screens, the “OK” button confi
rms your
selection.
ARROWS
• When in live image preview mode, use the UP and
DOWN arrows to zoom in and out.
• Use the RIGHT and LEFT arrows to increase and
decrease the LED intensity.
Figure 5 — Installing Battery
Magnet
Pop-out
Stand
Battery
Release
Eyelet
for Hook
Figure 6 — Connecting the Cable to the Unit
Hand Held
Display Unit
Cable
Figure 7 — Mirror
Mirror
Figure 11 — Typical Applications
Figure 8 — Installing Mirror
Slot
Boss
Figure 9 — Using the Imager
ON/OFF
switch
RIGHT
arrow
LEFT
arrow
LCD
screen
Figure 10 — Imager LED Light
LED
Imager
Camera
Arrows
Delete
Playback
MENU
Capture/OK
Figure 12 — User Button Interface
Summary of Contents for BK6000
Page 1: ...User Manual Part ZBK6000 Visual Inspection Device BK6000 Video and Still Image Capture ...
Page 2: ...User Manual Part ZBK6000 Visual Inspection Device BK6000 Video and Still Image Capture ...
Page 11: ...Sichtprüfungsgerät BK6000 Video und Einzelbilderfassung ...
Page 58: ...Sichtprüfungsgerät BK6000 Video und Einzelbilderfassung ...


