background image


English 


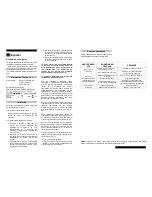
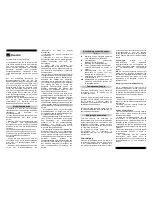
Installation 


To fix the cooker hood please choose one of 
the following options: 


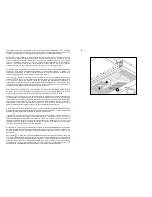
a) Fix it to the upper part of the furniture 

Figure 3 must be used where the position 
of the holes is indicated. 

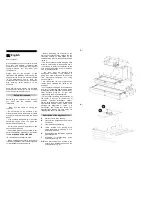
b)  Fix  it  to  the  internal  laterals  of  the 
furniture:  

1.-  Screw  two  screws  to  each  side  of  the 

furniture  interior  following  figure  5 
instructions. Leave them 3 mm loose for 
adjustment. 

2.- Screw the provided brackets to the top 

part  of  the  hood,  keeping  the  internal 
furniture width. 

3.- Hold and rise the hood until the slots of 

their  brackets  fit  in  the  screws  (step  1) 
of the furniture. 

4.-  Keeping  the  appliance  hold,  push  it 

towards  furniture

s  bottom  until  screws 

fits into a stable position inside the slots. 

5.-  Rise  the  hood  a  little  until  a  definitive 

position is obtained and tight the loosen 
four screws to the brackets. 


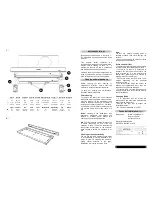
The  lower  part  of  the  extractor  must  be 

installed  a  minimum  height  of  60  cm 

above the hob for electric cookers and 65 

cm  for  gas  cookers.  (If  the  installation 

instructions  of  a  gas  cooker  indicate  a 

greater distance this must be observed). 

The  KSET910X  cooker  hood  only  can  be 

installed in furniture of 90 cm. 


Once  the  hood  is  installed,  the  front  facia 
can  be  fitted.  For  this  the  frontal  surface  of 
the  hood  is  firstly  cleaned  with  alcohol 
(manufacturer

s  safety  recommendations  for 

the  handling  of  solvents  are  always  to  be 
followed). Then remove the  protective paper 
of the adhesive on the fascia, it can now be 
placed  in  its  correct  position,  applying 
pressure on the adhesive area.


When  the  extractor  is  working  at  the  same 
time 

as 

other 

non-electrical 

cooking 

equipment,  the  outlet  air  pressure  must  not 
exceed 4 Pa (4 x 10

-5 

bar). 


To achieve optimum performance the length 
of  the  outlet  hose  should  not  exceed  4 
meters, or include more than two 90

º

 angles 

(elbows) 
 
Although 

venting 

to 

the 

outside 

is 

recommended,  active  carbon  filters  may  be 
used,  which  allow  the  purified  air  to  be 
returned  to  the  kitchen  through  the  outlet 
pipe. 
 
If  you  wish  to  substitute  the  front  panel  and 
replace  it  with  one  matching  the  kitchen 
units, follow the following instructions (Fig.2): 
* Withdraw the movable group. 
*  Remove  the  screws  (T)  that  support  the 
front. 
* Install the new front fixing it with the same 
screws that held the old one. 


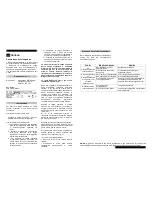
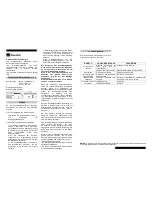
If something does not work 

 
Before  seeking  technical  assistance  carry 
out the following checks first: 


Om n

å

gonting inte fungerar 

 
Innan du kontaktar verkstad g

å

 efter  f

ö

ljande 

instruktioner: 


FEL 

M

Ö

JLIG ORSAK 

L

Ö

SNING 

Kontakten 

ä

r inte isatt 

S

ä

tta i kontakten 

Fl

ä

kten fungerar inte  Det kommer inte str

ö

m i 

kontakten


F

ö

rs

ä

kra dig om att det finns el


Filtret 

ä

r fullt med fett 

Reng

ö

r filtret eller byt ut det 

Tillt

ä

ppning i utg

å

ngsr

ö

ret


Ta bort tillt

ä

ppningen


Fl

ä

kten suger inte 

upp tillr

ä

ckligt eller 

vibrerar 

Fel utg

å

ngsr

ö

r


Kontakta installat

ö

ren och f

ö

lj 

instruktionerna i denna 
bruksanvisning


Lamporna 

ä

r utbr

ä

nda 

Byt ut lamporna 

Lamporna t

ä

nds inte 

L

ö

sa lampor


Skruva 

å

t lamporna


SMEG. 

f

ö

rbeh

å

ller sig r

ä

tten att g

ö

ra 

ä

ndringar f

ö

r att f

ö

rb

ä

ttra sina produkter om de anser det 

n

ö

dv

ä

ndigt utan att detta f

ö

rs

ä

mrar produkten. 


Summary of Contents for KSET610X

Page 1: ...tractoras KSET610X KSET910X Libretto istruzioni Cappe Aspirante KSET610X KSET910X Gebruikshandleiding Afzuigkappen KSET610X KSET910X Bedieningsanleitung Dunstabzugshauben KSET610X KSET910X Ðóêîâîäñòâî ïî ýêñïëóàòàöèè Âûòÿ æêà KSET610X KSET910X Manual de Instruções Exaustores KSET610X KSET910X Bruksanvisning Köksfläkt KSET610X KSET910X 20 04 09 ...

Page 2: ...mbolo en el producto o en los documentos que se incluyen con el producto indica que no se puede tratar como residuo doméstico Es necesario entregarlo en un punto de recogida para reciclar aparatos eléctricos y electrónicos Deséchelo con arreglo a las normas medioambientales para eliminación de residuos Para obtener infomación más detallada sobre el tratamiento recuperación y reciclaje de este prod...

Page 3: ...ìè ýêîëîãè åñêîãî çàêîíîäàòåëüñòâà îòíîñèòåëüíî îáðàùåíèÿ ñ îòõîäàìè Äëÿ ïîëó åíèÿ áîëåå ïîäðîáíîé èíôîðìàöèè îá îáðàáîòêå è óòèëèçàöèè äàííîãî èçäåëèÿ îáðàòèòåñü â ìåñòíûå àäìèíèñòðàòèâíûå îðãàíû ñëóæáó îáðàùåíèÿ ñ êîììóíàëüíûìè îòõîäàìè èëè ìàãàçèí â êîòîðîì áûëî ïðèîáðåòåíî èçäåëèå __________________________________________________________________________________________________________________...

Page 4: ...he voltage and the frequency conform to what shown on the characteristics label of the extractor located inside it The cooker hoods provided with plug must preserve it accessible In the opposite way it is necessary to install an omnipolar switch with at least a distance of 3 mm between Line L and Neutral N The room must be provided with appropriate ventilation if the extractor is going to be used ...

Page 5: ...ressive detergents may darken the surface of metallic parts without this affecting its gas retaining properties N B The filter must be cleaned at least once a month depending on how often the extractor is used It must be remembered that grease accumulates in the extractor when cooking whether it is switched on or not Cleaning of the extractor body The use of warm 40ºC approx soapy water is recomme...

Page 6: ...be placed in its correct position applying pressure on the adhesive area When the extractor is working at the same time as other non electrical cooking equipment the outlet air pressure must not exceed 4 Pa 4 x 10 5 bar To achieve optimum performance the length of the outlet hose should not exceed 4 meters or include more than two 90º angles elbows Although venting to the outside is recommended ac...

Page 7: ...e luftströmmen vara starkare än 4Pa 4 x 10 5 bar För att uppnå bästa prestation ska uttömnings röret inte vara längre än 4 meter och Inte ha mer än två vinklar på 90º Även om vi rekommenderar att oset ska föras utomhus går det även att installera aktiva kolfilter som tillåter oset föras tillbaka till köket via utgångsröret Om du vill byta ut originalfrontpanelen mot en annan likvärdig så gå efter ...

Page 8: ...ages il faudra le faire sous votre responsabilité Cela peut être dangereux Pour toute réparation y compris la substitution du câble d alimentation il doit s adresser au Service d Assistance Technique qualifié plus proche en utilisant toujours des rechanges originaux Les réparations ou les modifications réalisées par un autre personnel peuvent occasionner des dommages ou un mauvais fonctionnement à...

Page 9: ...t sur la commande indiquée sur la figure 1 vous pourrez contrôler les fonctions de la hotte Pour obtenir une meilleure aspiration nous vous recommandons de mettre la hotte en marche quelques minutes avant de cuisiner entre 3 et 5 minutes pour que le flux d air soit stable et continu au moment d aspirer les fumées De la même façon maintenez la hotte en fonctionnement quelques minutes après avoir fi...

Page 10: ...urs suivre les recommandations de sécurité des fabricants lors de la manipulation de dissolvants Après avoir retiré le papier protecteur de l adhésif de l enjoliveur superposez celui ci dans sa position correcte en appliquant une pression ferme sur la zone adhésive Lorsque la hotte de cuisine est mise en fonctionnement en même temps que d autres appareils alimentés par une énergie autre que l élec...

Page 11: ...perfície frontal do exaustor deve ser primeiramente limpa com álcool as recomendações de segurança do fabricante em relação à utilização de solventes devem ser respeitados De seguida retire o papel protector da faixa adesiva Coloque a na posição correcta aplicando pressão na área do adesivo Quando o exaustor está em funcionamento ao mesmo tempo que um equipamento não eléctrico a pressão de saída d...

Page 12: ...lo do motor permite a selecção de 3 posições B O interruptor de luz é independente dos motores C A iluminação é feita através de lâmpadas halogéneas D Os filtros localizados sobre a zona de cozinhado podem ser removidos facilmente para a limpeza E Grupo extraível que permite abranger uma grande área de extracção F Possibilidade de incorporar filtros de carvão activo na grelha de segurança Fig 6 G ...

Page 13: ...el funcionamiento de los motores C Iluminación mediante lámparas halógenas D Filtros situados sobre la zona de cocción fácilmente extraibles para su lavado E Conjunto extraible que permite una mayor superficie de captación de gases F Posibilidad de incorporar filtros de carbón activo Fig 6 G H Aletas anti retorno que se colocarán en la boca de salida situando sus extremos en los orificios dispuest...

Page 14: ...la campana con alcohol isopropílico se han de seguir siempre las recomendaciones de seguridad de los fabricantes en el manejo de los disolventes Tras quitar el papel protector al adhesivo del embellecedor se superpondrá este en su posición correcta realizando una firme presión sobre la zona adhesivada Cuando la campana de cocina se ponga en funcionamiento al mismo tiempo que otros aparatos aliment...

Page 15: ...ñòè èçãîòîâèòåëÿ ýòîãî ïðîäóêòà Ñíÿ â çàùèòíóþ êëåéêóþ ïëåíêó ñ ïîâåðõíîñòè ïàíåëè íàëîæèòü åå íà âûòÿ æêó â ïðàâèëüíîì ïîëîæåíèè è íàäàâèòü â ìåñòå íàíåñåíèÿ êëåÿ ùåãî âåùåñòâà Êîãäà âûòÿ æêà ðàáîòàåò îäíîâðåìåííî ñ äðóãèìè ïðèáîðàìè èñïîëüçóþùèìè ïèòàíèå îòëè íîå îò ýëåêòðè åñêîãî äàâëåíèå âîçäóõà íà âûõîäå íå äîëæíî ïðåâûøàòü 4 Ïà 4õ10 5 áàð Äëÿ îïòèìàëüíîé ðàáîòû ïðèáîðà äëèíà âíåøíåãî âîçäóõî...

Page 16: ...e ai danni provocati dall uso indebito del dispositivo Îïèñàíèå ïðèáîðà ðèñ 1 A Îðãàíû óïðàâëåíèÿ ìîòîðîì ñ âûáîðîì òðåõ ñêîðîñòåé B Âûêëþ àòåëü îñâåùåíèÿ íå ñâÿ çàííûé ñ ìîòîðîì C Ãàëîãåííîå îñâåùåíèå D Ôèëüòðû íàä çîíîé ïðèãîòîâëåíèÿ ïèùè ñ óïðîùåííîé ñèñòåìîé äåìîíòàæà äëÿ î èñòêè E Ñúåìíûé ýëåìåíò óâåëè èâàþùèé ïëîùàäü óëàâëèâàíèÿ ãàçîâ F Ìåñòî âîçìîæíîé óñòàíîâêè ôèëüòðà èç àêòèâèðîâàííîãî óã...

Page 17: ...funzionamento dei motori C Illuminazione mediante lampadine alogene D Filtri posti sopra la zona di cottura facilmente estraibili per relativo lavaggio E Gruppo estraibile che consente una maggiore superficie di aspirazione dei gas F Possibilità di aggiunta di filtri a carbone attivo Fig 6 G H Alette antiritorno da sistemare nella bocchetta di uscita inserendone le estremità negli appositi orifizi...

Page 18: ...nte con alcool isopropilico attenersi sempre ai consigli di sicurezza dei produttori per quanto riguarda l uso di solventi Dopo aver tolto la carta di protezione dall adesivo dell elemento decorativo posizionarlo correttamente e premerne la zona adesiva Quando la cappa aspirante si utilizza assieme ad altri dispositivi funzionanti a energia non elettrica la pressione di uscita dell aria non dovrà ...

Page 19: ...erseite der Dunstabzugshaube mit Isopropanol reinigen dabei die Sicherheitsvorschriften des Herstellers im Umgang mit den Lösungsmitteln beachten Nach Abziehen des Schutzpapiers die Abdeckung in ihrer vorgesehenen Position anbringen und fest andrücken Wird die Dunstabzugshaube gleichzeitig mit Geräten in Betrieb gesetzt die nicht mit Elektroenergie gespeist werden darf der Unterdruck nicht größer ...

Page 20: ... Absaugfläche F Möglichkeit zum Einsatz von Aktivkohlefiltern im Sicherheitsgitter Abb 6 G H Rückschlagklappen im Abgasabzug diese sind am Ende der hierfür vorgesehenen Öffnungen eingesetzt Abb 4 Bedienungsanweisung Durch Betätigen der in der Abbildung 1 bezeichneten Bedienelemente werden die Funktionen der Dunstabzugshaube gesteuert Schalten Sie die Dunstabzugshaube einige Minuten vor Kochbeginn ...

Page 21: ...satz der Zufuhr muß es zum qualifizierten Service der technischen Anwesenheit nahe gehen ersetzte Vorlage immer verwenden Alle Reparaturen oder Eingriffe durch anderes Personal können Schäden und Funktionsstörungen am Gerät hervorrufen und Gefahren für Ihre Sicherheit zur Folge haben Der Hersteller haftet nicht für Schäden aus einer unsachgemäßen Verwendung des Geräts Beschrijving van het apparaat...

Page 22: ...eïnstaleerd Daarvoor 1 maak het oppervlak van de voorkant decoratie schoon met isopropylalcohol houdt altijd rekening met de veiligheidsvoorschriften van de fabrikanten bij het gebruik van oplosmiddelen 2 verwijder de beschermende film van de lijm sticker 3 druk de voorkant decoratie op de juiste positie op die lijm sticker Als de afzuigkap tegelijktijd wordt gebruikt met andere apparaten die aang...

Reviews: