background image

CHAPTER 3

CONNECTING POWER AND DEVICES

24

smarttech.com/kb/171257

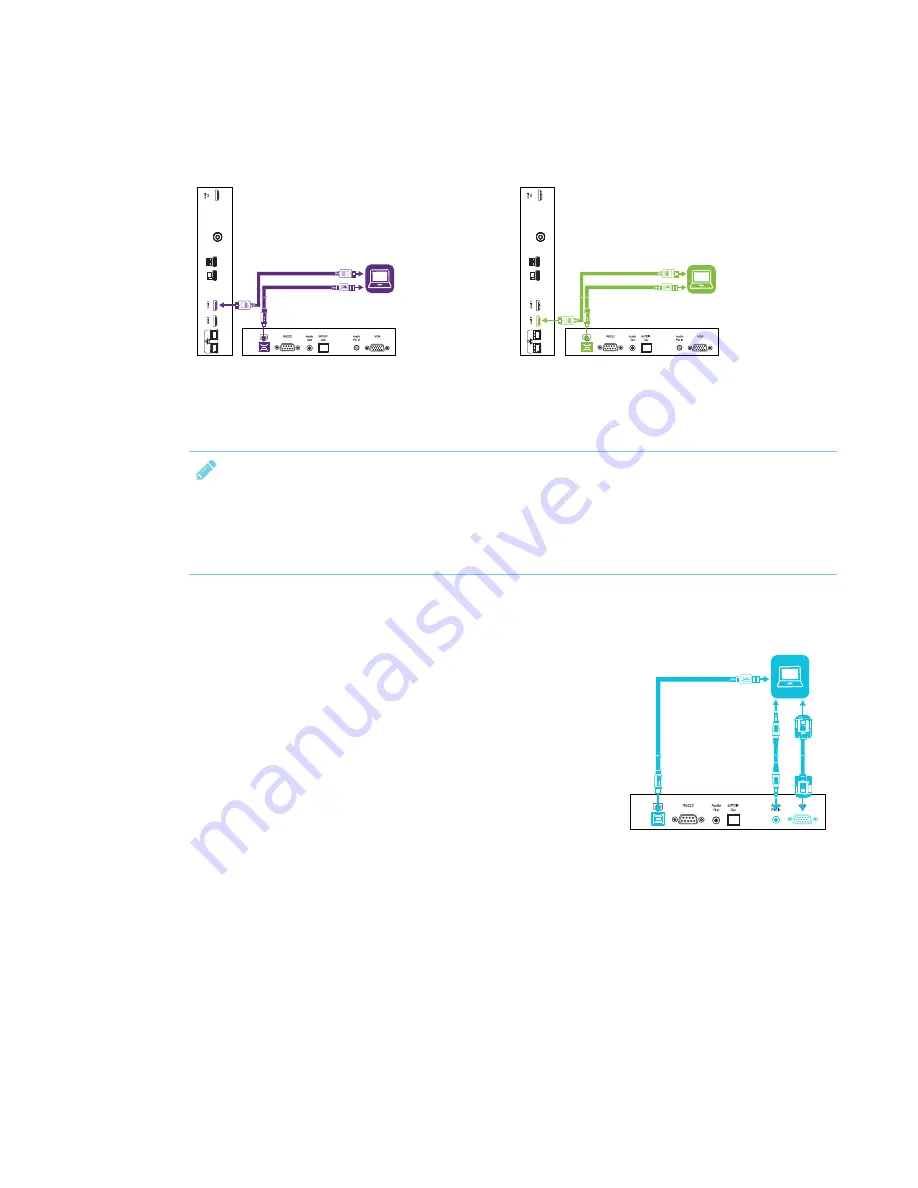
Connecting to the side connector panel

The side connector panel includes two HDMI video connectors: HDMI 1 and HDMI 2. Both

connectors can accommodate an HDMI cable for video and audio, and both support HDMI 2.0.

NOTES

l

The USB Type-B connector for touch control is located on the bottom connector panel. See

Connecting to the bottom connector panel

below.

l

You can connect a wireless USB keyboard and mouse to the two USB Type-A connectors.

Connecting to the bottom connector panel

The bottom connector panel includes a video connector and USB connector:

l

VGA:

This connector can accommodate a VGA cable for video.

l

USB Type-B:

This connector can accommodate a USB cable for touch control for computers

connected to HDMI 1, HDMI 2 or VGA.

Summary of Contents for SBID-MX265

Page 1: ...Was this document helpful smarttech com docfeedback 171257 SMART Board MX series interactive displays INSTALLATION AND MAINTENANCE FOR MODELS l SBID MX265 l SBID MX275 l SBID MX286...

Page 2: ...2018 SMART Technologies ULC All rights reserved No part of this publication may be reproduced transmitted transcribed stored in a retrieval system or translated into any language in any form by any me...

Page 3: ...r to touch the surface of the SMART product Rather mount the product at the appropriate height l To reduce the risk of fire or electric shock do not expose the SMART product to rain or moisture l If t...

Page 4: ...ll outlet and seek assistance from qualified service personnel if any of the following occur o The power cable or plug is damaged o Liquid is spilled into the display o Objects fall into the display o...

Page 5: ...h the SMART product to a computer that has a USB compliant interface and that bears the USB logo In addition the USB source computer must be compliant with CSA UL EN 60950 and bear the CE mark and CSA...

Page 6: ...owing two conditions 1 This device may not cause harmfulinterference and 2 this device must accept any interference received including interference that may cause undesired operation Radiation exposur...

Page 7: ...FR DE IS IE IT EL ES CY LV LI LT LU HU MT NL NO PL PT RO SI SK TR FI SE CH UK HR 5150MHz 5350MHz is for indoor use only CAUTION EXPOSURE TO RADIO FREQUENCY RADIATION This equipment complies with EUra...

Page 8: ......

Page 9: ...nce 21 Connecting power 22 Connecting to a network 22 Connecting cables for room computers guest laptops and other input sources 23 Connecting external speakers 25 Connecting room control systems 26 C...

Page 10: ...MART knowledge base for additional troubleshooting information 73 Contacting your reseller for additional support 73 Appendix A Using iQ system settings 75 Network settings 75 Application settings 75...

Page 11: ...Supported resolutions 95 HDMI 1 in HDMI 2 in and HDMI 3 in 95 VGA 95 Appendix F Hardware environmental compliance 97 Waste Electrical and Electronic Equipment and Battery regulations WEEE and Battery...

Page 12: ......

Page 13: ...nsor 7 Internal speakers 7 Related products 7 SBA 100 projection audio system 8 SMART Audio 400 classroom amplification system 8 USB extenders 8 More information 9 This chapter introduces the SMART Bo...

Page 14: ...vides one touch access to collaborative tools including a whiteboard wireless screen sharing and a web browser Touch support You can do everything on the display that you can do at your computer open...

Page 15: ...86 86 218 cm Refer to the specifications for detailed technical information for this model including product dimensions and weights see More information on page 9 For help identifying your display see...

Page 16: ...e slot is not a limited power source To reduce the risk of fire make sure that accessories connecting to the slot satisfy the fire enclosure requirements of IEC 60950 1 TIP Use the Identifying your iQ...

Page 17: ...USB peripherals and a computer or other input source No Name Procedure 1 USB Type A connector Connect USB drives and other devices that you want to use with the currently selected input source 2 USB...

Page 18: ...eeze Press to freeze and unfreeze the screen See SMART Board MX series interactive displays user s guide smarttech com kb 171284 5 Mute Press to mute or unmute the volume 6 Volume decrease Press to tu...

Page 19: ...atus light The status light blinks green and red when it registers a button being pressed on the remote control When the status light is red the display is in a low power state To wake the display pre...

Page 20: ...ltiple speaker options are available including wall and ceiling mounted speakers The amplifier receives audio signals from the microphones and translates them into crystal clear sound through the spea...

Page 21: ...arttech com kb 171284 SBID MX165 MX175 MX186 MX265 MX275 and MX286 installation instructions smarttech com kb 171274 SBID MX265 specifications smarttech com kb 171240 SBID MX275 specifications smartte...

Page 22: ......

Page 23: ...splays 19 Installing the display on a stand 20 Using SMART mobile stands 20 Using a third party stand 20 SMART recommends that only trained installers install the display This chapter is for installer...

Page 24: ...orient the box during transportation Using transportation aides You can use the following aides to transport the display l Cart l Furniture dolly l Mechanical lift Accommodating doorways hallways and...

Page 25: ...tters carefully clean up the area and have the display repaired or replaced CAUTION For safety and to prevent further damage do not continue to install or use the display if its glass is cracked chipp...

Page 26: ...here it could be hit by a door or gate l There are no nearby shelving units desks or other furniture that has doors or drawers that could hit the display l Furniture wall d cor and other room features...

Page 27: ...indows or strong overhead lighting Risks of light Interference include o Reduced visibility Light sources can cause glare on the display s screen reducing its visibility o Touch system interference Ma...

Page 28: ...play in a recessed area there is at least 4 10 cm of space between the display and the recessed walls to enable ventilation and cooling Choosing a height Consider the general height of the user commun...

Page 29: ...6 MX265 MX275 and MX286 installation instructions smarttech com kb 171274 Contact your authorized SMART reseller smarttech com where for information on SMART s mounting options If you choose a third p...

Page 30: ...reating hotpots in equipment premature failures and in displays that use projectors exploding projector bulbs l Mount the display vertically 90 relative to the floor plus or minus 2 for tolerance and...

Page 31: ...CAUTION Do not over tighten the bolts SMART Board MX275 Minimum M8 length 18 mm x mm where x is the combined thickness of the wall mount and washer Maximum M8 bolt length 30 mm x mm where x is the co...

Page 32: ...lays SMART recommends that you work closely with an experienced installer Installing the display on a stand If you want to move the display from place to place or if it s not possible to install the d...

Page 33: ...ottom connector panel 24 Connecting to the front connector panel 25 Viewing a connected computer or other device s input 25 Connecting external speakers 25 Connecting room control systems 26 Connector...

Page 34: ...rk connection for downloading software and firmware updates and a number of the iQ appliance s apps require a network connection as well You can use one of the display s RJ45 jacks pictured to connect...

Page 35: ...Maximum length Recommendation HDMI 23 7 m 1 Use only certified HDMI cables that have been tested to support the performance standard you require VGA 23 7 m Use VGA cables with all pins in their connec...

Page 36: ...onnector for touch control is located on the bottom connector panel See Connecting to the bottom connector panel below l You can connect a wireless USB keyboard and mouse to the two USB Type A connect...

Page 37: ...is connector can accommodate a USB cable for touch control for computers connected to HDMI 3 Viewing a connected computer or other device s input Users can tap the Input button to open the input selec...

Page 38: ...al speakers Connecting room control systems A room control system enables users to control a room s lighting audio system and possibly the display Some installations may require you to integrate the d...

Page 39: ...diagram and table present the connectors on the display s connector panel No Connector Connects to Notes 1 HDMI 1 4 out HDCP compliant External monitor This connector is HDCP encrypted HDMI NOTE HDMI...

Page 40: ...e currently selected input source 4 HDMI 1 2 0 in HDMI 1 input video and audio See page 23 5 HDMI 2 2 0 in HDMI 2 input video and audio See page 23 6 RJ45 2 Network See page 22 Bottom connector panel...

Page 41: ...s that you want to use with the currently selected input source 2 USB Type A connector Connect a USB drive to update the display s firmware 3 USB Type B connector Connect a USB cable to the display an...

Page 42: ...ype A 2 N A Do not use See page 29 3 HDMI out N A Do not use See page 27 5 Micro SD N A This connector is a service port 6 LED N A LED lights green when the iQ appliance is inserted in the accessory s...

Page 43: ...s firmware 41 About firmware updates 41 Applying the display s firmware update manually 42 Updating system software manually 42 Locking down the Settings app for iQ system software 43 Creating a new...

Page 44: ...Next 6 Set the time and then tap Next 7 Name the display and then tap Next 8 If the display isn t using a wired network connection select a wireless network and then tap Next 9 Select the list of app...

Page 45: ...y is connected to a network using an Ethernet connection the iQ appliance will also be connected to the network Before you do so your organization s network administrators need to configure the networ...

Page 46: ...smarttech com kb 171257 Network administrators need to configure the network so users can use the Screen Share app update the system software automatically over the air and enable the iQ appliance to...

Page 47: ...tebook Player SMART amp https smarttech com SMART Notebook Player https www fabric io SMART Notebook Player https classlab com SMART Notebook Player SMART amp https www firebase com test html SMART No...

Page 48: ...353 mDNS UDP 5353 mDNS TCP 7000 Picture sharing TCP 7001 Video streaming UDP 7010 Display mirroring UDP 7011 Display mirroring TCP 7100 Display mirroring TCP 47000 Audio negotiation TCP 49152 65535 Dy...

Page 49: ...liance can connect to a network using either Wi Fi or use the display s Ethernet connection Network administrators can also add a browser proxy or install a certificate To connect to a Wi Fi network 1...

Page 50: ...launcher appears 2 Tap Settings The Settings window appears 3 Tap Wi Fi 4 Tap and hold the network to which you re adding a proxy A dialog box appears 5 Tap Modify network 6 Select Show advanced opti...

Page 51: ...ate 9 Tap OK 10 Select a pattern PIN or password method Tap OK IMPORTANT Make note of the pattern PIN or password The pattern PIN or password may be required to install future certificates If the patt...

Page 52: ...can make it difficult to estimate the impact of Screen Share on a network where many users would like to screen share simultaneously For example in a school where 30 teachers are using Screen Share si...

Page 53: ...prevent automatic system software updates see Configuring the iQ appliance s network connection on page 33 Applying an automatic iQ system software update manually If the iQ appliance has downloaded t...

Page 54: ...to update the display s firmware at a later time To apply an automatic system software update manually 1 On the display press the Menu button on the front control panel 2 Tap Update 3 Under Update tap...

Page 55: ...Settings app by a lockdown certificate saved on a USB drive NOTE This limits access to the settings for the iQ appliance It does not limit access to the SMART Board MX interactive display s settings C...

Page 56: ...te on it into the display This is a snippet 2 Open the launcher 3 Tap Settings 4 Tap Lock Down Settings The settings are locked down Unlocking the iQ appliance with an existing lockdown certificate If...

Page 57: ...to the Beta channel and want to return to the Stable channel you must perform a factory reset that erases all of the iQ system software settings Before switching to the Beta channel Before switching...

Page 58: ...ftware releases The display checks for a Stable channel system software update 5 Tap Ready to apply update Getting support and sending feedback SMART Support will not be able to help you resolve probl...

Page 59: ...cher 4 Select the apps you want to include in the launcher OR Clear the check boxes for apps you want to remove from the launcher Enabling the Whiteboard Library The display saves Whiteboard sessions...

Page 60: ......

Page 61: ...ing SMART software on connected computers To take full advantage of the SMART Board display s features install SMART Learning Suite and SMART Product Drivers on computers you connect to the display In...

Page 62: ...ers from smarttech com downloads Setting connected computers resolutions and refresh rates The following table presents the recommend resolutions and refresh rates for the display s input sources Inpu...

Page 63: ...e that it remains securely installed l Check the mounting location for signs of damage or weakness that can occur over time l Check for loose screws gaps distortions or other issues that could occur w...

Page 64: ...round the display s perimeter between the screen and the frame Dust buildup on the protective plastic can impair touch performance Inspect these areas for dust and clean them every week CAUTION l Do n...

Page 65: ...t for a few hours so that it can acclimate to the new temperature Failing to do so can cause humidity to build up in the space between the front glass and the LCD If condensation appears under the scr...

Page 66: ...To perform a factory reset see Restore factory settings on page 82 A factory reset returns all options to their default values To reset the display 1 Flick the switch to the OFF O position 2 Flick the...

Page 67: ...Remove all accessible cables connectors and antennae 5 Remove the iQ appliance from the accessory slot 6 Lift the display from its mounting location and insert it into its original shipping box WARNIN...

Page 68: ......

Page 69: ...Android mobile devices 66 Resolving issues with Apple devices 67 Resolving issues with Chrome browser and Chromebook 68 Resolving issues with Windows computers 70 Advanced troubleshooting for Screen S...

Page 70: ...e the switch on the backof the display is in the ON I position l Make sure the power outlet is working by testing it with a different device l Make sure the power cable is working by testing it with a...

Page 71: ...rates on page 50 l Restart the display and any connected computers See Turning the display off and backon on page 53 l Make sure the cable is not longer than the maximum specified in the display s sp...

Page 72: ...l Make sure the cable is not longer than the maximum specified in the display s specifications l Make sure the cable is securely connected to the video connectors on the display and the computer l If...

Page 73: ...cting external speakers on page 25 l Adjust the volume on the display and the connected computer and make sure both are not muted l Make sure the display is set as the default audio device for the con...

Page 74: ...display to another location in the room l Remove the display from the wall calibrate it and confirm if this resolves the issue If it does checkthe walland wallmount for issues The display responds to...

Page 75: ...nected HDMI sync device for example a display video splitter video extender or video capture system may not support High Bandwidth Digital Content Protection HDCP or may not support HDCP version 2 2 M...

Page 76: ...3 l l Make sure the iQ system software and computer are set to the correct date and time You can t download SMART NotebookPlayer to your mobile device l If you re using an iPhone download the app from...

Page 77: ...ion See Connecting the display and iQ appliance to a networkon page 33 l If Browser can t visit secure https websites ensure the iQ system software s date and time are correct l Contact the system adm...

Page 78: ...everalminutes and then try to connect to the display again l Ensure you have the latest operating software on your Android device Make sure no system updates are pending for your Android device See th...

Page 79: ...hat s connected wirelessly l On your mobile device turn Airplane mode on and then off on your mobile device l Restart your mobile device NOTE Restarting your mobile device can clear networkaddress inf...

Page 80: ...to allow Screen Share and other iQ features The system administrator should also make sure that device to device communication is not intentionally blocked See Configuring the iQ appliance s networkc...

Page 81: ...ted to different wireless access points which can increase latency On the computer disconnect and then reconnect the Ethernet cable or turn Wi Fioff and then backon to try to connect to a closer acces...

Page 82: ...ou ve restarted your display and stilldon t see the display s name in the list of devices wait severalminutes and then try to connect to the display again l A Mac computer Apple mobile device or Andro...

Page 83: ...isplay in the list of devices found and follow the on screen instructions l If you re using Miracast move the computer closer to the display or to the side of the display where the iQ appliance is ins...

Page 84: ...lay s casting IDmay not have propagated yet through the networkor may be cached on the networkwhen it s not actually available Wait severalminutes and attempt to connect again Screen Share is not work...

Page 85: ...unexpectedly or the video stops playing on the display l If your display is connected to a 2 4 GHz network connect your display to a 5 GHz network l Select a less congested Wi Fichannel Referring to t...

Page 86: ...CHAPTER7 TROUBLESHOOTING 74 smarttech com kb 171257 NOTE You need to remove the iQ appliance from the display to locate the serial number...

Page 87: ...n Wi Fito discover networks Status Wi Fi N A Shows information about the wireless networkthe display is connected to N A Ethernet N A Shows information about the networkthe display is connected to N A...

Page 88: ...ervices You can restart Screen Share as a troubleshooting step if a mobile device or computer can t find or connect to the display System settings Option Values Function Notes Date Time Automatic Date...

Page 89: ...k N A Clean up N A N A N A Clean Up Policy Disabled Manually reset with the Clean Up button in the launcher 1 hour 2 hours 3 hours 1 day Sets how often the display cleans up N A Clean Up the whiteboar...

Page 90: ...A Send feedbackto SMART about the display experience N A Board Details N A N A N A Build Number N A Shows the iQappliance s serial number To find the display s serial number on the bottom frame or on...

Page 91: ...isplay s settings 79 Network 80 Screen lock 80 Advanced 81 Update 82 Recovery 82 About 83 Accessing the display s settings You can access the display s settings using the Menu button on the front cont...

Page 92: ...connecting to a networkwirelessly Turn on Wi Fito discover networks Enabling Wi Fidisables Ethernet Wi Fi hotspot Wi Fihotspot Enable Disable Enables or disables the Wi Fi hotspot The lockscreen appe...

Page 93: ...e apps to appear on the home screen Tap the app you want to remove from the home screen Then select the app you want to appear on the home screen instead HDMI out 480p 1080p 4K Select the output resol...

Page 94: ...ng the power button on the front controlpanel Update Option Values Function Notes Firmware version N A Shows technicalinformation about the display s scalar firmware To see the firmware version use th...

Page 95: ...ge N A Shows how much storage memory is available and how much is currently in use N A Resolution N A Shows the display s current screen resolution N A Android N A Shows the current version of the And...

Page 96: ......

Page 97: ...and inventory 89 Power state 90 Input 90 Brightness 90 Volume 91 Mute 91 Firmware version 91 Serial number 91 Part number 91 Resolving issues with remote management 92 You can connect a computer to th...

Page 98: ...standard RS 232 cable Do not use a null modem cable Null modem cables typically have ends of the same type Configuring the computer s serial interface settings Configure the computer s serial interfa...

Page 99: ...he display is in normal operating mode READY The screen is off but the display is ready to turn on when l A user presses the Power button on the front control panel l A user presses the Power button o...

Page 100: ...ation about the display or to adjust display settings type commands after the command prompt and then wait for the display s response CORRECT get volume volume 55 If you type a command that the room c...

Page 101: ...et volume volume 55 To assign a value to a setting Use a set command This example sets the volume to 65 set volume 65 volume 65 To increase or decrease the value of a setting Use the set command to in...

Page 102: ...eady l standby l powersave l updateon l updateready Input Get command Set command Response get input set input Value Where Value is one of the following l ops l hdmi1 l hdmi2 l hdmi3 l vga input Value...

Page 103: ...e of the following l on l off mute Value Where Value is one of the following l on l off Firmware version Get command Response get fwversion fwversion Value Where Value is the firmware version Serial n...

Page 104: ...e connections are secure l Configure the serialinterface settings See Configuring the computer s serialinterface settings on page 86 You re experiencing other issues with remote management or the prev...

Page 105: ...ol panel A list of input sources appears 2 If the input source list doesn t include SMART MX e the display is a SMART Board MX series interactive display The display has an iQ appliance installed If t...

Page 106: ......

Page 107: ...9 97 Hz 30 Hz 25 Hz 23 98 Hz 24 Hz 1920 1080 16 9 FHD 1080p 59 94 Hz 60 Hz 50 Hz 29 97 Hz 30 Hz 25 Hz 23 98 Hz 24 Hz 1360 768 16 9 N A 60 015 Hz 1280 720 16 9 HD 720p 59 94 Hz 60 Hz 50 Hz 29 97 Hz 30...

Page 108: ...71257 Resolution Input source aspect ratio Mode Refresh rate 1280 1024 5 4 SXGA 60 60 020 Hz 1024 768 4 3 XGA 60 XGA 70 XGA 75 60 004 Hz 70 069 Hz 75 029 Hz 800 600 4 3 SVGA 60 SVGA 72 SVGA 75 60 317...

Page 109: ...rical and electronic equipment and batteries contain substances that can be harmful to the environment and to human health The crossed out wheeled bin symbol indicates that products should be disposed...

Page 110: ......

Reviews: