SMA Solar Technology AG
Installation Guide
SB50US-80US-IUS094030
21
3.3 Configuring the AC Voltage
The Sunny Boy may be easily configured for the different grid types commonly found in the U.S. The
Sunny Boy is compatible with:
• 208 V AC output (except for Sunny Boy 8000US)
• 240 V AC output
• 277 V AC output
The Sunny Boy comes from the factory pre-configured for
utility interconnection at 240 V AC. The Sunny Boy may
be reconfigured for other voltages by following the steps
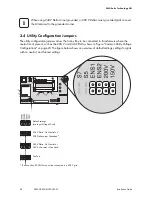
below and referring to Figure to the right.
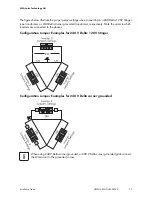
There are four wires coming into the main cabinet through
a grommet. Each wire is labeled with its corresponding
voltage and is connected to one of the two large terminal
blocks located just below the grommet. Refer to the Figure
on the right and follow the instructions below:
1. The input voltage setting is determined by the
jumper that is connected to the left terminal block
(A). The Sunny Boy comes from the factory
configured for connection to a 240 V system. If the
system is 240 V, no adjustment is necessary.
2. If adjustment is necessary, choose the wire with the
correct voltage for your application from the right
terminal block (C ) and connect it to the left side of
the left terminal block. Tighten all wires on the left
terminal block.
Torques for left AC configuration terminal block:
3. Do not remove the wire in the left terminal block labeled 0 V (B). It remains connected to the
right side of the left terminal block in all configurations.
4. All unused wires connect to the right terminal block (C) and tighten them. Torques for right AC
configuration terminal block (unused wires):
The Sunny Boy 8000US may not be connected to a 208 V grid.
Grey Terminal Blocks (Weidmüller)
10 - 6 AWG: 18 in-lb (2 Nm)
Green Terminal Blocks (Phoenix)
8 - 6 AWG: 40 in-lb (4.5 Nm)
10 AWG: 22 in-lb (2.5 Nm)
Grey Terminal Blocks (Weidmüller)
11 in-lb (1.2 Nm)
Green Terminal Blocks (Phoenix)
15 in-lb (1.7 Nm)

