background image

Page 44

December 2007

SJ 46AJ 

Major Components 

Section 3 - Operation

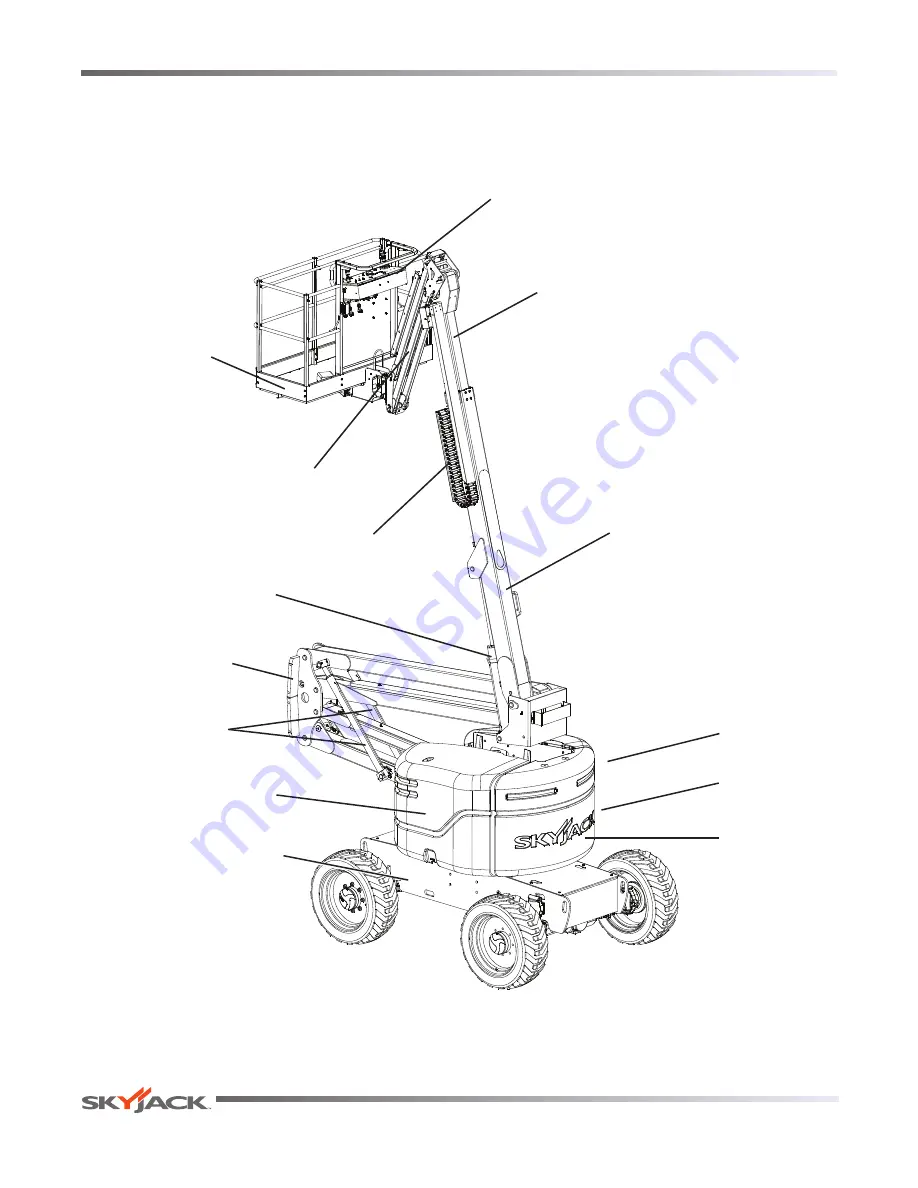
3.2  Major Components

SKYJACK Articulating Boom

Platform

Jib

Control 
Compartment

Engine 

Compartment

Base

Fly Boom

Turret

Main Boom

Power Track

Platform Control Console

Base Control 
Console

Lift Cylinder

Riser

Riser

Cylinders

Summary of Contents for SJ 46AJ

Page 1: ...ARTICULATING BOOMS MODELS SJ46AJ 169510AD A November 2015 OPERATING MANUAL ANSI CSA ...

Page 2: ...10 Loteamento American Park Empresarial Skyjack Service Center 3451 Swenson Ave St Charles Phone 630 262 0005 Toll Free 1 800 275 9522 Fax 630 262 0006 Email service skyjack com Illinois 60174 USA Parts Service Europe Unit 1 Maes Y Clawdd Oswestry Shropshire SY10 8NN UK Phone 44 1691 676 235 Fax 44 1691 676 238 E mail info skyjackeurope co uk Maesbury Road Industrial Estate This manual is based on...

Page 3: ...in minor or moderate injury It may also be used to alert against unsafe practices IMPORTANT IMPORTANT indicates a procedure essential for safe operation and which if not followed may result in a malfunction or damage to the aerial platform The Safety Alert Symbol identifies important safety messages on aerial platform safety signs in manuals or elsewhere When you see this symbol be alert to the po...

Page 4: ...meplate 45 3 5 Component Identification 46 3 6 Component Identification Optional Equipment Attachments 47 3 7 Operator s Responsibility 49 3 8 Start Operation 50 3 9 Refueling Procedure 55 3 10 Loading Unloading 57 3 11 Chassis Tilt 59 3 12 Technical Diagrams 60 Section 4 Tables 63 Table 4 1 Standard and Optional Features 63 Table 4 2a Specifications and Features 64 Table 4 2b Specifications and F...

Page 5: ...abels found within this manual If any labels are damaged or missing replace them immediately Service Policy and Warranty SKYJACK warrants each new articulating series work platform to be free of defective parts and workmanship for the first 24 months Any defective part will be replaced or repaired by your local SKYJACK dealer at no charge for parts or labor Contact the SKYJACK Service Department f...

Page 6: ...ollow simple and fundamental safety rules and precautions You as a careful operator are the best insurance against an accident Therefore proper usage of this aerial platform is mandatory The following pages of this manual should be read and understood completely before operating the aerial platform Common sense dictates the use of protective clothing when working on or near machinery Use appropria...

Page 7: ...lified persons must maintain a minimum approach distance of 10 feet from any energized power line up to 50 kV Energized power lines over 50 kV require a greater minimum approach distance to be maintained Refer to CFR 1910 333 As per CSA B354 4 02 The operator shall maintain the minimum safe approach distance MSAD from energized conductors at all times in accordance with the authority having jurisd...

Page 8: ...l platform or operate elevated in windy or gusty conditions that exceed the limits specified in Section 4 Table 4 5 DO NOT increase the lateral surface area of the platform Increasing the area exposed to the wind will decrease aerial platform stability Avoid tenting DO NOT elevate the aerial platform if it is not on a firm level surface DO NOT drive elevated near depressions or holes of any type l...

Page 9: ... all body parts inside the aerial platform BE AWARE of blind spots when operating the aerial platform ENSURE that there are no personnel or obstructions in the path of travel including blind spots DO NOT lower the platform unless the area below is clear of personnel and obstructions DO NOT use boom to push pull other objects or to lift the chassis DO NOT raise the aerial platform while it is on a ...

Page 10: ...ence of alcohol or drugs DO NOT attempt to free a snagged platform with lower controls until personnel are removed from the platform DO NOT position the aerial platform against another object to steady the platform DO NOT place materials on the guardrails or materials that exceed the confines of the guardrails unless approved by Skyjack DO NOT operate if aerial platform is not working properly or ...

Page 11: ...tions and must be inspected and used in accordance with the manufacturer s recommendations All personal fall protection equipment must be attached only to approved anchorage points within the platform of the aerial platform WARNING Entering and exiting the aerial platform should only be done using the three points of contact Use only equipped access openings Enter and exit only when the aerial pla...

Page 12: ...Page 12 December 2007 SJ 46AJ Notes ...

Page 13: ...operator to read completely understand and follow all instructions and warnings contained in this operating manual and on the aerial platform 149432AA At Platform Controls 1 Pull out emergency stop button 2 Depress and hold foot switch 3 Activate emergency pump switch 4 Activate desired boom function EMERGENCY LOWERING PROCEDURE 149432AA At Platform Controls 1 Pull out emergency stop button 2 Depr...

Page 14: ...determined limit WARNING If aerial platform becomes tilted causing alarm to sound the platform must be fully lowered immediately Ensure that aerial platform is on a firm level surface before operating the aerial platform Refer to Section 3 11 for instructions regarding recovery from an inclined position 2 2 3 Drive Bypass Valve This valve is located on the inboard side of the drive pump and can be...

Page 15: ...ntial locks are used to prevent from getting stuck when driving on loose muddy or rocky terrain Refer to Section 2 4 3 for instruction regarding testing differential lock switch WARNING Before engaging differential lock ensure drive steer controller is in neutral position 2 2 6 Footswitch The footswitch is located on the floor of the platform When depressed and held it enables controls on platform...

Page 16: ...s light indicates failure in engine control system 4 Fly Boom Extend Retract Switch This switch controls extension or retraction of fly boom 5 Start Function Enable Emergency Power Switch This momentary switch when held in start position starts engine When held in function enable position allows base control functions to operate With engine off and when held in emergency power unit position allows...

Page 17: ... circuit and shuts engine off 14 Water In Fuel Light If Equipped This light indicates water separator is full Open drain to release water Engine damage could occur if ignored for excessive length of time 15 Circuit Breakers In the event of a power overload or positive circuit grounding the circuit breaker pops out Push breaker back in to reset 16 Engine Diagnosis Switch If Equipped When held in ei...

Page 18: ...is light indicates failure in engine control system D Fuel This light indicates low fuel level E Glow Plug Diesel This light illuminates until glow plugs have completed their timed cycle When the lamp goes out the engine is ready to be started 5 Emergency Stop Button This red mushroom head pushbutton disconnects power to control circuit and shuts engine off 6 Emergency Power Unit This switch enabl...

Page 19: ...veling Override Switch This switch overrides automatic leveling of platform and controls tilting up or tilting down of platform 15 Platform Rotation Switch This switch controls left or right rotation of platform 16 Boom Turret Controller This dual axis lever controls raising or lowering of main boom or rotating left or right of turret 17 Generator On Off Switch If Equipped This switch turns the hy...

Page 20: ...ll labels are in place and are legible 2 3 2 Electrical Maintaining the electrical components is essential to good performance and service life of the aerial platform Inspect the following areas for chafed corroded and loose wires boom to platform cable harness engine compartment electrical panel engine wiring harness rotary manifold wiring 2 3 3 Limit Switches Ensure limit switches are properly s...

Page 21: ...rdous conditions WARNING Explosion hazard Keep flames and sparks away Do not smoke near batteries WARNING Battery acid is extremely corrosive Wear proper eye and facial protection as well as appropriate protective clothing If contact occurs immediately flush with cold water and seek medical attention 1 Check battery cases for damage 2 Clean battery terminals and cable ends thoroughly with a termin...

Page 22: ...e to the engine pivot tray Ensure that tray securing bolt is in place Engine Oil Level Maintaining the engine components is essential to good performance and service life of the aerial platform WARNING Beware of hot engine components Check oil level on dipstick Oil level should be in the safe zone Add oil as needed Refer to Table 4 2b for recommended oil type Engine Air Filter Ensure there are no ...

Page 23: ...ydraulic oil tank The hydraulic oil level should be between the minimum and maximum marks on the sight glass Add oil as needed Refer to Table 4 2b for recommended oil type Brake and Main Manifolds Ensure all fittings and hoses are properly tightened and there is no evidence of hydraulic leakage Ensure there are no loose wires or missing fasteners Emergency Power Unit Ensure there are no loose or m...

Page 24: ...re are no loose or missing parts all fittings and hoses are properly tightened and there is no evidence of hydraulic leakage Oscillating Cylinder Assembly Ensure oscillating cylinder assembly is properly secured there are no loose or missing parts all fittings and hoses are properly tightened and there is no evidence of hydraulic leakage NOTE Oscillating axle is locked when aerial platform is in w...

Page 25: ... WARNING Intermixing tires of different types or using tires of types other than those originally supplied with this equipment can adversely affect stability Therefore replace tires only with the exact Skyjack approved type Failure to operate with matched approved tires in good condition may result in death or serious injury 2 3 8 Manuals Ensure a copy of operating manual and other important docum...

Page 26: ...ure all bolts and pins are properly tightened Ensure all hoses are properly tightened and there is no evidence of hydraulic leakage 2 3 13 Boom Ensure there are no loose or missing parts and there is no visible damage Ensure all bolts and pins are properly tightened Ensure there are no visible cracks in welds or structure and there are no signs of deformation Ensure all hoses are properly tightene...

Page 27: ...Heater If Equipped Ensure battery warmer hydraulic oil heater cord is properly secured with no signs of visible damage and hydraulic leakage Work Light If Equipped Ensure lamps are properly secured with no signs of visible damage Ensure mounting bracket is properly secured Ensure there are no loose wires or missing fasteners Flashing Amber Light If Equipped Ensure lamp is properly secured with no ...

Page 28: ...ce Prior to performing function tests be sure to read and understand Section 3 8 Start Operation CAUTION Allow engine to warm up for a few minutes at low speed before applying any load WARNING Cold Weather Caution must be exercised when operating aerial platform in cold temperature Cold temperature can affect the performance of the aerial platform Braking response and other functions may delay Thr...

Page 29: ...tion 3 Start engine by selecting start position from start function enable emergency power switch Test Base Emergency Stop 1 Push in emergency stop button Result Engine should shut down and aerial platform functions should not operate 2 Pull out emergency stop button and restart engine Test Function Enable Switch and All Boom Functions WARNING Ensure that there are no personnel or obstructions in ...

Page 30: ...p motor Do not use emergency power unit continuously for more than two minutes NOTE To conserve battery power test each function through a partial cycle 3 On base control console pull out emergency stop button 4 On base control console turn off base platform base off platform key switch to platform position 5 Select emergency power position from start function enable emergency power switch and act...

Page 31: ... to platform position WARNING Ensure that you maintain three points of contact to mount dismount platform 5 Enter platform and close gate 6 On platform control console select on position from engine start on off switch 7 Select start position from engine start on off switch to start engine 8 Dismount from platform 9 On base control console attempt to activate each boom and platform switch while ho...

Page 32: ...ase control console lift switch guard and push rocker switch to on position 3 Push rocker switch to off position LED light should continuously illuminate Walk back to the engine compartment side of the aerial platform Result The shutoff valve should disengage after 20 seconds refer to shutoff valve diagrams 4 Close engine compartment cover Ensure switch is returned to off position and switch guard...

Page 33: ...erious injury WARNING Ensure that there are no personnel or obstructions in test area and that there is sufficient room for boom to swing Test Platform Emergency Stop Light 1 On platform control console pull out emergency stop button Result Emergency stop light should continuously illuminate Test Platform Emergency Stop 1 Start engine by selecting start position from engine start on off switch Res...

Page 34: ...tions should not operate NOTE A 15 second anti tiedown feature deactivates footswitch when operator depresses it for 15 seconds without activating any function Test Engine Start On Off Switch 1 Ensure engine is running 2 Select off position from engine start on off switch Result Engine should shut down and platform control console is disabled 3 Select on position from engine start on off switch Re...

Page 35: ...n Result Aerial platform should move in forward or reverse direction and then come to a stop Test Driving Speed 1 Depress and hold footswitch 2 Raise main boom 4 ft 1 2 m above ground and then slowly move drive steer controller to full drive position Result The maximum achievable drive speed should be significantly less than stowed drive speed 3 Lower boom to stowed position 4 Extend fly boom appr...

Page 36: ...tinuously for more than two minutes NOTE To conserve battery power test each function through a partial cycle 1 On platform control console push in emergency stop button to turn engine off 2 Pull out emergency stop button 3 Select on position from engine start on off switch 4 Depress and hold footswitch 5 Turn emergency power switch to on position and activate each function control handle or switc...

Page 37: ...n left and right 3 Ensure boom is in stowed position 4 Depress and hold footswitch and drive aerial platform first forward then reverse 5 Remove your foot from footswitch Result Aerial platform should come to an abrupt stop If aerial platform does not stop immediately or if aerial platform pulls to one side while stopping do not operate aerial platform until brake adjustments have been checked Tes...

Page 38: ...troller is in neutral position 1 On platform control console push differential lock switch forward to the locked position and then release Result Differential light should turn on Differential lock should be engaged 2 Pull differential lock switch backward to the unlocked position and then release Result Differential light should turn off Differential lock will disengage when drive torque is relea...

Page 39: ...designated location in platform Failure to avoid this hazard could result in death or serious injury 1 Extend fly boom 12 in 30 cm while on a firm level ground Result The steer axle should be locked 2 Drive one of the steer tires up onto a 6 in 15 cm block or curb Result An appropriate tilt of the aerial platform chassis should occur 3 Retract fly boom while in tilt position Result The steer axle ...

Page 40: ...ith no sudden movements and must not exceed a speed of 2 in sec 50 mm sec WARNING When pushing winching or towing do not exceed 2 mph 3 2 km h WARNING Do not winch or tow aerial platform on grade steeper than 45 4WD WARNING Do not winch or tow aerial platform onto a slope or brake the towing vehicle rapidly Do not pull aerial platform down an incline towards a winch 1 Before winching or towing aer...

Page 41: ... power disconnect switch to off position CAUTION Do not use hydraulic power with brake disengaged 3 Locate the bypass valve on the inboard side of the drive pump Bypass the drive pump by loosening the valve stem item 1 marked with yellow paint two revolutions counterclockwise 1 Figure 2 7 Drive Bypass Valve CAUTION Do not release brakes before disengaging drive motor 4 Push in black brake valve pl...

Page 42: ...ergency power unit continuously for more than two minutes At Base Control Console 1 Ensure engine is off 2 Pull out emergency stop button 3 Select either base position or platform position from key switch 4 Select emergency power position from start function enable emergency power switch and activate desired boom function At Platform Control Console 1 Ensure engine is off 2 Pull out emergency stop...

Page 43: ... Maintenancemustbeperformedbytrained and qualified competent personnel who are familiar with mechanical procedures Death or serious injury could result from the use of an aerial platform that is not properly maintained or kept in good working condition The operator must be sure that the aerial platform has been properly maintained and inspected before using it The operator must perform all the dai...

Page 44: ...ts Section 3 Operation 3 2 Major Components SKYJACK Articulating Boom Platform Jib Control Compartment Engine Compartment Base Fly Boom Turret Main Boom Power Track Platform Control Console Base Control Console Lift Cylinder Riser Riser Cylinders ...

Page 45: ...mbly consists of the riser telescoping fly and main boom assembly The riser is mounted on the turret with the main boom attached to the riser The riser mechanism uses two double acting hydraulic cylinders with holding valves to control vertical movement AJ models are equipped with a 60 in 152 cm jib controlled by a double acting hydraulic cylinder 3 3 4 Platform The platform is constructed of a sk...

Page 46: ... platform function is activated On aerial platforms with certain options a flashing amber light will accompany this alarm 3 5 3 AC Outlet on Platform If Equipped This outlet is a source of AC power on the platform The outlet is located on the right side of platform control console and the plug is located at the middle rear section of the turret 3 5 4 Turret Transportation Lock This locking device ...

Page 47: ...turret of the aerial platform This light flashes when boom function is activated This works in conjunction with all motion alarm NOTE The combined weight of attachment panels occupants and tools should not exceed platform rated capacity 3 6 4 Tire Sealant If Equipped This option is identified with a tire sealant label located at the rim of the wheel 1 2 Figure 3 3 Tire Sealant Label Tire Sealant L...

Page 48: ...uipment is plugged into its dedicated AC outlet on the platform 2 Welder AC Outlet This AC outlet is dedicated for the welder NOTE In sub zero temperatures the hydraulic oil should be warmed prior to operating the welder NOTE This option adds 90 lb 41 kg to the platform This weight must be included when determining the total load on the platform including personnel and other materials WARNING Only...

Page 49: ...removed from service Repairs to the aerial platform may only be made by qualified competent repair personnel After repairs are completed the operator must perform visual and daily maintenance inspections function tests again Scheduled maintenance inspections shall only be performed by a qualified competent person see Table 4 7 3 Cold Weather Hydraulic System Warm Up WARNING Caution must be exercis...

Page 50: ...s been damaged or appears to have worn or missing parts has alterations or modifications not approved by the manufacturer has safety devices which have been altered or disabled has been tagged or locked out for non use or repair Failure to avoid these hazards could result in death or serious injury 3 8 1 To Activate Base Control Console WARNING Ensure that you maintain three points of contact to m...

Page 51: ... 3 8 5 To Move Riser Up and Down Using Base Control Console 1 Activate and hold function enable switch by pushing it to the right 2 Push riser up down switch to either up or down position Release switch to stop 3 8 6 To Raise or Lower Main Boom Using Base Control Console 1 Activate and hold function enable switch by pushing it to the right 2 Push main boom raise lower switch to either raise or low...

Page 52: ...Enter platform and close gate 5 Attach body harness lanyards of each occupant to fall protection anchorage points Rated for one 1 person per anchorage 6 On platform control console pull out emergency stop button 7 Push and hold start position from start on off switch until engine starts WARNING DO NOT over crank the starter If engine fails to start after multiple attempts contact qualified compete...

Page 53: ...d hold footswitch 2 On jib up down switch select to move jib up or to move jib down Release switch to stop 3 8 14 To Move Riser Up and Down Using Platform Control Console 1 Depress and hold footswitch 2 On riser up down switch select to move riser up or to move riser down Release switch to stop 3 8 15 To Extend or Retract Fly Boom Using Platform Control Console 1 Depress and hold footswitch 2 On f...

Page 54: ...o minute duty cycle CAUTION Do not use emergency power unit continuously for more than two minutes 3 8 22a To Engage Differential Lock Switch 1 Depress and hold footswitch 2 On platform control console push differential lock switch forward to the locked position and then release 3 8 22b To Disengage Differential Lock Switch 1 Ensure path of intended motion is clear 2 Depress and hold footswitch 3 ...

Page 55: ...aerial platform if you smell gas For gasoline engine models use only unleaded gasoline with an octane rating 87 or higher WARNING Do not smoke in an area where aerial platforms are stored or refueled 3 9 1 Regular Fuel 1 Ensure engine and all systems are turned off and emergency stop buttons are depressed 2 Open fuel compartment door and remove fuel cap 3 Carefully pour fuel into tank ensuring tha...

Page 56: ...oks 6 Remove the propane cylinder To install a propane cylinder 1 Ensure engine and all systems are turned off and emergency stop button is depressed 2 Place propane cylinder on bracket or in compartment 3 Ensure metal peg on bracket or compartment is inserted into propane cylinder rim 4 Reconnect propane cylinder straps to hooks and fasten tightly 5 Attach coupler to propane cylinder and turn clo...

Page 57: ...atform is being loaded or unloaded 3 10 1 Loading and Tie down 1 Lock turret using turret transportation lock refer to Section 3 10 2 2 Turn key switch to off position and remove key before transporting 3 Turn main power disconnect switch to off position 4 Chock aerial platform wheels if necessary 5 Remove all loose items 6 Anchor down aerial platform to transport surface using tie down points ref...

Page 58: ...ched only to designated lifting points refer to Figure 3 8 WARNING Use chains of ample load capacity sufficient to withstand aerial platform weight 1 Place boom in stowed position centered between drive wheels Lock turret using turret transportation locking pin refer to Section 3 10 2 into the transport point refer to Figure 3 7 2 Turn main power disconnect switch to off position 3 Remove all loos...

Page 59: ...t alarm is active 3 11 1 Platform Uphill If the aerial platform becomes tilted with the platform uphill refer to Figure 3 9 follow the steps below to return to a lowered and retracted position 1 Lower main boom completely 2 Lower riser completely 3 Retract fly boom completely 4 Drive to a firm level surface 3 11 2 Platform Downhill If the aerial platform becomes tilted with the platform downhill r...

Page 60: ... 3 05 20 6 10 4 57 15 30 9 14 7 62 25 40 35 50 55 45 10 67 12 19 13 72 15 24 16 76 Feet Meters Figure 3 11 Reach Diagram 46AJ 30 76 cm 72 183 cm 45 5 12 70 cm 7 4 2 24 m 8 6 2 58 m 75 25 2 7 68 m 3 5 9 cm 55 75 141 6 cm 46 5 14 15 m 25 7 63 m 24 6 7 48 m 6 11 5 29 21 cm 21 4 6 5 m 70 44 111 cm 53 134 cm 6 8 2 03 m 16 40 6 cm 6 10 2 07 m 14 36 cm Figure 3 12 Dimension 46AJ ...

Page 61: ...if it is not on a firm level surface Axle oscillation locked work mode drive speed 0 8 km h 0 5 mph max Axle oscillation free travel mode drive speed 7 7 km h 4 8 mph max Axle oscillation free travel mode drive speed 4 8 mph 7 7 km h max Axle oscillation locked work mode drive speed 0 5 mph 0 8 km h max Figure 3 13 Axle Oscillation SJ 46AJ ...

Page 62: ...Page 62 December 2007 SJ 46AJ Notes ...

Page 63: ... Rear entry spring hinged gate Spring applied hydraulically released brake Variable speed drive and function controls 3500KW hydraulic generator Receptacle outlet cable on platform Air line or hydraulic line to platform 60 x 30 in 152 x 76 cm platform side gate All function motion alarm Foam filled tires Catalytic Muffler Level 1 Catalytic Muffler Level 2 Cold weather start kit diesel Flashing amb...

Page 64: ...pprox 15 25 seconds approx 4 8 mph 7 7 km h 0 5 mph 0 8 km h 122AE ANSI Turning Radius Inside Outside MODEL Platform Size Total platform length outside Total platform depth outside Height Working Platform elevated Drive Turret Length Overall with platform Base and tires Width Outside std tires Turret Weight Weight with air tires Weight with foam filled tires Platform rotation Horizontal reach Hori...

Page 65: ...Limits Arctic Coolant Option 200 F 93 C Chevron Rykon MV Mobilfluid 424 Coolant Capacity Hydraulic Oil Recommended Oil Type Operating and Oil Temperature Limits Approved Alternates Note Cold weather starting temperatures can be improved with Skyjack options Please consult your nearest Skyjack service center Esso Univis N46 24 gal 91 L 3 0 gal 11 4 L GM 60 40 Extended Life Coolant GM 50 50 Extended...

Page 66: ... must be completed after an annual inspection has been completed Do not use the aerial platform if an inspection has not been recorded in the last 13 months 20__ 20__ 20__ Model Number _________________ Serial Number __________________ 20__ 20__ 20__ 20__ 20__ 20__ Pictorial Description Inspection Date Inspector Signature Tables Section 4 ...

Page 67: ...Size 315 55 D20 Type Air Foam filled Tire Ply Rating 12 Wheel Nuts Torque 290 ft lb 393 2 Nm 60639AB ANSI Table 4 5 Maximum Platform Capacities SJ 46AJ 500 lb 227 kg 2 Persons Maximum Wind 28 mph 12 5 m s Maximum Side Force 90 lbf 400 N 60640AB ANSI Total Capacity Section 4 Tables ...

Page 68: ...verage load the aerial platform imparts on the whole surface projected directly underneath it The structure of the operating surface beams etc must be able to withstand more than the indicated values above Gross Aerial Platform Weight Weight platform capacity SJ 46AJ MODEL with Air Filled Tires MODEL with Foam Filled Tires Gross Aerial Platform Weight Total Aerial Platform Load Wheel LCP OUP Local...

Page 69: ... Off Platform Switch A Hydraulic Oil A Test Positive Air Shutoff If Equipped A Brake and Main Manifolds A Platform Control Console Emergency Power Unit A Test Platform Emergency Stop Light A Fuel Tank A Test Platform Emergency Stop A Fuel Leaks A Test Footswitch A Base Test Engine Enable Switch A Turret Transportation Lock A Test Steering A Drive Axle A Test Driving Function A Oscillating Cylinder...

Page 70: ...tuator Manuals Tie Rod Test Driving Speed Test Emergency Power Test Horn Test Brakes Control Compartment Test Platform Emergency Stop Test Footswitch Test Engine Enable Switch Platform Control Console Oscillating Cylinder Assembly Emergency Power Unit Drive Axle Test Brakes Test Manual Platform Leveling Test Differential Lock Switch Main Power Disconnect Switch Test Emergency Power Test Off Base P...

Page 71: ...ety Red Safety Red indicates DANGER Safety Orange Safety Orange indicates WARNING Safety Yellow Safety Yellow indicates CAUTION Safety Green Safety Green indicates emergency lowering Safety Blue Safety Blue indicates safety information Section 5 Labels ...

Page 72: ...SJ 46AJ No Label Pictorial Description 1 Connect AC Supply Connect AC supply here 2 Body Crushing Hazard Danger Body crushing hazard 3 Crushing Hazard Danger Crushing hazard 4 3 5 2 2 6 5 2 1 6 6 Engine Side Labels Section 5 ...

Page 73: ...ription 4 Warning Do Not Alter Do not alter or disable limit switches or other safety devices 5 Skyjack Logo Skyjack 6 Model Number Product Identifier Model number will vary may not be as shown Engine Side Continued 4 3 5 2 2 6 5 2 1 6 6 Section 5 Labels ...

Page 74: ...ocate brake valve and pump 6 Push in black knob 7 Pump by pushing red knob in and out until firm resistance is felt or until 300 psi 21 bar shows on the gauge if equipped Brake is now released 8 A Remove blocks from wheels B Push tow winch to desired location 9 Block or chock wheels to prevent aerial platform from rolling At hydraulic tank side 10 Reset brake by pulling out black knob At engine si...

Page 75: ... Points Only use these points for lifting or tying down 3 Tire Sealant If Equipped Indicates that tire sealant is present inside the tires 4 Wheel Specifications Refer to manual for wheel type offset pressure and torque 7 1 2 2 6 5 4 3 3 4 5 6 8 Engine Compartment Section 5 Labels ...

Page 76: ...6 Tire Pressure Indicates rated tire pressure Tire pressure will vary may not be as shown Foam filled Tire If Equipped Indicates foam filled tire 7 Warning Do Not Alter Do not alter or disable limit switches or other safety devices 8 Main Power Disconnect Main power disconnect switch Engine Compartment Continued 7 1 2 2 6 5 4 3 3 4 5 6 8 Labels Section 5 ...

Page 77: ...age 77 No Label Pictorial Description 1 4x4 If Equipped Product identifier 4 wheel drive 2 Serial Plate Product identification and specifications Serial plates will vary may not be as shown 1 2 Rear Side Base Section 5 Labels ...

Page 78: ...wise At hydraulic tank side 5 Locate brake valve and pump 6 Push in black knob 7 Pump by pushing red knob in and out until firm resistance is felt or until 300 psi 21 bar shows on the gauge if equipped Brake is now released 8 A Remove blocks from wheels B Push tow winch to desired location 9 Block or chock wheels to prevent aerial platform from rolling At hydraulic tank side 10 Reset brake by pull...

Page 79: ...ire Sealant If Equipped Indicates that tire sealant is present inside the tires 5 Wheel Specifications Refer to manual for wheel type offset pressure and torque 6 Wheel Load Indicates rated wheel load Wheel load will vary over different aerial platforms 7 Tire Pressure Indicates rated tire pressure Tire pressure will vary may not be as shown Foam filled Tire If Equipped Indicates foam filled tire ...

Page 80: ...lfur Only Diesel Ultra Low Sulfur Only Diesel Use diesel fuel only Unleaded Fuel Use unleaded gasoline only 10 Open Fuel Cap Slowly Refer to Operating manual Open fuel cap slowly to prevent fuel from spraying out of fuel tank 11 Positive Air Shutoff If Equipped Use this switch to trigger the positive air shutoff valve Control Compartment Continued Labels Section 5 ...

Page 81: ...o extend fly boom or to retract fly boom Select to rotate platform to the left or to rotate to the right Select to tilt platform up or to tilt platform down Select to move jib up or to move jib down Select to rotate turret to the left or to rotate to the right Select to raise riser or to lower riser Select to raise main boom or to lower main boom Push and hold to start engine to enable base contro...

Page 82: ... or to retract fly boom Select to rotate platform to the left or to rotate to the right Select to tilt platform up or to tilt platform down Select to move jib up or to move jib down Select to rotate turret to the left or to rotate to the right Select to raise riser or to lower riser Select to raise main boom or to lower main boom Push and hold to start engine or to enable the emergency power unit ...

Page 83: ...d Danger Body crushing hazard 2 Annual Inspection Ensure that work platform has received annual inspection prior to operation 3 Emergency Lowering Procedure In case of emergency follow procedure outlined in label to lower the platform Control Side 1 5 1 3 6 2 1 4 6 5 Section 5 Labels ...

Page 84: ...No Label Pictorial Description 4 Crushing Hazard Danger Crushing hazard 5 Model Number Product Identifier Model number will vary may not be as shown 6 Skyjack Logo Skyjack Control Side Continued 1 5 1 3 6 2 1 4 6 5 Labels Section 5 ...

Page 85: ... or maximum number of people Load platform uniformly Platform capacity will vary over different aerial platforms 2 Operator s Daily Inspection Refer to the Operating manual Perform visual inspection and function tests at the beginning of each shift Refer to Table 4 7 Maintenance and Inspection Schedule 3 Horizontal Load Rating Apply no more than indicated side load Operate below indicated wind spe...

Page 86: ... 3 Manual Box Indicates location of operating manual 4 kg lb Platform Capacity Rated work load when operating on a level ground Rated work load includes the weight of both personnel and material and maximum number of people in each configuration Do not exceed total weight or maximum number of people Load platform uniformly Platform capacity will vary over different aerial platforms Platform Contin...

Page 87: ...ith this work platform prior to operation 6 AWPT Click It ANSI CSA Indicates full body harness awareness 7 Model Number Product Identifier Model number will vary may not be as shown 8 Horizontal Load Rating Apply no more than indicated side load Operate below indicated wind speed only 9 Skyjack Logo Skyjack Platform Continued 2 1 1 3 2 4 7 9 5 8 6 Section 5 Labels ...

Page 88: ...tion 1 Crushing Hazard Danger Crushing hazard 2 Warning Do Not Alter Do not alter or disable limit switches or other safety devices 3 Footswitch Enable On Off Depress and hold footswitch to enable platform function Platform Continued 1 2 1 3 Labels Section 5 ...

Page 89: ... Pictorial Description 1 Glow Plugs Start Engine Select to energize glow plugs Select for diesel fuel or for propane fuel Push and hold to start engine and then return to on position or select to turn engine off Select to turn hydraulic generator on or to turn it off 2 Emergency Lowering Procedure Follow procedure outlined in label to lower the platform 3 E Stop Horn Select to sound horn Read oper...

Page 90: ...age 90 December 2007 SJ 46AJ No Label Pictorial Description 5 Boom Turret Controller Push and hold controller in this direction to rotate turret to the left or to rotate turret to the right Push and hold the controller in this direction to raise main boom or to lower main boom 6 Boom Jib Platform Controls Select to rotate platform to the left or to the right Select to tilt platform up or down Sele...

Page 91: ...Page 91 No Label Pictorial Description 1 Body Crushing Hazard Danger Body crushing hazard 2 4x4 If Equipped Product identifier 4 wheel drive 3 Connect AC Supply Connect AC supply here Front Side Base 2 3 1 1 Section 5 Labels ...

Page 92: ...Page 92 December 2007 SJ 46AJ Notes ...

Page 93: ...e State of California to cause cancer birth defects and other reproductive harm Battery posts terminals and related accessories contain lead and lead com pounds chemicals known to the State of California to cause cancer birth defects and other reproductive harm WASH HANDS AFTER HANDLING ...

Page 94: ...www skyjack com Pålitelig lift løsninger av folk som bryr seg ...

Reviews: