background image

More options for calling the destination entry menu

Press in the menu 

Navigation

 function key 


Route


→ 

New dest. / stopover

→ 

Options


 .

Press in the menu 

Navigation

 function key 


POIs


→ 

Other POIs

→ 

Options

 .

Press in the menu 

Navigation

 function key 


My tours

→ 

New dest.

→ 

Op-

tions


 .

Destination input via the address

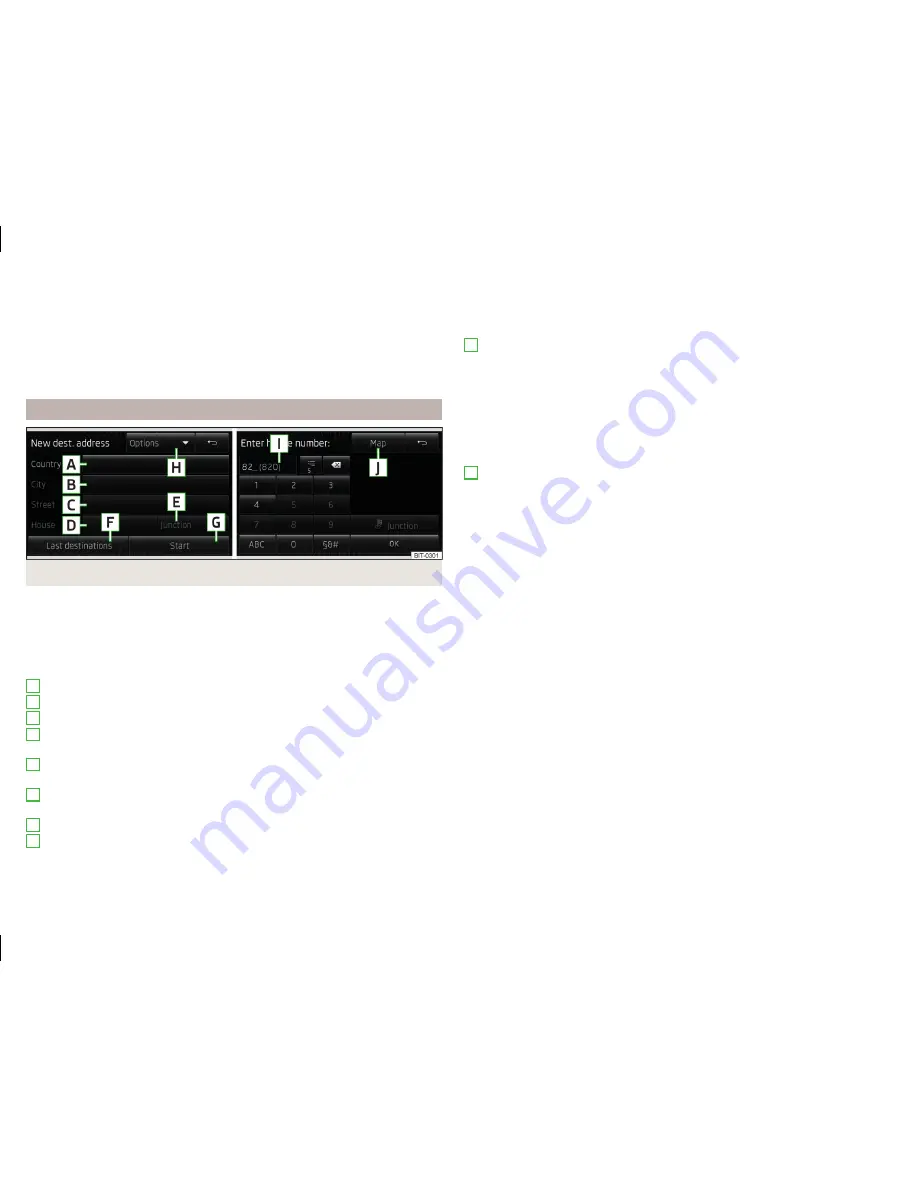
Fig. 36 

Destination entry by address / house number

The entry of a new destination can be done by entering or altering the ad-
dress.

Press in the menu 

Navigation

 function key 


→ 

Options


→ 

Address 

- the

following menu for entering the destination by address opens.

Entering the destination address

Country

 - enter country

City

 - enter city or town

Street

 - enter street

House number

 - enter house number (the function key is enabled only af-

ter the street has been entered)

Junction

 - enter junction (the function key is enabled only after the street

has been entered)

Last destinations

 - open the list of last destinations 

» page 66

List of

saved destinations (My destinations)

Start

 - Start route calculation

Options


 - Opens the destination menu 

» page 63

Options of the desti-

nation entry

A
B
C
D

E

F

G

H

House number entry

By pressing the function key 

House number

 the following menu 

» Fig. 36

 is

opened for the house number entry.

Input line
Entry of selected items (the number displayed represents the number of
entries matching the entered number)
Delete characters in the entry line
Switch to letters 

» page 11

Alphanumeric with keyboard

Switch to special characters

Junction

 - Entering a junction (a traversing road)

Confirmation of the entered number

Map

 - Opens the map display 

» page 65

You need to enter both the building number and a further address indicator in
the form of a number. The device displays a list of destinations from combina-
tions of the two numbers.
If the entered house number was not found, the following menu opens to clar-
ify the destination.

No house number

 - Enter an address without a house number and display a

menu with destination details

Nearest house number:

 - Confirmation of the proposed house number

Enter junction

 - Open a menu with junctions with the selected street

Entry operation

The address positions are already pre-filled with the data of the last destina-
tion.
The pre-filled positions can be adjusted by touching the item and then chang-
ing it.
To start navigation, you need to enter country, city and street.
The information is entered step by step in the individual input screens.
When entering the street, instead of a street name, it is possible to select the
centre of the entered city by touching the function key 

Centre

. Then it is no

longer necessary to enter the house number or junction.
When entering the address, the function key 

Map

 is displayed on the input

screen 

» page 11

Alphanumeric with keyboard

. When you press the function

key, the system opens a screen with the map 

» page 65

 where you can spec-

ify the address more precisely or check it.

I





J

64

Navigation

Summary of Contents for Infotainment Navigation Amundsen

Page 1: ...SIMPLY CLEVER Infotainment Navigation Amundsen Operating Instructions...

Page 2: ...5L0012720DA...

Page 3: ......

Page 4: ...nfotainment Navigation Amundsen here after called the unit we thank you for your confidence in us Please read these Operating Instructions carefully because the operation in accordance with these inst...

Page 5: ...und 19 Menu Setup 20 Radio 23 Operation 23 Settings 27 Media 29 Operation 29 Audio sources 31 Pictures 36 Image viewer 36 Communication 38 Telephone 38 Pair 42 Connection 45 Dial telephone number 47 T...

Page 6: ...ns can differ in minor details from your vehicle they are only in tended to provide general information KODA AUTO a s pursues a policy of constant product and model develop ment Changes in terms of su...

Page 7: ...e button within 1 s Hold Pressing the button for 2 5 s Turn Turn the knob to the left right Move Touching with the finger and moving on the device screen in the desired direction Explanation of symbol...

Page 8: ...ic requirements and additional provisions of Directive 1999 5 EC with reference to radio equipment and telecommunications devices KODA AUTO a s hereby declares that the connection and the use of this...

Page 9: ...data devices to be used for mass storage resources GSM a telephone service of mobile communication ID3 tag an additional feature of a music file which allows for the dis play of artist title album na...

Page 10: ...ism for the following for the impairment of factory or garage fitted control units after installation in another vehicle for example after a theft for the impairment of components operated outside of...

Page 11: ...usted man ually page 20 1 2 3 4 5 6 7 8 9 10 11 12 13 Device power on off Switching the unit on and off manually Press to switch the device on or off Turn on device automatically If the device was not...

Page 12: ...e 54 Adjust the volume of the device that is switched on Every change in volume is displayed on the screen Increase volume Turn the control to the right Decrease volume Turn the control to the left Mu...

Page 13: ...reen areas which confirm a function or a menu are called function keys Grey background The key is inactive and thus not selectable White background The key is active and thus selectable Green backgrou...

Page 14: ...uch as Lorem Ipsum The entry such as a telephone contact to be searched for must be entered along with the special characters diacritics In the function key the number of matching selected entries is...

Page 15: ...o next channel saved Button adjustment wheel Fig 5 Action Operation 3 4 Hold and re lease Change within the frequency range in desired di rection after releasing the button the search for the next sta...

Page 16: ...enu of the MAXI DOT dis play a Does not apply for AUX Only the name of the track being played is displayed in the MAXI DOT display Operating the phone menu Fig 7 Multifunction steering wheel Press the...

Page 17: ...displayed next to each entry in the call list Incoming call Outgoing call Missed call Operating the navigation menu Fig 8 Multifunction steering wheel Press the button 8 on the multifunction steering...

Page 18: ...following menus Radio Media Telephone Navigation The voice control system can be used either by the driver or by the front pas senger WARNING Do not use the voice control function in an emergency or w...

Page 19: ...l key on the multifunction steering wheel or press twice Press a key or a function key on the device does not apply to Issue the voice command End voice control Instructions and help for voice control...

Page 20: ...is recognized by the device Stop restore voice command input Read and observe on page 15 first Stop In some menus the procedure for entering voice commands can be stopped with the right control 2 Fig...

Page 21: ...de favourites icons in the map Turn off favourites Accessing the route information Voice command Operation Distance to destination Information concerning distance to the destination Time of arrival In...

Page 22: ...m Medium volume Loud High volume Bluetooth audio Volume settings of the Bluetooth Audio profile connec ted device Quiet Low volume Medium Medium volume Loud High volume Lowering entertainment Lowers t...

Page 23: ...copyrights are only available in the English language Screen settings Press the button Screen Switch off screen in 10 seconds Activate deactivate the display Brightness Adjusts the brightness of the s...

Page 24: ...e For some languages there is no voice control available In this regard an ap propriate warning message appears on the device screen Data transmission of mobile devices Press the button Mobile device...

Page 25: ...vices with enabled Blue tooth functions and activated visibility Bluetooth audio A2DP AVRCP Switch on off the connection option for Bluetooth profiles A2DP or AVRCP1 System Information Press the butto...

Page 26: ...ountries where the RDS function is not supported we recommend turning off the AF and RDS function Main menu Fig 12 Main menu FM and AM DAB main menu Read and observe on page 23 first Call up the main...

Page 27: ...page 23 Station info Display information on the DAB stations by accompanying Radio text A and pictures presentation B Radio text Displays one radio text Slideshow Only a representation of images pres...

Page 28: ...the Radio menu press the function key the list of available stations is opened page 24 Select the desired station Manually selecting a radio station In the Radio menu press the function key It current...

Page 29: ...or radio stations is displayed Press the preset button for the station which a logo is to be assigned to A menu of media CD SD card USB is displayed In the relevant media select the image you want to...

Page 30: ...the search for alternative fre quencies of the station currently being heard when you turn off AF off is dis played on the device screen Radio Data System RDS Switches on off the RDS function RDS Reg...

Page 31: ...nges are used In some countries the DAB radio reception is only possible in the so called L band If no L band DAB radio reception is possible in the country then we recom mend to leave this menu item...

Page 32: ...30 Multimedia Database2 page 31 Menu settings Media page 31 Description of function keys of the menu Media for playback page 29 Play back Note The name of the artist the album and the title of the fil...

Page 33: ...roller 2 Fig 1 on page 7 2 Note Some function keys for playback may not be available Folder track list Browser Fig 16 Folder Title list The content of an audio source is displayed in alphabetical orde...

Page 34: ...s only available for the display of the entire source content page 30 Track lists Sorted by the track title A B Artists Sorted by artist s name Albums Sorted by album name Tracks Sorted by the track t...

Page 35: ...the owner s manual of the specific manufacturer for operating the exter nal audio source Select audio source Fig 18 Select audio source Read and observe and on page 32 first Selection of the audio so...

Page 36: ...d on the front of the device Inserting an SD memory card Push the SD memory card into the available slot with the cut edge upwards SD card 1 or downwards SD card 2 until it locks into place The play f...

Page 37: ...ss is automatically started applies for audio sources where charging via the USB connector is possible The charging efficiency can be different compared to the charging from the usual mains power supp...

Page 38: ...ial software MTP player with the Android oper ating system and Windows USB 1 x 2 x and 3 x or higher with support of USB 2 x Bluetooth Player Bluetooth proto colsA2DPand AVRCP 1 0 1 4 Other sources Po...

Page 39: ...rmation on the following subjects Operation 36 Select source 37 Supported Formats 37 Settings 37 First and foremost pay attention to the safety instructions page 7 Impor tant notes Note Viewing image...

Page 40: ...screen in the re quired direction Rotate by 90 Touch screen using two fingers and move clockwise or counter clockwise only availa ble with standard representation Press or A Operation Action Maximum z...

Page 41: ...the functions of both telephones can be operated via the device The device allows you to work with text messages SMS of the connected tel ephone a telephone support and a connection via the MAP profil...

Page 42: ...o difficulties when establishing a connection with the device or transferring da ta The functionality of the telephone is dependent on the telephone service op erator and the telephone being used Furt...

Page 43: ...phone is displayed in the function key B Fig 22 on page 39 Additional telephone The additional telephone provides you with the opportunity to accept or reject the incoming call when a telephone call i...

Page 44: ...ssign function keys to allow speed dialling of con tacts you can also add and delete quick contacts here Mailbox number Enter here Enter the telephone number of the mailbox Prefix Switch on off the op...

Page 45: ...ve the key for a few minutes a a On vehicles with a starter button switch off the ignition and open the driver s door Pair Introduction This chapter contains information on the following subjects cond...

Page 46: ...h for available telephones with activated Bluetooth function and visibility Opening of the settings menu page 41 Settings After pressing the function key Find telephone the search for available device...

Page 47: ...upled Press the function key Bluetooth Find telephone Select tele phone Results press and to select the desired telephone Press the function key Bluetooth Find devices Results press and select the tel...

Page 48: ...PIN code into the device Enter the PIN code shown on the device display into the telephone within 30 seconds 2 If necessary acknowledge the telephone confirmation requirement concern ing the connectio...

Page 49: ...he main telephone Select the telephone you want from the list of paired telephones or if the de sired telephone from the list does not exist press the function key Find tele phone Then select the desi...

Page 50: ...List of telephone contacts 48 Speed dialling a telephone number 49 Call lists 50 First and foremost pay attention to the safety instructions page 7 Direct entry of the telephone Fig 24 Direct entry o...

Page 51: ...Press the function key Info call the Info number is dialled An information service can be called when information regarding the products and services of the KODA brand are required The breakdown and...

Page 52: ...Depending on the telephone contact images for the first 1000 contacts are imported at the same time If an error occurs while loading the list the following message appears Import failed Please try ag...

Page 53: ...menu Telephone function key The system displays a call list Description of the function keys Open the call list All All calls listed max 120 calls Missed calls List of missed calls up to 40 calls Dia...

Page 54: ...n key The telephone call is switched backto the device Conference The conference is a shared call with between three and six participants Start a conference invite additional participants During a cal...

Page 55: ...ion keys of the follow ing menus can be displayed New text message Creating and sending the message page 52 New text message Inbox Open a list of received messages page 53 Received text mes sage Sent...

Page 56: ...message by means of the Checkbox add remove Removal of the selected contact from the recipient list Return to view the text message Fig 28 Sending a text message Press the function key Fig 29 the tex...

Page 57: ...ed by your telephone service provider KODA accepts no responsibility for the transmitted data volume An intensive use of the function MirrorLink and the work associated with applications e g GPS mobil...

Page 58: ...h the list of applications Display the alphanumeric keypad of the device Display function keys on the right side Display of the function keys in the bottom of the screen Masking the function keys In a...

Page 59: ...ported by the facility or there may be no MirrorLink application availa ble in the facility Disconnected The time limit for the connection with the facility has expired Disconnect and reconnect to the...

Page 60: ...vehicles which have the right of way such as police ambulance and fire brigade vehicles can be heard at all time CAUTION In some countries some unit features can no longer be selected when the ve hic...

Page 61: ...first The map display can be operated by using function keys by finger touching the device screen or with the right controller 2 Fig 1 on page 7 The type of map display can be selected page 60 Depend...

Page 62: ...he automatic scale fast map manual scale The manual scale is turned on when the function key G and the symbol Fig 32 on page 58 is displayed Map scale can be change in the following ways Turning the r...

Page 63: ...POI categories display page 62 Map A B C D E Split screen Fig 34 Split screen menus in the split screen Read and observe and on page 57 first Additional information is displayed in the split screen de...

Page 64: ...setup Display additional information page 62 Manage memory Sort contacts enter your home address and delete desti nations page 62 Import destinations Import custom destinations previously pre pared pa...

Page 65: ...ion near by with the following menu items Cancel Close the window with the warning Search Search for the nearest fuel station when you select the fuel station the new route will be calculated from you...

Page 66: ...ination input via the address 64 Destination input via the map point using the GPS coordinates 65 First and foremost pay attention to the safety instructions page 7 Impor tant notes This chapter discu...

Page 67: ...in the entry line Switch to letters page 11 Alphanumeric with keyboard Switch to special characters Junction Entering a junction a traversing road Confirmation of the entered number Map Opens the map...

Page 68: ...he latitude and longitude valuesfor the entered point The symbol displays the current map scale This can be changed while the entry is being made manually page 59 GPS coordinates The travel destinatio...

Page 69: ...ests and contacts the following menu is displayed Search by pressing the function key the search for a destination or a con tact starts using the named entered in the destination menu the function key...

Page 70: ...ter selecting the source and confirming the menu item Import all vCards from this folder the importing the data stored in vCard format into the device memory begins For more information on creating an...

Page 71: ...pressing the function key Find name D Fig 39 on page 67 Following the search a menu with the found locations is displayed The menu is sorted according to the distance to the specified search area By p...

Page 72: ...gories of the saved personal POIs page 68 Personal POI Categories alphabetical Displays all POI categories in alphabetical order Car and travel Dining and shopping Companies and public services Emerge...

Page 73: ...Skiing Other destinations shown on the map Sym bol Meaning Symbol Meaning Home address Favourite Destination Stopover destination City centre Town centre Route guidance Introduction This chapter cont...

Page 74: ...e in one of the following ways Within 15 min route guidance is continued taking into account the calcula ted route From 15 min to 120 min the device screen displays Continue route guid ance after conf...

Page 75: ...ruption can be entered manually after this entry the device per forms a new data calculation and offers an alternative route The traffic jam information increases or decreases by touching the scale or...

Page 76: ...isplayed Function key All show all traffic information Function key Route only display the traffic information on the current route A map showing the traffic obstruction Window with the following info...

Page 77: ...Stopover with sequential number final destination expected arrival time at the final destination or stopover Distance to final destination or stopover A B C D A B C E With destinations on the route a...

Page 78: ...n the target type Fig 44 New destination or a destination stored in the list of last destinations The menu is shown at the destination entry point by pressing the function key if this destination is n...

Page 79: ...destination Route options Display a menu for setting the route options page 61 Start Start route calculation By pressing the function key Edit G the following menu is displayed for the destination pro...

Page 80: ...es presentation 24 Settings 27 Data transmission of mobile devices 21 Delete the telephone from the list of paired de vices 45 Demo mode 62 Description of the device 7 Destination Custom destination 6...

Page 81: ...nage memory 62 Manoeuvre graphical driving recommendations 71 Nav announcements 71 Map automatic scale 59 Display 58 Display options 60 Fast Map 59 Lane recommendations 62 Main menu 58 Manual scale 59...

Page 82: ...61 Route type 61 Satellite data 61 saved destinations 66 Save the current position 66 Search area 68 Settings 61 Split screen 60 Status line 62 Stopover 74 Tour editing 73 Tour memory 74 Traffic info...

Page 83: ...age favourites 49 Media 31 MirrorLink 55 Navigation 61 Radio 27 Restore factory settings 21 Software Update 22 Sound 19 System Information 22 Telephone 41 User profile 49 Voice control 21 Volume 9 Set...

Page 84: ...d 53 TMC dynamic route 73 Information 73 Operation 72 Requirements 72 TMC Traffic information 72 Touch screen 8 Tour editing 73 Tour memory 74 Traffic dynamic route 73 Information 73 Operation 72 Requ...

Page 85: ...82 Index...

Page 86: ...83 Index...

Page 87: ...r any other use either in whole or in part is not permitted without the written consent of KODA AUTO a s KODA AUTO a s expressly reserves all rights relating to copyright laws Subject to change Issued...

Page 88: ...www skoda auto com Amundsen Yeti Infotainment anglicky 11 2014 S90 5614 02 20 5L0012720DA 5L0012720DA...

Reviews: