background image

4

ZCE831 

Date 2019May7/D

LUBRICATION

For maximum performance and tool life, an air line lubricator, set to deliver 4 drops per minute, is recommended.  SIOUX No. 288 Air Motor Oil is 

recommended.
If an airline lubrication is not used, it is recommended that the tool be oiled daily before use to improve performance. Add air motor oil and run the tool 

for 10-20 seconds to distribute oil through the tool.

MAINTENANCE

Water, dust and other airline contaminants can cause rust and vane sticking. For long periods between tool use, flush the tool with 5 ml of oil and run for 

10 seconds. This will help remove contaminants and reduce the formation of rust.

DISMANTLING & ASSEMBLY INSTRUCTIONS 

Disconnect tool from air supply. Remove Cap Screws (9B) from Motor Housing (30) using a screw driver. Remove Steel Housing (44), while taking 

care to capture the oil from the assembly. Remove Anvil (37 or 38) and Pins (36) from the front of the Frame (34), and then remove the Twin Hammers 

(35) from the side of the Frame. Remove Cap Screws (9A) from Motor Housing to remove Throttle Handle (8) from Motor Housing. Remove Exhaust 

Deflector (31) by removing Tapping Screws (32). Once these items are removed from the Motor Housing, heat the remaining Motor Housing 

components until the assembly is hot to the touch. With the assembly still warm, press the Rotor (23) and Rear Plate (22) from the Motor Housing, then 

press the Cylinder (25) from the Motor Housing. Remove the Hose Adapter (1) from the Throttle Handle using a wrench and remove the Throttle Spring 

(4), Valve Ball (5), and Valve Pin (6) from the Throttle Handle using long nose pliers. Using a hammer and a punch, remove Spring Pin (10) and remove 

Inside Trigger (12). Remove Screw (15) with a screw driver and remove Spring (14) and Steel Ball (13) from the detent hole in the Throttle Handle. 

Remove Cap Screw (20) using a hex wrench and remove Reverse Lever (19). With these removed, remove Reverse Regulator (18) through the front of 

the Throttle Handle.

REASSEMBLY

Clean and examine all parts for wear and replace any parts with parts obtained from manufacturer or authorized distributor. All parts must be dry. Check 

that all bearings run smoothly. Before installing Cylinder (25) into Motor Housing (30) preheat the motor housing until the Motor Housing is hot to the touch 

before press fitting together. When installing the Rear Plate (22) onto the Rotor (23), press equally on the inner and outer bearing races.  Ensure a final 

gap of 0.0010” to 0.0015” between the Rear Plate and Rotor. When reinstalling Twin Hammers (35) ensure that they are installed as mirror images; counter 

bores facing each other and chamfers on the outside. Reassemble remaining tool parts in reverse order following the threadlocker schedule in the table. 

Refill impact assembly with 60 mL of suitable impact oil. Connect tool to a suitable air supply (90 psi preferred) and run tool slowly for 5 seconds to allow 

the oil to circulate
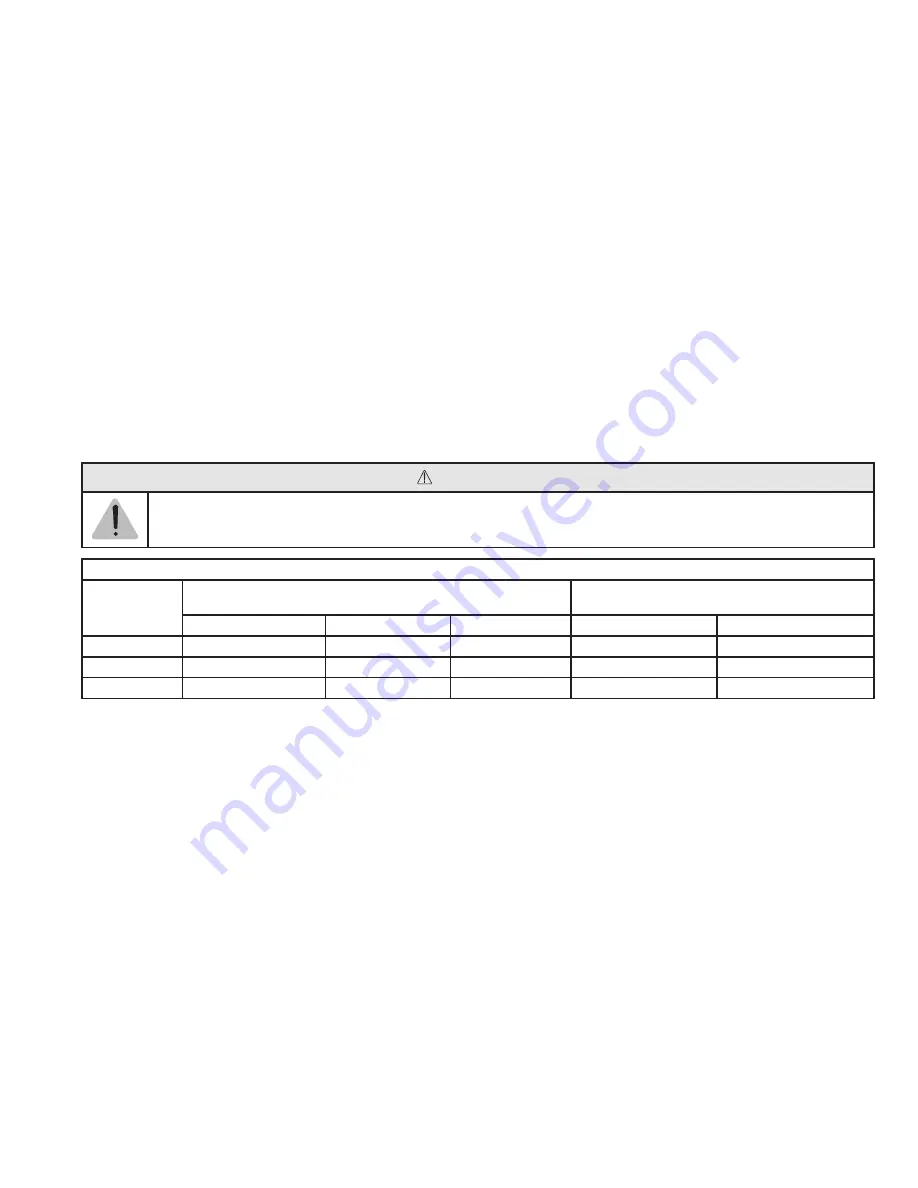
WARNING

Disconnect tool from air supply before performing any adjustment, maintenance, or repair.

NOISE AND VIBRATION READINGS

Catalog 

Number

Noise (Tested in accordance with ISO Standard 15744)

Vibration (Tested in accordance with  

ISO Standard 28927-1:2009)

Sound Pressure (dBA)

Sound Power (dBA)

Uncertainty (dBA)

Vibration m/s

2

Uncertainty m/s

2

IW1000MP-8H

102.7

108.1

3.0

12.4

1.99

IW1000MP-8H5

TBD

TBD

TBD

TBD

TBD

IW1000MP-8H8

98.9

110.5

3.0

6.93

0.38

Summary of Contents for IW1000MP

Page 1: ...g screws can cause injury This tool is not insulated for contact with electric power sources Do not use near live electric circuits When driving screws into walls be aware that they may have hidden el...

Page 2: ...oses that are not oil resistant or are not rated for the working pressure can burst Make sure that all air hoses are oil resistant and rated for the working pressure Air hoses that burst can cause inj...

Page 3: ...ditional one quarter to one half turn slight additional turning is necessary if gaskets are being clamped For additional power needed on disassembly work turn regulator to its fully open position This...

Page 4: ...ing long nose pliers Using a hammer and a punch remove Spring Pin 10 and remove Inside Trigger 12 Remove Screw 15 with a screw driver and remove Spring 14 and Steel Ball 13 from the detent hole in the...

Page 5: ...taub erzeugt Atmen Sie den Staub nicht ein Tragen Sie eine zugelassene Staubmaske Durch Maschinenschleifen S gen Schleifen Bohren und andereT tigkeiten auf Baustellen kann Staub mit Chemikalien freige...

Page 6: ...d leicht zug nglich sein um die Luftzufuhr im Notfall abstellen zu k nnen Peitschende Luftschl uche k nnen Verletzungen verursachen Luftschl uche die nicht lbest ndig bzw nicht f r den Betriebsdruck z...

Page 7: ...weitere bis Drehung festziehen Bei ebenfalls festzuziehenden Dichtungen noch etwas mehr festziehen Falls beim Auseinanderbauen zus tzliche Leistung ben tigt wird den Regler ganz auf ge ffnete Position...

Page 8: ...tte 22 aus dem Motorgeh use dr cken Anschlie end auch den Zylinder 25 aus dem Motorgeh use herausdr cken Den Schlauchadapter 1 vom Startergriff abziehen und Starterfeder 4 Ventilkugel 5 und Ventilstif...

Page 9: ...durante las operaciones de lijar aserrar amolar taladrar y en otras actividades de construcci n contienen substancias qu micas que se sabe causan c ncer defectos cong nitos y otros da os en el sistem...

Page 10: ...aceite o que no est n calibradas para la presi n que implica el trabajo pueden romperse violentamente Aseg rese de que todas las mangueras sean resistentes al aceite y que est n calibradas para sopor...

Page 11: ...la tuerca hasta que est al ras y luego apri tela de un cuarto a media vuelta m s un giro ligeramente mayor ser necesario si se est n apretando juntas o empaques Cuando se necesite una potencia adicio...

Page 12: ...e el cilindro 25 Retire el adaptador de la manguera 1 de la palanca reguladora y quite el resorte regulador 4 la esfera de la v lvula 5 y la clavija de la v lvula 6 de la palanca con unos alicates de...

Page 13: ...vvitamento Usare una maschera di tipo approvato La polvere generata durante le operazioni di levigatura di taglio di perforazione e varie altre attivit di costruzione contiene sostanze chimiche che po...

Page 14: ...r la pressione di servizio Tubi dell aria che scoppiano possono causare infortuni Il mancato utilizzo degli strumenti alla corretta pressione dell aria pu provocarne il funzionamento anomalo Non super...

Page 15: ...mergere i dadi arrugginiti in olio lubrificante fluido e rompere il blocco di ruggine prima di rimuovere il dado con la chiave pneumatica Se il dado non inizia a muoversi entro tre cinque secondi usar...

Page 16: ...la della valvola 4 la sfera della valvola 5 e il perno della valvola 6 dall impugnatura utilizzando una pinza a becco lungo Utilizzando un martello e un punzone rimuovere il perno a molla 10 e smontar...

Page 17: ...produits chimiques qui sont connus comme provoquant le cancer des anomalies cong nitales et d autres troubles reproductifs L inhalation des poussi res g n r es par le vissage peut causer des blessures...

Page 18: ...blessures Une pression pneumatique inad quate est susceptible d entra ner un fonctionnement irr gulier Ne pas d passer la pression pneumatique maximum de 90 psig 6 2 bar ou celle inscrite sur la plaq...

Page 19: ...oup de rouille et pour les fixations ressort qui absorbent beaucoup de la puissance d impact Si possible fixez ou calez l crou pour viter le retour lastique Faites tremper les crous rouill s dans de l...

Page 20: ...la soupape 5 et le poussoir de la soupape 6 de la poign e l aide d une pince bec long l aide d un marteau et d un poin on retirer la goupille du ressort 10 et retirer la g chette 12 Retirer la vis 15...

Page 21: ...aaien van schroeven Gebruik een goedgekeurd masker Schuren zagen slijpen boren en andere gereedschapsactiviteiten kunnen stofdeeltjes cre ren met chemische bestanddelen waarvan geweten is dat ze kanke...

Page 22: ...stand zijn tegen olie en geklasseerd zijn voor de werkdruk Slangen die barsten kunnen lichamelijk letsel veroorzaken Bij onjuiste luchtdruk kunnen pneumatische boren storingen geven Zorg dat de luchtd...

Page 23: ...k van U bouten lange dopschroeven dubbele schroefdraaddiepte moer ernstig geroeste bouten en veerringen omdat deze een groot gedeelte van de slagenergie absorberen Als het enigszins mogelijk is moet d...

Page 24: ...e cilinder 25 van de motorbehuizing Verwijder de slangadapter 1 van het gaspedaalhandvat en verwijder het gaspedaalveertje 4 de afsluiterbal 5 en de klep pen 6 van het gaspedaalhandvat met behulp van...

Page 25: ...ningsf rm gan Inandning av damm som skapas vid skruvdragning kan orsaka personskador Detta verktyg r inte isolerat mot kontakt med elektriska str mk llor Se till att inte anv nda verktyget n ra str mf...

Page 26: ...gsta till tna lufttryck p 90 psig 6 2 bar eller det som angivs p verktygets namnpl t eller i bruksanvisningen Anv nd luftregulator f r att bibeh lla r tt lufttryck Motordrivna verktyg som fungerar ob...

Page 27: ...enna sl ende mutterdragare r klassad f r bultstorlek 1 25 mm Detta m ste nedgraderas f r fj der U bultar dragbultar l nga sexkanth lskruvar djupa muttrar n r det r mycket rost samt vid fj drande f rba...

Page 28: ...rm tryck rotorn 23 och bakstycket 22 fr n motorhuset och tryck sedan cylindern 25 ut ur motorhuset Ta bort slangadaptern 1 fr n gasreglaget och ta bort gasreglagefj dern 4 ventilkulan 5 och ventiltapp...

Page 29: ...apping Screw 34 SP505624 O Ring 35 PT1800 11 Twin Cage 36 PT1800 13 Twin Hammer 2 IW1000MP 8H5 IW1000MP 8H8 PT1800 13 M Twin Hammer 2 IW1000MP 8H 37 SP506518 Twin Hammer Pin 2 38 PT1800L 12R Long Anvi...

Page 30: ...Normen oder Bezugnahme auf Spezifikationen anhand derer die Konformit t erkl rt wird Sicherheit ISO 11148 6 2010 Schwingungsemission ISO 28927 2 2009 Ger uschemission ISO 15744 2008 Der Bevollm chtigt...

Page 31: ...r f rences aux normes harmonis es utilis es ou r f renc es dans les sp cifications en vertu desquelles la conformit est d clar e S curit ISO 11148 6 2010 Vibration ISO 28927 5 2009 Bruit ISO 15744 200...

Page 32: ...erade standarder som anv nts eller h nvisningar till de specifikationer enligt vilka verensst mmelsen f rs kras Veiligheid ISO 11148 6 2010 Trilling ISO 28927 2 2009 Lawaai ISO 15744 2008 Den auktoris...

Page 33: ...33 ZCE831 Date 2019May7 D NOTES...

Page 34: ...arteggiatura segatura smerigliatura trapanatura con attrezzi elettrici e simili attivit pu contenere sostanze chimiche che causano cancro difetti congeniti o altri danni all apparato riproduttivo AVER...

Page 35: ...This pdf incorporates the following model numbers IW1000MP IW1000MP 8H IW1000MP 8H5 IW1000MP 8H8...

Reviews: