background image

E

3

. The Function For 200 Point(Be the same with: 2V-GRIND)


57 


25

50

50

150

4

5

5

1

0

1(-5,25)

2(-10,75)

3(-10,100)

E

A

C

B

D

0(0,0)

X

Y

grinding wheel

every UCS taking a subsidiary zero position as its original points to perform the 
processing when need. 

2. In the display mode of every UCS, processing with various special function can 

be performed. 


. The setting of subsidiary zero position 

There are two methods of setting subsidiary zero position: the one is entering 

the  position  of  the  subsidiary  zero  position  directly,  the  other  is  resetting  once  a 
subsidiary zero position is reached. 

Method 1: Directly Entering, under the UCS display mode, key       

Number keys              . 

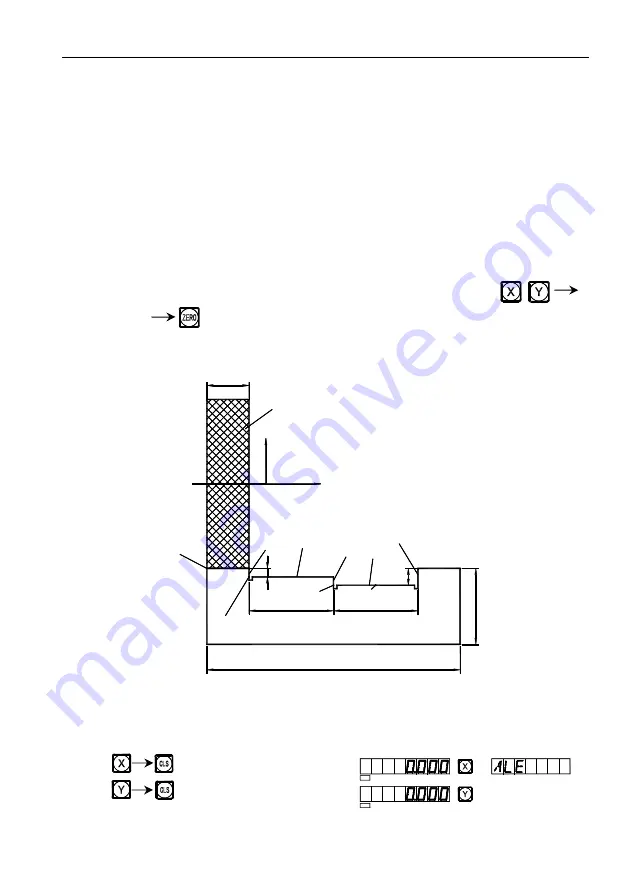
Take  Fig.  (1)  as  example:  After  turning  the  machine  on,  move  the  machine 

tool to the center point O in Fig.(1), Enter the absolute display mode.   


Fig. (1) 


Reset, set the zero position in the absolute mode at the main reference of the 

working piece. 


SEL

SEL

Summary of Contents for SDS6

Page 1: ...SINO DIGITAL READOUTS SDS6 Operation Manual GUANGZHOU LOK SHUN CNC EQUIPMENT LTD ...

Page 2: ... and grinding machine and lathe machine SDS6 3V the readout used for 3 axis milling machine and lathe machine and discharging processing It is recommended that Instructions for panel keys of the SDS6 digital display meter that is applicable to this manual are listed in P1 4 of the above Section 1 Read through follow safety precautions and Section 2 see P102 107 which are very important to the safe...

Page 3: ...the case of abnormality please contact Guangzhou Lokshun CNC Equipment Ltd or dealer Once the optical electronic ruler used in the digital display meter is damaged do not replace it with rulers of other brands because products of different companies have their respective characteristics indicators and wiring Never make wiring without the guide of professional technicians otherwise the digital disp...

Page 4: ...Illustration of Panel and Keyboard 1 SDS6 3V READOUT PANEL AND KEYBOARD SDS6 2V READOUT PANEL AND KEYBOARD ...

Page 5: ...on Key in Calculation function key Calculation function key in Calculation function key Input calculation result canceling key in Calculation function key Key for Inverting Trigonometric Functions in Calculation function key Square root calculating key in Calculation function key Entry keys for decimal point Entry key plus or minus symbol 0 1 2 3 4 5 6 7 8 9 X0 Y0 Z0 ...

Page 6: ...n the meter System British system display Function key for Sleep Function key for 200 zero Position R angular ARC function key ARC Function key Function key for circle equally Dividing PCD Function key Function key for drilling holes along an oblique line Angular surface processing function key In calculation function as sine trigonometric function key 1 2 R ...

Page 7: ...unction as tangent trigonometric function key Key for the conversion of relative absolute display Key for the selection of upper lower term or plane procession Key for taper measure function Key for calling 200 tool storeroom Key for input 200 tool storeroom Key for radius Function key for machine output EDM only SDS6 3V readout has Function key for data filtration only SDS6 2V readout has TOOL ...

Page 8: ... Point Subsidiary Zero Position 38 Be the same with MIIL_MS MIIL_M EDM E2 The Function For 200 Point Subsidiary Zero Position 47 Be the same with LATHE E3 The Function For 200 Point Subsidiary Zero Position 55 Be the same with 2V GRIND F PCD Circle Equally Dividing Holes 62 Be the same with MIIL_MS MIIL_M EDM G Angular Surface Processing 66 Be the same with MIIL_MS H The Function Calculator Functi...

Page 9: ...Function Of Measure For Taper 81 Be the same with LATHE L EDM Matching Output Function 83 Be the same with 3V EDM M Digital Filter Function 93 Be the same with 2V GRIND N N3 Function 95 Be the same with 2V MIIL_MS O The Progressive Progressing of rectangular Inner chamber 99 Be the same with 2V MIIL_MS P Additional sheet 102 ...

Page 10: ...A Basic Function 1 A Basic Functions ...

Page 11: ...eadout has X axis Y axis and Z axis The lathe machine readout display LATHE the grinding machine readout display GRIND the multifunctional milling machine readout display MILL_MS the universal milling machine readout display MILL_M the discharging processing readout display EDM 2 Setting of System In process of self check key then the system enter setting mode after self check finished 1 Setting a...

Page 12: ... method alike axis X Key next step 7 choose machine type SDS6 3V readout multifunctional milling machine readout universal milling machine readout discharging processing readout lathe machine readout SDS6 2V readout multifunctional milling machine readout universal milling machine readout grinding machine readout lathe machine readout key next step 8 choose whether integrate Y axis with Z axis pre...

Page 13: ... Z axis displayType Notice if choosing angle display type then automatic enter the function of setting the line of encoder the angle display Support minutes and seconds demonstration and Decimal display mode Innormal mode press key to switch If having chosen the inch display mode in angle display mode the angle display has priority and the range of angle value is from 0 to 360 degree 11 Self test ...

Page 14: ...he correct one again 5 Key If any mistake is found now repeat steps 3 5 6 Move the machine table to the position of 13 and the processing at Point B can start 5 Absolute relative user coordinate display mode Key the absolute relative display mode will convert one the other following are operations 1 Let the Tool point to Point M reset under the absolute mode Key or Key 2 Move the machine tool to P...

Page 15: ...Message Screen It is in absolute display mode when INC is display Message Screen Keying can also realize the conversion between the two display mode and it is also possible to enter the display mode of 200 sets of user coordinates as shown in the following circulating schematic diagram Key and enter the display mode of 200 sets of user coordinates directly Enter the number Key digit keys such as E...

Page 16: ...ve the machine tool to bring the axis displayed value into zero and the center position is reached in the same method can determine the center positions of Y axis and Z axis note Lathe machine without this function 7 R D Radius Diameter Switch Display X axis datum on the center line 1 Cutting tool in place A 2 Key 3 Move the cutting tool to place B 4 Key Notes only lathe machine has this function ...

Page 17: ...y the size displayed in the mm System inch system will convert one to the other 1 The original display is in the mm system and the display in inch is desired 2 Key 3 Key or choose the bits of decimal 4 bits or 5bits Key 4 Enter processing mode of Hole B 5 Key can convert directly to mm System 10 Segmented error compensation Note only in Metric system can do Segmented error compensation After Segme...

Page 18: ...llows 1 Move the raster ruler to the smallest end of the coordinate data Enter into the ALE right angle coordinate system 2 Press enter into the input function of multi segment compensation of X axis the set up method for Y axis and Z axis is the same as X axis 3 setting compensation of Segmented error 1 FIND_ZE searching for the origin suiting for having set the compensation of segmented error pr...

Page 19: ...ensation setup of the 1st segment Move towards the positive direction of X axis of the machine tool until get to the place of compensation Press When press Y axis will displays the X axis s value and that means the compensation value has been setup If the value input is wrong don t move the raster ruler and press then press this time the digit display LED of Y axis will be in input state and input...

Page 20: ...The Segmented compensation value is only aimed at the digit display meter raster ruler and machine tool set up together If the raster ruler or digit display meter whose Segmented compensation value is set up in a machine tool is moved to another machine tool the Segmented compensation value needs to be reset When the Segmented compensation function is not needed the Segmented compensation value is...

Page 21: ... At this time directly press key to quit the Segmented compensation setup and finish finding the mechanical origin Remarks It is applicable to setting up parameters according to sketch map 1 2 Firstly move the raster ruler to the smallest value and then set up Segmented compensation Press Choosing the FIND_ZE function Enter into the interface for choosing compensation method press to enter X axis ...

Page 22: ...offs the digital display box will automatically store the working state such as the working mode in every axis displayed data and the linear error compensation factor just before every interruption event in its memory Every time when the machine is turn on again the digital display box will recover to its working state just before the interruption event after self checking and the valve just befor...

Page 23: ...starting the processing key and the box will turn on all the display No matter how the machine tool was moved after the display had been turned off the box will see and keep in mind the end state after the machine tool have been moved When the display has been turned on again the displayed working state will be the actual state Note When the sleep switch has been turned off the digital display box...

Page 24: ...B Smooth R Be the same with MIIL_MS MIIL_M 15 B Smooth R Be the same with MIIL_MS MIIL_M ...

Page 25: ...illing machine This arc Calculation function makes it possible to freely control the smoothness of the circular arc The distance between two adjoining working points is uniform the smoothness of the circular arc can be control through the control of this distance This function is used in the processing of circular arc The display on the message window prompts the operator to enter all the paramete...

Page 26: ...dinate of Point D 30 10 The coordinate of Point E 30 10 The coordinate of Point F 20 20 The coordinate of Point G 30 10 The coordinate of Point H 20 20 In Plane XY XZ or YZ the start and end angle of a circular arc is counted in anti clockwise As shown in Fig 3 From A to B 0 90 Arc AB Form B to A 90 0 From B to C 90 180 Arc BC From C to B 180 90 From C to D 180 270 Arc CD From D to C 270 180 From ...

Page 27: ...en a flat end milling tool is used the circle center position is the position of Point O with respect to Point B on the tool As shown in Fig c when a circular arc milling tool is used the circle center position is the position of Point O with respect to Point C on the tool In the processing of the arc in Plane XY as shown in Fig a the circle center position is the position of the center axis of th...

Page 28: ...r outer circular arc as shown in Fig b RAD TL For inner circular arc as shown in Fig c RAD TL 10 Move the machine tool to the start point of the processing in following with the display on axes and then start the point by point processing 11 You can quit the Arc R Calculation function as will just key Ⅰ Take the processing of the arc shown in the figure in page 22 as an example 1 At first finish t...

Page 29: ...s shown in Fig b Key Key 6 Enter the radius of the circle Key Key 7 Enter the diameter of the tool Key Key 8 Enter the maximal cut Key Key 9 Enter the start angle of the arc Key Key 10 Enter the end angle of the arc Key 2 2 5 2 2 2 2 5 5 2 0 5 1 0 0 9 SEL SEL SEL SEL SEL SEL SEL SEL SEL SEL SEL SEL ...

Page 30: ... come to be displayed and you can move the machine tool to bring the displayed values on the both axes into zero and reach the position of the corresponding point of the R circular arc Ⅱ Take the processing of the arc shown in the figure in page 24 as an example again 1 At first finish tool setting reset key and enter ARC function 2 choose smooth function press press only 2V readout has this set i...

Page 31: ...n Fig a Key Key If you use a circular arc milling tool finish tool setting as shown in Fig b Key Key If you use a flat end milling tool finish tool setting as shown in Fig a Key Key If you use a flat end milling tool finish tool setting as shown in Fig b Key Key 6 Enter the radius of the circle Key Key 2 5 5 2 3 2 2 5 5 3 5 0 0 0 1 0 SEL SEL SEL SEL SEL SEL SEL SEL SEL SEL SEL SEL SEL SEL SEL ...

Page 32: ...tart angle of the arc Key Key 10 Enter the end angle of the arc Key Key 11 Determine inner outer circle mode Key or Key Key 12 It is display that the processing start at the first point Use a circular arc milling tool setting as Fig a Use a circular arc milling tool setting as Fig b 5 0 1 2 7 0 1 0 8 SEL SEL SEL SEL SEL SEL SEL SEL SEL SEL SEL SEL SEL SEL SEL SEL SEL SEL SEL SEL SEL SEL SEL SEL ...

Page 33: ...orresponding point of the R circular arc Note When the arc to be processed in Planes XZ and YZ covers the 90 or the 270 position for example the one from 210 to 330 covers 270 in Fig c and the other from 135 to 45 covers 90 in Fig d end mill shall not be used Ⅲ Take the processing of the working piece shown in the figure on the right as the third example 1 For the processing of this working piece ...

Page 34: ...dout has only smooth R function so hasn t this set item and directly get into next step 3 Select processing plane Key or 4 Select Plane XZ Key 5 Enter the position of the circle center Key Key 6 Enter the radius of the circle Key Key Now a circular arc mill is used finish the tool setting as shown in Fig b 7 Enter the diameter of the tool Key Key 8 Enter the maximal cut Key Key R 1 1 1 1 2 5 5 1 0...

Page 35: ...e Key or Key Key 12 It is display that the processing start at the first point 13 enter the processing and display the first point 14 Press or to display the every processing position Move the machine tool to bring the display value on X and Y axes into zero that s the each point of R You may quit ARC function at will just key 1 5 0 3 0 R SEL SEL Z Y X ALE ALE ALE X ...

Page 36: ...C Simple R Be the same with 2V MIIL_MS 2V MIIL_M 27 C Simple R Be the same with 2V MIIL_MS 2V MIIL_M ...

Page 37: ...function may be a good choice In general the processing of a circular arc will be realized in one of the eight ways shown below using end mill or circular arc mill The operation procedure of the simple arc R function Let the tool face just at the arc and key enter arc R Calculating function As to how to let the tool face just at the start point just refer to 1 in page 30 1 Select the simple R func...

Page 38: ...T When processing an arc in Planes XZ and YZ MAX CUT in the simple R function is defined as the depth of cut in each cut feed in Z axis direction see Fig a the maximal cut can be changed during the processing When processing an arc in plane XY MAX CUT is the cut of each cut feed and is uniform refer to Fig b 7 Implement the processing point by point following the display 8 You may quit the arc R C...

Page 39: ...L1 L 2 R L R L R the radius of the tool L R the radius of the tool L R L R the radius of the tool L R the radius of the tool L R L1 R L1 R L2 the radius of the tool L2 the radius of the tool L R L1 the radius of the tool L1 the radius of the L2 R tool L2 R End mill Circular arc mill Plane XY L 2 R L1 ...

Page 40: ...Start processing Key Point A as the start point 0 0 Key Point B as the start point 0 0 Key 9 Refer to the display move the machine tool to bring the displayed value on X axis into zero then turn the Z axis star wheel to let the machine table rise or drop by the display value in Y axis 10 Key or and the position of next last point will displayed You can quit ARC function at will just key 1 0 0 0 5 ...

Page 41: ...tion key 2 Select the way of the R processing Point A is the start point key Point A is the start point key 3 Select the processing plane Key or 4 Select Plane XZ Key 5 Enter the radius of the circular arc Key Key 6 Enter the diameter of the tool Key Key 7 Enter the maximal cut Key Key 8 Enter processing mode Key Point A is the start point 0 0 key Point A is the start point 0 0 key R 5 6 0 1 5 0 5...

Page 42: ...he surface quality of the arc worked out will be very no uniform In order to improve the surface quality of the circular arc processing in Plane XZ and YZ the operator may change the maximal cut during the processing to bring a rather uniform surface quality When processing an arc in Plane XY MAX CUT is the cut of each cut feed By reason of the cut of each cut feed in uniform the surface quality o...

Page 43: ...D Hole Drilling Along An Oblique Line Be the same with MIIL_MS 34 D Hole Drilling Along An Oblique Line Be the same with MIIL_MS ...

Page 44: ...when MODE L length mode is selected The step length STEP This is the distance between two neighboring the holes This data shall be entered when MODE S step length mode is selected Angle ANGLE This is the direction of the oblique line in the plane coordinate The angle is 30 in a so the plane angle to be entered is 30 the angle is 30 in b so the plane angle to be entered is 30 Number of holes NUMBER...

Page 45: ...es into zero You can quit the function at will just key For the working piece in a it is more convenient to select MODE L In the following we take working piece in b as anther example to shown how to operate when MODE S is selected 1 At first move the tool to the position of the start hole A Key to enter the function 2 Choosing the processing plan Press or Choose processing plan press only 3V read...

Page 46: ...nter the angle Key Key 6 Enter the number of holes Key Key 7 Enter processing state 8 Key to display the position of next processing point and then move the machine tool to bring the displayed value on both X and Y axes into zero You can quit the function at will just key 2 0 3 0 4 SEL SEL SEL SEL SEL ...

Page 47: ...E1 The Function For 200 Point Be the same with MIIL_MS MIIL_M EDM 38 E1 The Function For 200 Point Subsidiary Zero Positions Be the same with MIIL_MS MIIL_M EDM ...

Page 48: ...be very difficult for complicated moulds or moulding fittings to do in such a way The function 200 point subsidiary zero positions is specially provided as a good resolution for this problem Ⅰ The operator must know the following two key points before making use of this function 1 Every subsidiary zero position is equivalently the original point of one UCS Once entering the display mode of such UC...

Page 49: ... of subsidiary zero position There are two methods of setting subsidiary zero position the one is entering the position of the subsidiary zero position directly the other is resetting once a subsidiary zero position is reached Method 1 Directly Entering under the UCS display mode key Number keys Take Fig 1 as example After turning the machine on move the machine tool to the center point O in Fig 1...

Page 50: ...er interruption happen in the course the zero position may be tracked back 2 Enter the UCS display mode Two Method Method 1 Key Key Method 2 Key Key 3 Enter the position of the first subsidiary zero position Key 4 Enter the position of the second UCS Key or Key 5 Enter the position of the second zero position Key 6 Enter the display mode of the third UCS Key or Key 1 8 3 0 0 2 7 0 0 4 3 SEL SEL SE...

Page 51: ...Fig 1 we can see that Point O is at the position 80 30 with respect to Point 1 70 40 with respect to Point 2 and 60 40 with respect to Point 3 If the operator enter the coordinates of a subsidiary zero point other than the zero position in the absolute mode the displayed data will be the position with respect to subsidiary zero point in the corresponding UCS For example when the position of the th...

Page 52: ...2 X axis display 70 Y axis display 40 7 Enter the display mode of the second UCS Key 8 Clear set the second subsidiary zero point Key 9 Return to the absolute state display mode Continue to touch three times key 10 Move the machine table of the machine tool to Point 3 X axis display 60 Y axis display 40 11 Enter the display mode of the third UCS Key 1 2 3 SEL SEL SEL SEL SEL SEL SEL SEL SEL SEL SE...

Page 53: ...e used to help in the processing It is possible to enter a UCS display mode using key or When using keys and you may key or continuously until entering the desired UCS When using key just key and under the prompt ZERO No enter the number of the desired UCS For the related operations the operator may refer to 5 Absolute relative user coordinate display mode under Ⅰ Usage of A Basic Function We take...

Page 54: ...oint C X axis display 0 Y axis display 20 9 Process Hole C 10 Enter the display mode of the third UCS Key 11 Move the machine tool to point 3 X axis display 0 Y axis display 0 12 Enter PCD function process the six small holes distribute uniformly on the circle center at Point 3 Key 13 The processing of the six small holes has been finished return to Point D the display should be SEL SEL SEL SEL SE...

Page 55: ...the display mode of the corresponding UCS resetting in this state is actually to reset a new subsidiary zero position The point at which the resetting operation act become the new subsidiary zero position and the new subsidiary zero position replacing the original subsidiary zero position 3 Turn to one half during a subsidiary zero position is being used 1 2 function may be used under UCS display ...

Page 56: ...E2 The Function For 200 Point Be the same with LATHE 47 E2 The Function For 200 Point Subsidiary Zero Positions Be the same with LATHE ...

Page 57: ...osition point by point more over it may be very difficult for complicated moulds or molding fittings to do in such a way The function 200 point subsidiary zero positions is specially provided as a good resolution for this problem Ⅰ The operator must know the following two key points before making use of this function 1 Every subsidiary zero position is equivalently the original point of one UCS On...

Page 58: ...entering the position of the subsidiary zero position directly the other is resetting once a subsidiary zero position is reached Method 1 Directly Entering under the UCS display mode key Number keys Take Fig 1 as example After turning the machine on move the machine tool to the center point O in Fig 1 Enter the absolute display mode Fig 1 In the following content take Y axis as an example Reset se...

Page 59: ...iary zero position Key 4 Enter the position of the second UCS Key or Key 5 Enter the position of the second zero position Key 6 Enter the display mode of the third UCS Key or Key 7 Enter the display mode of the third zero position Key The setting of all the subsidiary zero positions of the working piece shown in Fig 1 has been finished 2 0 7 0 2 2 0 1 0 3 3 2 0 1 3 0 1 ...

Page 60: ...nder absolute state the display result will be the position of this point in this user coordinate Method 2 Clearing when the position is reached When the machine tool is at the position of the subsidiary zero point key Method 2 is not suited to operations on lathe The instructions for lathe are not given in details in this manual Ⅳ The usage of subsidiary zero positions After entering the display ...

Page 61: ... absolute coordinate origin at Point A then directly the position of the auxiliary zero point according to the setting method I for auxiliary zero point to set up the user coordinate system We have set the first auxiliary zero point at the point 10 40 the second at the point 20 05 70 and the point 30 05 120 1 After checking the cutting tool enter the first user coordinate system Key 2 Enter the co...

Page 62: ...to absolute state Keep pressing until ALE is displayed 9 Switch the work piece to the other side of its for turning of such other end encircle Φ40 Ⅴ The Clearing of Subsidiary Zero Positions and Other Related Problems 1 The Clearing of Subsidiary zero positions In absolute state ALE state key 10 times continuously the memory about all the subsidiary zero positions will be cleared the 200 subsidiar...

Page 63: ...n and the new subsidiary zero position replacing the original subsidiary zero position 3 Turn to one half during a subsidiary zero position is being used 1 2 function may be used under UCS display mode Turning to one half under the UCS display mode using a subsidiary zero position is actually also resetting a new subsidiary zero position After the operation of turning to one half act the original ...

Page 64: ...E3 The Function For 200 Point Be the same with 2V GRIND 55 E3 The Function For 200 Point Subsidiary Zero Positions Be the same with 2V GRIND ...

Page 65: ...ry difficult for complicated moulds or moulding fittings to do in such a way The function 200 point subsidiary zero positions is specially provided as a good resolution for this problem Ⅰ The operator must know the following two key points before making use of this function 1 Every subsidiary zero position is equivalently the original point of one UCS Once entering the display mode of such UCS the...

Page 66: ...etting of subsidiary zero position There are two methods of setting subsidiary zero position the one is entering the position of the subsidiary zero position directly the other is resetting once a subsidiary zero position is reached Method 1 Directly Entering under the UCS display mode key Number keys Take Fig 1 as example After turning the machine on move the machine tool to the center point O in...

Page 67: ...the zero position may be tracked back 2 Enter the UCS display mode Two Method Method 1 Key Key Method 2 Key Key 3 Enter the position of the first subsidiary zero position Key 4 Enter the position of the second UCS Key or Key 5 Enter the position of the second zero position Key 6 Enter the display mode of the third UCS Key or Key 7 Enter the display mode of the third zero position Key 1 5 5 2 7 5 0...

Page 68: ...any other point than the zero point under absolute state the display result will be the position of this point in this user coordinate Method 2 Clearing when the position is reached When the machine tool is at the position of the subsidiary zero point key Method 2 is not suited to operations on grinding machine The instructions for lathe are not given in details in this manual Ⅳ The usage of subsi...

Page 69: ...y 7 Process the plane B D Start grinding until the displays on both X axis and Y turn out 0 8 Return to absolute state Keep pressing until ALE is displayed Ⅴ The Clearing of Subsidiary Zero Positions and Other Related Problems 1 The Clearing of Subsidiary zero positions In absolute state ALE state key 10 times continuously the memory about all the subsidiary zero positions will be cleared the 200 ...

Page 70: ...on and the new subsidiary zero position replacing the original subsidiary zero position 3 Turn to one half during a subsidiary zero position is being used 1 2 function may be used under UCS display mode Turning to one half under the UCS display mode using a subsidiary zero position is actually also resetting a new subsidiary zero position After the operation of turning to one half act the original...

Page 71: ...F PCD Circle Equally Dividing Holes Be the same with MIIL_MS MIIL_M EDM 62 F PCD Circle Equally Dividing Holes Be the same with MIIL_MS MIIL_M EDM ...

Page 72: ...e number of holes equally dividing the circle For the example shown in Fig B 5 points from point 1 to Point 5 must used to divide the arc from 0 to 180 into 4 equal sections So 9 points must be used to divide the whole circle into 8 equal sections and Point 9 will coincide with Point 1 As shown in the Fig in order to drill 8 hole on the circle into 8 sections the number of point to be entered shou...

Page 73: ...Enter the center position of the circular arc Key Key next step 4 Enter the diameter of the circular arc Key Key next step 5 Enter the number of points equally dividing the arc Fig c we can consider it as 6 points is used to divide the arc from 0 to 300 into 5 equal section Key Key next step It is also possible to consider as 7 points in points in used to divide the whole circle into 6 equal secti...

Page 74: ... Enter processing The display result for dividing the arc into 5 equal sections The display result for dividing the arc into 6 equal sections 9 Key and the position of next processing point will be displayed just move the machine tool to bring the displayed values on both axes into zero to reach the corresponding processing position 10 You may quit PCD function at will just key 0 3 0 0 0 3 6 SEL S...

Page 75: ...G Angular Surface Processing Be the same with MIIL_MS 66 G Angular Surface Processing Be the same with MIIL_MS ...

Page 76: ...piece on the machine table with an oblique angle equal roughly the desired bank angle 1 Key to enter the angular surface processing function 2 Select the processing plane Plane XY 3 Enter the angle of the angular surface ANGLE 4 Move the machine table to let the metering tool for example dial indicator preset on the milling machine come just in contact with the reference plane being aligned adjust...

Page 77: ...the reference plane being aligned come just in contact with the metering tool and the scale reading be zero 7 Move the machine table to bring the displayed value on Y axis into zero You may quit the angular surface processing function at will just key Ⅱ Processing the angular surface When the processing plane is Plane XZ or YZ the angular processing function may prompt in processing the angular su...

Page 78: ...t the angular surface processing function at will just key Refer to the example 1 Align for the bank angle finish tool setting and key 2 Select the processing plane Key Select Plane XZ Key 3 Enter the diameter of the tool Key Key 4 Enter the start point Key Key 5 Enter the coordinates of the end point Key Key 6 Enter processing state 1 0 0 2 0 2 0 0 SEL ALE ALE ALE ALE ALE Z Y X ALE ALE ALE ...

Page 79: ... Angular Surface Processing Be the same with MIIL_MS 70 Key or and respectively the position of last next processing point will be displayed You may quit the angular processing function at will just key ...

Page 80: ...H The Function Calculator Function Be the same with MIIL_MS 71 H The Function Calculator Function Be the same with MIIL_MS ...

Page 81: ...tion you may quit the function at will just key the same key the key for Calculating the square root the key for inverting trigonometric functions key it and then key a trigonometric function key for Calculating the inverse trigonometric function trigonometric function key key for canceling last input and the result of last calculation data axis transferring key them in succession to transfer the ...

Page 82: ...hine table to bring the displayed value into zero the position of Point B is reached the processing of Hole B may start Quit the resulted value axis transferring function enter the calculation function again Key Key to quit the calculation function Notes When the value of input or calculation runs over the information window display CTR E means the result of calculation is wrong press key can resu...

Page 83: ...I Tool Diameter Compensation Be the same with 3V MIIL_MS 74 I Tool Diameter Compensation Be the same with 3V MIIL_MS ...

Page 84: ...tool diameter compensation function provided in the digital display box can make the related compensation automatically Note The tool diameter can be made only in the direction of X or Y direction Operation Procedure 1 Key to enter the tool compensation function 2 Select a processing way among the preset 8 ways prompt WHICH 3 Enter the diameter of the tool DIA 4 Enter processing state Refer to the...

Page 85: ...ove the machine tool to bring the X axis displayed value into 150 000 and then move to bring the Y axis displayed value into 100 000 so the processing of two peripheral sides finishes Start the processing at the position shown in Fig 3 Move the machine tool to bring the X axis displayed value into 150 000 and then move to bring the Y axis displayed value into 100 000 so the processing of two perip...

Page 86: ...J 200 Tool Storeroom Be the same with LATHE 77 J 200 Tool Storeroom Be the same with LATHE ...

Page 87: ...hich is also the zero point of ALE coordinate system as the figure a shows the relative position of the second tool is X axis 25 30 5 Y axis 20 10 10 3 Number the tool and store the relative position to the base tool into the digital readout 4 In process the operator can input the numbers of using tool the digital readout will display the relative position dimension of using tool to the zero point...

Page 88: ...play value when moving the base tool to touch the frame of adjusting tool set the first tool to the base tool 2 Enter the inputting stare Key 3 Input the datum of next tool Key Key 4 Input the numbers of tool Key Key 5 Input the datum of tool Key 6 Key continue to input the datum of next tool Key quit the inputting state You can operate the tool storeroom as below after you input the datum of tool...

Page 89: ...Key 4 Exit Key Move the flat from to make the display value of X axis and Z Z0 axis become zero The second tool has reached the datum mark in like manner the operator can input and call 200 tools Notice You can clear the display value to zero in ALE coordinate system only when using the base tool you can clear the display value to zero in INC coordinate system when using other tools 2 SEL Y X ALE ...

Page 90: ...K The Function Of Measure For Taper Be the same with LATHE 81 K The Function Of Measure For Taper Be the same with LATHE ...

Page 91: ...work piece surface Pressing it to make the lever meter point to zero 1 Then entering the function of measure for taper Key 2 Move the lever meter to position B of work piece surface press it to make the lever meter point to zero 3 Compute Key The display value of X axis is taper The display value of Y axis is angle 4 Quit Key 60 A B A B 0 90 80 70 6 0 50 4 0 30 20 10 30 20 70 50 4 0 6 0 10 90 80 0...

Page 92: ...L EDM Matching Output Function Be the same with 3V EDM 83 L EDM Matching Output Function Be the same with 3V EDM ...

Page 93: ... displayed value on Z axis increases gradually According the set direction on Z axis the processing directions are divided into positive and negative When the electrode Fig 1 goes down and processing goes from upper to lower the value displayed on digital display meter increases and the processing direction now is positive This direction is then set as normal setup When the electrode goes up and p...

Page 94: ... height above the depth of processed surface i e the negative anti fire height the digital display case will flash alarm signal meanwhile its exported signal will automatically shut down the discharging processing machine to avoid any possibility of fire accident as shown in Fig 2 2 Concrete operating methods See the concrete processing examples 1 2 and 3 1 Before processing first set the paramete...

Page 95: ...ange accordingly But the displayed value on Y axis will not change and always refer to the value of depth reached by processing 6 When the displayed value on Z axis is equal to the set target value the matching switch is shut off EDM discharging machine will stop processing and message screen will display EDM E According to the setup of operators there are 2 kinds of exit modes automatic mode mean...

Page 96: ... display Automatic mode to replace the AUTO mark You can use or to change 5 Select positive or negative processing direction Key set at negative processing Positive Key Negative Key 6 choose the EDM process mode there s two alterative choice 0 and 1 of EDM MODE Press to choose mode 0 the relay act as list below A power off relay OFF B CPU resetting relay OFF C CPU start up relay ON D Running funct...

Page 97: ...tarted if you find it is necessary to change the originally set DEPTH ERRHIGH or EXIT MODE and PROCESSING DIRECTION the operator can press button to enter the setup mode When the message screen displays DEPTH you can re ser the depth value continue to press button the screen will display ERRHIGH AUTO or STOP and POSITIVE or NEGATIVE in succession then you can re set any item as you choose Press do...

Page 98: ...fore processing Example 2 Work piece shown in the processing drawing c Please make sure the processing direction is positive 1 First move the main axis electrode to make it touch the work piece datum as shown in Fig d then press reset Move the electrode to the shown place in drawing e 0 2 SEL SEL SEL SEL SEL SEL SEL SEL SEL SEL SEL SEL SEL SEL SEL d 10 c Z 0 positive processing 10 SEL SEL SEL b el...

Page 99: ...its automatically 5 Example of Negative Processing Example 3 Work piece as shown in the processing drawing f Before processing please make sure the processing is negative 1 First move the main axis electrode to make it touch datum place for processing specifications of the work piece as shown in Fig g Then press to clear the display 1 0 SEL SEL SEL SEL SEL SEL SEL SEL SEL SEL SEL SEL SEL SEL SEL S...

Page 100: ...exiting from EDM press button to return to the status when you exited from PCD just now then you can continue to use PCD function In such a cycle you can use the discharging processing machine to process evenly the hole around the circumference 7 Switch Display Mode Function In EDM spark processing if the operator wants to know the XY plane coordinates in the exterior he can press button then the ...

Page 101: ...he same with 3V EDM 92 8 back panel EQUAL OUT port EQUAL OUT port is connected to the output of relay 1 0A30DC 0 5A125VAC 0 3A60VDC PIN SIGNAL COLOR OF WIRE 1 NC Normal Close Brown 3 COM Common Blue 5 NO Normal Open Yellow green 6 1 9 5 ...

Page 102: ...M Digital Filter Function Be the same with 2V GRIND 93 M Digital FilterFunction Be the same with 2V GRIND ...

Page 103: ...l made operator indisposed SDS6 2V special readout for grinding machine has the digital filter function it delays the readout display value when the grinding machine is vibrating The operator can use the digital filter function as follow 1 Enter the digital filter function Key 2 Key quit the digital filter function Note The digital filter function can only be used in INC or ALE mode SEL SEL SEL SE...

Page 104: ...N N3 Function Be the same with 2V MIIL_MS 95 N N3 Function Be the same with 2V MIIL_MS ...

Page 105: ...N N3 Function Be the same with 2V MIIL_MS 96 the function is suit for Z axis vertical slope machining There are four machining mode as following example ΔZ 0 1 A 60 ΔZ 0 1 A 120 ΔZ 0 1 A 120 ΔZ 0 1 A 60 ...

Page 106: ...t point Key plane YZ 2 Key enter N3 function 3 Key select the processing plane 4 Select plane XZ Key to ensure 5 Enter the angle Key Key next setp 6 Enter the feeding of Z delta Z Key Key start processing Note When processing delta Z of each step is equal 7 Point 1 move axis X to 0 move axis Z 0 1mm forward Key next point N3 tg 6 0 0 X Y X Y X Y X Y ...

Page 107: ... 1mm forward 11 Key quit N3 function digital readout show the current XY value 12 Validate the value using the equation bellow I Step number Delta X feed of axis X between each step Delta Z feed of axis Z between each step XI displacement of axis X in the Ith point ZI displacement of axis Z in the Ith point Note the processing on plane YZ is the same with plane XZ N3 tg I tgA Z X I I Z Z I The las...

Page 108: ...O The Progressive Progressing Be the same with 2V MIIL_MS 99 O The Progressive Progressing of rectangular Inner chamber Be the same with 2V MIIL_MS ...

Page 109: ...direction Operation procedure 1 Key to enter the progressive inner chamber processing function 2 Enter the diameter of the tool DIA 3 Enter the position of the inner chamber CT POS the position with respect to center of the tool 4 Enter the size of the inner chamber 5 Enter processing state The operation procedure in an example The processing of the inner chamber of the fitting shown in Fig 1 1 Fi...

Page 110: ...to bring the displayed values on both X and Y axes into zero 7 Key to display the processing position of next step refer to the prompts and move the machine to bring the displayed values on both X and Y axes into zero You may quit the progressive inner chamber processing function at will just key SEL SEL SEL SEL ...

Page 111: ...round the box 10 Number of coordinates 2 coordinates 3 coordinates 11 Display 7 digit with plus and minus symbol display 2 axes or 3 axes the message window displays by means of 8 star character display device 12 Frequency multiplication 4X 13 Allowable input signal TTL square wave 14 Allowable input signal frequency 5M Hz 15 Length resolution 5µm 1µm 10µm 0 1µm 0 2µm 0 5µm 16 Operation keyboard S...

Page 112: ...d 3 Mains voltage should be within 60 260V 4 Shorting of power supply inside grating ruler 4 Disconnect plug of grating ruler Enclosure of digital display meter is charged 1 Is enclosure of machine tool and digital display meter well grounded 1 Well ground enclosure of machine tool and digital display meter 2 Is there electric leakage from 220V power supply to the ground 2 Check 220V power supply ...

Page 113: ...onnectors burnt squeezed broken to cause shorting or breaking of inner circuits 4 Repair the grating ruler 5 Time of service of grating ruler too long some inner parts or components go wrong 5 Repair the grating ruler Grating ruler does not count sometimes 1 Carriage body of grating ruler apart from friction ball 1 Repair the grating ruler 2 Some part of small grating piece inside reading head of ...

Page 114: ...ogy precision mechanical technology microelectronic technology and computer technology and so on The customer without being trained may not repair this system The structural principle is as follows Produce pulse Enter digital by phonics readout principle Ⅳ Install figure notice 1 cliping the power and signal wire to avoid stumbling 2 install height is 1350mm from the operator standing floor Move l...

Page 115: ...roduct packaging bill 1 a piece of SDS6 series digital readout 2 a piece of power wire 3 a copy of operating instruction 4 A copy of verified certificate 5 A piece of dustproof cover 6 a piece of wire clip 7 a piece of bracket ...

Page 116: ...ees and 15 day limited replacement and free repair within the period of one warranty year from date of sale Accessories must be complete in replacement The following few services are not free 1 over one year warranty 2 abnormal damage due to failure of comply with requirements of using maintain and storage 3 damage caused by the unauthorized mender 4 without a valid invoice except the products can...

Page 117: ...LTD http www sino ld com Add No 16wordshop 3rd Industrial Park Xilang East Road Liwan District Guangzhou p c 510385 Tel 020 66839300 Fax 020 66839301 Hotline 400 111 8148 E mail infos sino ld com Version SDS6 V2 0 2011 04 08 ...

Reviews: