Singer Furtura III series
21
16. Needle clearance to shuttle
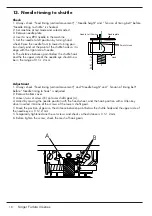
Check
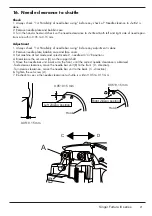
1. Always check ”14. Parallelity of needle bar swing” before any check of ”Needle clearnce to shuttle” is
done.
2. Remove needle plate and bobbin case.
3. Turn the hand wheel and check so the needle clearance to shuttle at both left and right side of needle posi-
tions are within 0.05 to 0.15 mm.
Adjustment
1. Always check ”14. Parallelity of needle bar swing” before any adjustment is done.
2. Remove needle plate, bobbin case and face cover.
3. Set machine at test mode and select mode 2 - needle at L/C/R positions.
4. Break loose the set screw (A) on the support shaft.
5. Move the needle bar unit, back or to the front, until the correct needle clearance is obtanied.
- To decrease clearance, move the needle bar unit (B) to the front (D - direction).
- To increase clearance , move the needle bar unit to the back (C - direction) .
6. Tighten the set screw (A).
7. Re-check to see so the needle clearance to shuttle is within 0.05 to 0.15 mm.
A
B
C
D
0.05~0.15 mm
Left Zigzag position
Right Zigzag position
0.05~0.15 mm
0.05~0.15 mm
Hook
Hook


