background image

8


Singer Furtura III series

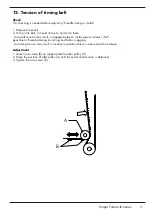
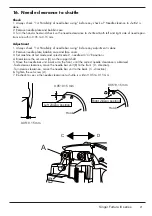
3. Presser foot height and parallelism to the needle plate

Check

1. Lower the feed dog, with the feed dog drop mechanism,so it is below the needle plate.
2. Raise the presser foot to its heighest position.
3. The clearance between the needle plate and the presser foot should be 5.6 mm.
4. Lower the presser foot , it should be parallel to the needle plate slot (B).

Adjustment

1. Remove the face cover, 
2. Lower the feed dog, with the feed dog drop mechanism, so it is below the needle plate.
3. Raise the presser foot to its heighest position. 
4. Loosen the set screw (A) and adjust the presser foot height by moving the presser bar up or down.
5. Tighten the set screw (A) securely 
6. Lower the presser foot and check so the presser foot is parallel with the needle plate slot (B).
if not 
a. Lift up the presser foot 
b. Loosen up set screw (A) and adjust the parallelity of the presser foot, by turn the Presser bar to the left 
or to the right.
7. Tighten the set screw (A) securely.
8. Re-check height and parallelity of the presser foot.

5.6 mm

B

A

Summary of Contents for FUTURA CE-150

Page 1: ...Service Manual CE 150 CE 250 CE 350 104 72 85 26 14 Feb 2008 ...

Page 2: ...ket for bobbin case 22 18 The lengthwise movement of the feed dog 23 19 Bobbin case thread tension 24 20 Upper thread tension unit 25 21 Position of buttonhole sensor lever 26 22 Tension of motor and pulley belt 27 23 The needle stop position 28 Function mode of sewing machine thread sensor deactivated 29 Test mode of sewing machine Apply to model CE 200E CE 250 350 30 Test mode for sewing machine...

Page 3: ...e Veuillez noter qu en cas de destruction ce produit doit bénéficier d un recyclage sécurisé conforme à la législation nationale applicable aux produits électriques électroniques En cas de doute veuillez contacter votre distributeur agréé Bitte beachten Sie dass hinsichtlich der Entsor gung dieses Produkts vorschriftsmäßig entspre chend der gültigen nationalen Gesetzgebung für elektrische elektron...

Page 4: ...inted out that these altered settings can cause poorer results on more normal fabrics How the different standard ratings are set can be seen from the description under each setting instruction The following list of setting gauges and service tools is intended as an instruction about the special service tools needed to servicing this machine 1 On several different occasions the needle is used as a ...

Page 5: ...he upper part of hook ring C The check is executed with a gauge which is 28 50 mm long Adjustment The setting is executed with a gauge which is 28 50 mm long 1 Remove face cover 2 bring the needle bar to its highest position from the front loosen set screw A and retighten it lightelly 2 Bring the needle bar to its lower turning position 3 Move the needle bar until the correct distance is obtained ...

Page 6: ...w 70 needle 2 Remove the face cover 3 Turning the hand wheel by hand to so the needle bar comes to its highest position 4 Loosen screw B of the threader stopper 5 Go down with the threader hook into the needle eye 5 Move the threader holder so that the threader hook is on the upper side of the needle eye see Fig 1 6 Tighten the screw B Make sure to attaching the threader stopper onto stopper pin D...

Page 7: ...rtura III series 7 Adjustment of threader hook sideways 1 If the sideways position of the hook isn t correct adjust the hook position with a small screw driver 2 Recheck that the needle threader works correctly ...

Page 8: ... Lower the feed dog with the feed dog drop mechanism so it is below the needle plate 3 Raise the presser foot to its heighest position 4 Loosen the set screw A and adjust the presser foot height by moving the presser bar up or down 5 Tighten the set screw A securely 6 Lower the presser foot and check so the presser foot is parallel with the needle plate slot B if not a Lift up the presser foot b L...

Page 9: ...be 0 9 to 1 1 mm above the needle plate Adjustment 1 Bring the feed dog to its highest position 2 Adjust by turning the Allen key screw A until a correct feed dog height 0 9 1 1 mm is obtained Turn clockwise It will be higher Turn counter clockwise It will be lower This Adjustment can be done without remowning the covers through the hole B on the front cover 3 Re check the feed dog height 0 9 1 1 ...

Page 10: ...OTE Remove the covers but the front cover must be connected to the pc board 1 To adjust the Feed dog timing vertical loosen the 2 set screws A on the main shaft B 2 Insert a hex driver into one of the screws If feed dog motion too early Hold the hex screw in position and turn hand wheel towards you If feed dog motion too late Hold the hex screw in position and turn hand wheel away from you 3 Tight...

Page 11: ...ct straight stitching and maximum stitch length 2 Brake loose the set screw A on the feed eccenter B 3 Turn the eccenter Turn it clockwise it will be less movment of the feed dog Turn it counter clockwise it will be more movment of the feed dog 4 Tighten the set screw A on the main shaft B 5 Turning hand wheel and set the needle to its upper turning position and in the position just before it star...

Page 12: ...regula tor gear turns for the feed regulator to stop at the the angle of feed 0 This adjustment has been made at the factory and is not needed for local maintenance repair Fine adjustment of feed amount Adjustment is to be made by turning the screw on the motor bracket support plate below the feed generating unit as shown on the next page It is recommended to adjust feed pitch with stretch stitch ...

Page 13: ...ont and the rear covers if control panel assay is removed before adjustment zero feed See secection Remove control panel Check of stitch balance After checking or setting the Zero feeding the fine tunning of the stich balance has to be done 1 Turn on the machine select stitch 17 in normal sewing mode 2 Thread up the machine 3 The balance between between forward and reverse feeding shall be such th...

Page 14: ... Connect the front cover 7 Enter Test mode and select mode 2 needle should now be in its right position 8 Loosen up the set screw F on the Step motor cogwheel B 9 Put a feeler gauge 0 4 mm between the Step motor cogwheel B and the units casting 10 Turn the Step motor cogwheel B so its calibration wing C is against the calibration stop D 11 Tighten the set screw F on the Step motor cogwheel B 12 Ch...

Page 15: ... 90 needle 3 The needle position should now be in the centre of the middle slots of needle plate see illustation 1 Adjustment 1 Remove face cover 2 Break loose the 2mm hex set screw A 3 Turn eccentric screw B on needle bar until the needle is in the centre of the middle slots of needle plate see illustation 1 4 Tighten the 2 mm hex set screw A B A ...

Page 16: ...stance between stopper C and the cam follower D should be 0 3 and 0 5 mm Adjustment 1 Front cover must be removed but still connected 2 Enter Test mode and select stitch 2 The nedle should be in its most right position and the step motor calibration wing A should now be against the calibration stop B 3 Loosen up the screw E and move the stopper C untill the distance is 0 3 and 0 5 mm between stop ...

Page 17: ...se Too weak tension may result in slippage between shuttle gear and lower shaft gear due to thread jamming bunching and fabric snagging Too strong tension may result in incorrect operation due to increased machine torque Adjustment 1 Loosen two screws B on support plate for idler pulley A 2 Move the position of idler pulley A ontil the correct belt tension is obtained 3 Tighten the two screws B B ...

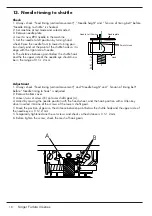
Page 18: ... of the needle eye should now be in the range of 0 5 1 2 mm Adjustment 1 Always check Feed timing vertical movement and Needle height and Tension of timing belt before Needle timing to hook is adjusted 2 Remove bottom cover 3 Loosen two set screws B on lower shafts gear A 4 Adjust by moving the needle position with the hand wheel and the hook position with a Allen key driver inserted into one of t...

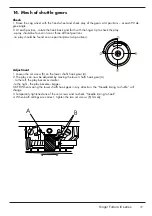
Page 19: ...ay should be found on one position max two positions Adjustment 1 Loosen the set screw B on the lower shafts hook gear A 2 The play can now be adjusted by moving the lower shafts hook gear A to the left the play becomes smaller to the right the play becomes bigger NOTE When moving the lower shafts hook gear in any direction the Needle timing to shuttle will change 3 Temporarily tightened one of th...

Page 20: ...e clearance to shuttle Adjustment 1 Remove needle plate bobbin case and face cover 2 Set machine at test mode and select mode 2 for needle at L C R positions 3 Loosen the set screw A and B on the needle bar unit see illustrated below 4 Adjust by moving shifting bracket C If needle touches the shuttle at left side move the shifting bracket C to the right If needle touches the shuttles at right side...

Page 21: ...stment is done 2 Remove needle plate bobbin case and face cover 3 Set machine at test mode and select mode 2 needle at L C R positions 4 Break loose the set screw A on the support shaft 5 Move the needle bar unit back or to the front until the correct needle clearance is obtanied To decrease clearance move the needle bar unit B to the front D direction To increase clearance move the needle bar uni...

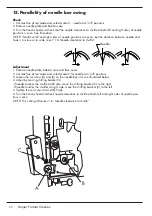
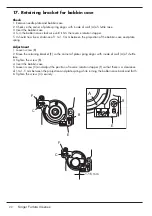
Page 22: ...stance of 1 to 1 5 mm between the projection of the bobbin case and plate spring Adjustment 1 Loosen screw B 2 Move the retaining bracket E so the corner of plate spring aligns with inside of wall A of shuttle race 3 Tighten the screw B 4 Insert the bobbin case 5 Loosen screw C and adjust the position of reverse rotation stopper F so that there is a clearance of 1 to 1 5 mm between the projection ...

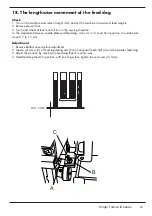
Page 23: ... direction 4 The clearance between needle plate and feed dog when it s in it s most front position should be bet ween 0 5 to 1 5 mm Adjustment 1 Remove bottom cover before adjustment 2 Loosen set screw C of feed regulating arm B on horizontal feed shaft A which operates feed dog 3 Adjust the position by moving the feed dog theeth in either way 4 Hold feed dog theeth in position with one finger the...

Page 24: ...case shall give a resistance of 14 18 g when pulling the th read slowly using normal polyester thread Adjustment 1 Insert a full bobbin into the bobbin case use normal polyester thread 2 Pull the thread slowly and turn screw A until the correct thread tension is obtained NOTE Remove any loose pieces of thread or fluff from the thread tension discs before any adjustment is done A ...

Page 25: ...dial A until a correct take up is obtained 40 50 g 3 Remove the cap screw B on thread tension house 4 Remove Thread tension dial A and re set it so S is in front of the index on the front cover 5 tighten cap screw B Adjustment 2 When Front cover is removed 1 Always check so the bobbin thread tension is correct before the upper thread tension is adjusted 2 Thread up the machine and sew the machine ...

Page 26: ...the slots of sensors Signals generated by closing and opening the sensors execute each step of buttonhole Check When sewing a one step buttonhole with the buttonhole foot it should sew it with out any interuption Adjustment 1 Looosen the screw A on the cantilever B 2 Move the cantilever B to change the closing timing in either way 3 Tighten screw A Buttonhole lever is at free position Buttonhole l...

Page 27: ...ws A 3 Move the belt tension unit B until the correct belt tension is obtained Move vertically belt tension for the pullybelt Move horizontal the belt tension for the motor 4 Tighten the two set screws A NOTE Too tight tension may result in abnormal rotation due to more burden on motor and more machine torque On the contrary too weak tension may result in noise from belt and slipping of belt Pushi...

Page 28: ...position Turn it down the tip of take up lever takes a lower position 4 Push on the controler cam holder ring to the left and tighten one of the set screws 4 Recheck so the needle stops at the right position by run the machine When the foot control is realesed machine should stop and the tip of take up lever should be located within a range on thread guide plate see illutration 5 Check so the cont...

Page 29: ...he machine will run without thread Handling Go to the Function mode of the machine by pressing buttons 1 and 2 Arrow up and 3 while the main switch A is switched on See illustration below Sewing function mode In Function mode all stitches are the same as in Normal sewing mode Embriodery function mode In Functions mode when operating the embroidery mode of machine it must be connect to a PC through...

Page 30: ...nder shaft to the right A for bobbin winding See illustration 2 Press the reverse stitch switch B located at the center position See illustration 3 Turn on power switch C See illustration below 4 Move bobbin winder shaft to the left D within 5 seconds to release it from bobbin winding position 5 Release the reverse button and now should button Nr 1 blink In case of embroidery sewing enter the Embr...

Page 31: ... diffrent sensors of the machine is de activated Machine will run wit hout thread Test Mode 3 Balance check Machine will feed 2 mm at center position stitch 11 needles forward and backward Needle must always stop at the staring stitch Mode 4 Balance check feed 2 mm at two needle positions stitch 31 needles forward and backward Needle must always stop at the staring stitch Test mode 5 Upper thread ...

Page 32: ...op to left bottom Test mode 4 The machine will from origin point make a diagonally from left top to right bottom Test mode 5 The machine will make a diamond shape continuously at 400 rpm The machine runs continuously under the test mode 5 Push the start stop switch again and the machine will stop Test mode 6 The machine will make a diamond shape continuously at 600 rpm The machine runs continuousl...

Page 33: ...w B inside 2 Turn the machine around and remove the screw C that holds face and back cover together and remove the face cover 3 Remove the two screws D holding the support leg Then remove the Support leg 3 Remove the screw E then remove the bottom cover 4 Remove four screws F on base cover and then remove base cover B A D E F F C ...

Page 34: ... A and then remove the top cover B 2 Remove screw C and then remove the th read sensor cover D Removing rear cover 1 The top face bottom and base covers must be removed first 2 Remove four screws A B and C 3 For the free arms cover remove screw C use thin Phillips screw driver A B D C B A B C ...
Page 35: ...ers must be removed first 2 Loosen a screw A on the bottom of thread guide plate looking from the front 3 Lay the machine on its back and remove two screws B from the bottom 4 Pull out the front cover and disconnect the three cables C that connects the front cover to the main PC Board A B C ...

Page 36: ...36 Singer Furtura III series Removing the circuit board cover 1 Remove two screws A 2 Pull the Curcuit board cover straight out The Circuit board is located inside of rear cover A A ...

Page 37: ... Remove support leg and base cover 2 Lay the machine on its back and remove two screws A by tuning them through the hole of bracket 3 Push up the control panel from the bottom of machine 4 Pull out the control panel from the front cover Disconnect the 4 cables B from the control panel Then remove the control panel Note When adjusting the machine with the front cover removed connect the control pan...

Page 38: ...nder USB connector Foot control Power stitch Transformer Primary Transformer Secondary Main motor LED lamp Switch for embroidery Drawer connector for embroidery Strat stop Switch etc Y motor X motor Sensor Sensor CN4 Circuit board for embroidery P No 84001 Switch panel circuit board CPU circuit board Pulse motor for feed Pulse motor for zigzag Button hole lever SW Sensor 1 for thread Wiring diagra...

Page 39: ... Connected with Switch Board CN8 Drawer for Embroidery CN9 Motor for material feeding CN10 Motor for needle position CN11 Buttonhole Stitch SW CN12 Thread breakage sensor CN13 Presser foot CN14 Check spring sensor CN15 Cam sensor harness CN16 Bobbin winding switch CN17 USB Connecter CN18 Foot Control CN19 CN21 Transformer secondary ...

Page 40: ...ase by lifting out from the left side 3 Using the brush provided clean around the whole exposed area and then apply a little oil in the place A Oiling in Needle bar 1 Remove face cover and then place one or two drops oil at Needle bar clamp B C Oiling in Idler pulley 1 Put one drop oil to center shaft of Idler pulley when removing rear cover A D ...

Page 41: ...recognizing Hoop size is recognized with the switch turned on or off at the hoop carriage When large hoop is attached or no hoop is not attached Switch is turned off as shown in the left photo When small hoop is attached Projection of small hoop pushes the spring to turn on the switch A Mounting plate of large hoop without projection Mounting plate of small hoop with projection SW OFF SW ON ...

Page 42: ... B back and forth to change relation with sensor C When adjusting position of embroidery foot along X axis Loosen screw D and move sensor plate E fixed on carriage of X axis unit to the right or left for adjustment If it is shifted to the left hoop stops early since sensor light is blocked early If it is shifted to the right hoop may shift excessively since sensor light is blocked late A B C D E D...

Reviews: