background image

Chapter 7-2 

EQ44/54 SHIFT menu

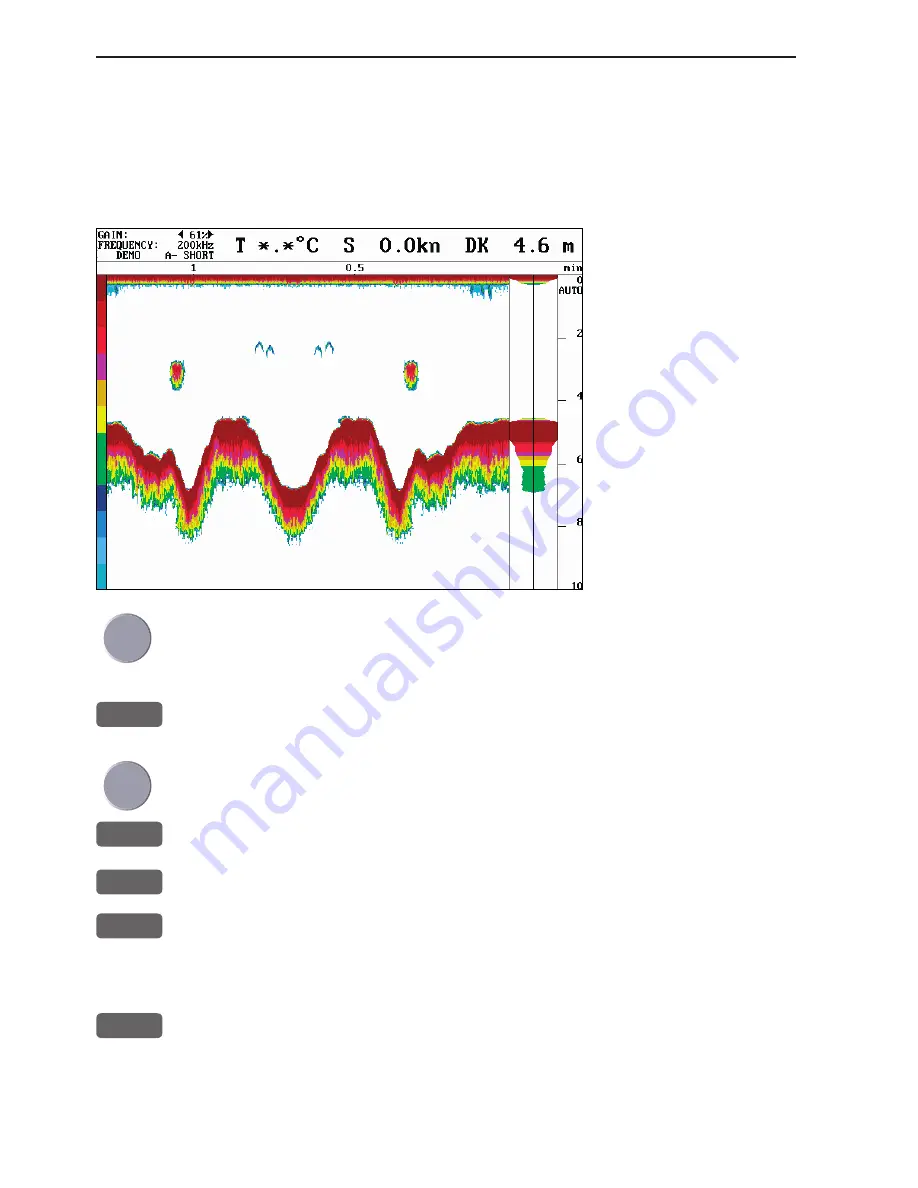
This feature can be applied when operating in deep waters. The 
expansion window can automatically follow a changing bottom or 
be set manually by means of the numeric keys 1-9, and then use the 
+/- keys or cursor to move the window up/down.
Press the [0] key for automatic bottom tracking.

Transmission line.
Time scale.


Press cursor left/right to adjust gain

ADJ

  Direct access to presentation setup related to active echo display 

50kHz or 200kHz - 

(see section 4.7)


Use the cursor to go to the function you wish to change the value for

+/-


Toggle between available values

ENT


Confirm changes, or...

MENU

  Abandon changes and exit Setup display

Echo quick menu

ENT


Call up the Echo quick menu 

with access to the following features:

 Change frequency.

 Activate/hide A-scope

 Turn transmit power on/off

Summary of Contents for EQ44

Page 1: ...M A N U A L Simrad EQ44 54 Echosounder 183 3403 102 English 05082 20...

Page 2: ......

Page 3: ...m screen 2 2 2 2 Key functions 2 3 2 3 Menu bar 2 5 2 4 Menu layout 2 6 2 5 Initial start up 2 7 2 6 Turn power on 2 8 2 7 Turn power off 2 8 Chapter 3 Echosounder operation 3 Echosounder operation 3...

Page 4: ...its language 10 5 10 4 Interface setup 10 7 10 4 1 Description of sentences 10 13 10 5 Palette setup 10 14 10 6 Factory settings 10 15 10 7 QuickGuide 10 17 Chapter 11 Installation and service 11 Inst...

Page 5: ...r 11 18 11 7 Preventive maintenance 11 20 11 8 Repair and service 11 20 11 9 Troubleshooting 11 21 11 10 Specifications 11 22 Appendix A Glossary of terms A 1 Index end of manual CE Declaration end of...

Page 6: ...Table of contents EQ44 54 Echosounder...

Page 7: ...m hereon these models are referred to as EQXX It is a good idea if you make yourself familiar with the key functions menu structure and rotation of pages screens described in chapter 2 before you star...

Page 8: ...y ground the unit to the ship s ground using the ground screw at the rear of the unit Good grounding should also be exercised for any equipment connected to the EQXX Quality service personnel The EQXX...

Page 9: ...The system will perform a software update and check for com munication activity When finished a new start up window will be presented on the screen After making sure that all connected products are t...

Page 10: ...B LCK to call up the bottom lock display Long press will toggle between echo dual frequency and custom screens ZOOM Press ZOOM to call up the zoom display Long press will toggle between echo dual freq...

Page 11: ...vate VRM expansion to expand the view near the VRM Variable Range Marker in the echosounder display Use the up down cursor to activate and move the VRM line Turn off the VRM line with CLR Shift displa...

Page 12: ...Chapter 1 6 EQ44 54 Introduction and safety summary...

Page 13: ...infor mation for the operator In split screens consisting of up to four displays the active display is indicated by a solid red frame Use the WIN key to clockwise toggle between which display on the s...

Page 14: ...PAGE Press the PAGE key until the full screen standard display appears MENU Call up the menu bar and 1 3 collect the Dual frequency display or you can toggle between the available displays in the STN...

Page 15: ...when in the appropriate menu EVENT Inserts a vertical mark at current ping and sends out WPL via NMEA to connected chartplotter MENU Turns the menu bar on off Exits any data display without taking an...

Page 16: ...top rotation ADJ Gives access to setup displays related to active display Scrolls through adjustable parameters VRM Toggles VRM Variable Range Marker on off WIN Toggles between active windows in split...

Page 17: ...highlight the function and press ENT If you want to switch to a different menu use the cursor key left right to move to the adjacent menu Most functions in the menus are general and can be called for...

Page 18: ...6 MISC 1 50kHz 1 Highway 1 Decca lanes 2 200kHz 2 Position 2 Loran C 3 Dual frequency 3 Depth temperature diagram 4 Custom screen 1 5 Custom screen 2 7 SETUP When selecting a sub menu in the SETUP men...

Page 19: ...he system will perform a software update and check for com munication activity When finished a new start up window will be presented on the screen After making sure that all connected products are tur...

Page 20: ...ss up on the cursor to go to the bottom line in the display Select language ENT Confirm entry To call up an echo display will require that the connected transducer type has been selected in the Echoso...

Page 21: ...verted into an ultra sonic signal by the transducer and transmitted into the water Any reflected signals from intervening objects such as a fish school are received by the transducer and converted bac...

Page 22: ...ivate the transmitter The transmitter sends a high voltage transmit ping to the transducer mounted on the hull At that point the trans mitter s job is done and the receiver takes over see fig 1 in sec...

Page 23: ...r See Fig 1 Fig 1 Transmitted ping from the transmitter receiver The sound waves move through the water until they encounter a change in density such as a fish or the bottom This causes the sound wave...

Page 24: ...amount going out to the sides The amount of focusing of the sound beam is expressed as a beam width Transducer Approximation of the sound pattern below the transducer This angle is the transducer s b...

Page 25: ...ish When the vessel is at rest the echo traces will appear stretched and flattened As the vessel s speed becomes greater the echo traces will become shorter and more arched The reason for this change...

Page 26: ...Chapter 3 6 EQ44 54 Echosounder operation...

Page 27: ...ns section 4 2 where one of the main echo displays i e 50kHz or 200kHz will be fixed in the left half of the screen Adjustments can be made individually to both displays section 4 7 To access one of t...

Page 28: ...ne Time scale Depth range is adjust able with keys or the Quick range keys 1 9 Press key 0 to return to Auto range The data field is preset to show Gain level Frequency Transmit pulse length A SHORT s...

Page 29: ...r MENU Abandon changes and exit Setup display 4 4 Variable range marker VRM Variable Range Marker refers to a horizontal black line shown on the display screen The user can measure the range to target...

Page 30: ...ching in a wider area determining bottom conditions and going the deepest 2 Hide Activate A scope The amplitude scope at the right side of the echo display indicates the precise amplitude or strength...

Page 31: ...FF Expansion window 6 m TVG Normal 20 log R Ping to ping filter ON Signal threshold OFF Color threshold OFF Depth grid OFF Transmit pulse length AUTO Transmit power AUTO Scroll synchronization TIME Sc...

Page 32: ...is is to help the user detect targets such as fish which are very close to the sea floor and whose echoes tend to merge with those of the sea floor itself Expansion window zoom level can be selected i...

Page 33: ...resh old allows you to choose not to display the blues or the blues and greens etc Doing this will leave only the stronger targets on the display screen Depth grid enables a more precise reading of de...

Page 34: ...croll speed is the ping rate and movement of the presentation of echoes on the screen moving from right to left It is adjustable Low Medium High Max Freeze to allow the user to show a longer history o...

Page 35: ...tions section 4 2 where one of the main echo displays i e 50kHz or 200kHz will be fixed in the left half of the screen Adjustments can be made individually to both displays section 4 7 Shortcut to the...

Page 36: ...Depth range is adjust able with keys or the Quick range keys 1 9 Press key 0 to return to Auto range Press cursor left right to adjust gain ADJ Direct access to presentation setup related to active ec...

Page 37: ...combinations section 4 2 where one of the main echo displays i e 50kHz or 200kHz will be fixed in the left half of the screen Adjustments can be made individually to both displays section 4 7 Shortcut...

Page 38: ...eys or the Quick range keys 1 9 Press key 0 to return to Auto range Press cursor left right to adjust gain ADJ Direct access to presentation setup related to active echo display 50kHz or 200kHz see se...

Page 39: ...combinations section 4 2 where one of the main echo displays i e 50kHz or 200kHz will be fixed in the left half of the screen Adjustments can be made individually to both displays section 4 7 Shortcut...

Page 40: ...tracking Transmission line Time scale Press cursor left right to adjust gain ADJ Direct access to presentation setup related to active echo display 50kHz or 200kHz see section 4 7 Use the cursor to go...

Page 41: ...navigation mode which could be Cursor Waypoint Route or Track navigation see next page 8 1 1 Navigation setup MENU Call up the menu bar and 5 1 load Highway display Since there is no navigation mode...

Page 42: ...ound X Cross track error S Speed over ground B Bearing to approaching WP D Distance to waypoint V Speed towards WP velocity Bottom line indicates name number of approaching waypoint or routepoint Ship...

Page 43: ...agnetic or true Position update if for some reason there is no position update from external sensor the displayed position will start to flash and once normal position update is resumed the flashing w...

Page 44: ...Position display Log reset log or insert alternative start figure by altering the value in the Log 1 and or Log 2 line Press CLR to reset the figure and press the numeric keys 0 9 to alter the figure...

Page 45: ...diagram 9 1 Decca lanes To change the position readouts to decca mode see section 10 2 under Pilot Position setup where Display position as can be tog gled to Decca MENU Call up the menu bar and 6 1...

Page 46: ...an 3F 31 Tohoku 6C 08 N Baltic 4B 32 Kyusyu 7C 09 NW Spanish 4C 33 Namaqua 4A 10 Trondelag N 4E 34 Cape chain 6A 11 English 5B 35 E Province 8A 12 N Bothnian 5F 36 Dampier 8E 13 S Spanish 6A 37 Port H...

Page 47: ...oran C chain display ADJ Open for change Leaf through the available chains see listing next page If required go to the slaves and Toggle between available slaves not all chains have more than one slav...

Page 48: ...t U S Canadian West Coast Canadian East Coast Labrador Sea West Coast U S North Pacific 4990 7960 7980 8970 9960 5990 5930 7930 9940 9990 Commando Lion North West Pacific Norwegian Sea Mediterranean S...

Page 49: ...ture diagram Present water temperature and depth Depth over time or dis tance Temperature over time or distance ADJ Call Setup for Depth Setup for Depth Scale for depth 0 100 m Color for depth Scale f...

Page 50: ...changed Toggle between available colors by means of the keys Scale for temperature can be set to 0 10 0 20 0 30 10 20 and 10 10 Interval of screen the interval for updating of screen can be related t...

Page 51: ...p see section 10 5 5 Factory settings see section 10 6 6 QuickGuide see section 10 7 10 1 Echosounder setup The Echosounder setup display mainly consist of general settings but also applies to a speci...

Page 52: ...e scale ON Restart of AUTO pulse power 20 sec Echo sampling BOTTOM Demo mode OFF MENU Exit Accept ENT Use the cursor key to move cursor around in the display Select new values by means of the keys ENT...

Page 53: ...gle between time and distance in Scroll synchro nisation section 4 7 Restart of AUTO pulse power will automatically restart the echosounder if bottom detection has been lost for the chosen time interv...

Page 54: ...vailable values ENT Confirm editing Display position as the position can be shown in latitude longitude Loran C or decca coordinates after selecting chain from the Miscellaneous menu Toggle with Displ...

Page 55: ...0 SW 2 00 PAGE rotation interval 05 sec Display text in English GB MENU Exit Accept ENT Scroll up down to go to the function you wish to change 0 9 Key in new values or Toggle between available values...

Page 56: ...sion hardware and software is implemented PAGE rotation interval can be set to anywhere between 03 to 99 seconds Refer to Fundamentals of the display and page system in section 2 1 for more details on...

Page 57: ...the same compass If you wish to use the built in GPS also on the Chartplotter which automatically was set to operate with an external position you can change the Group selection from SIMRAD to STAND...

Page 58: ...lect one of the listed products Press the key to access additional data Example EQ44 ECHO SOUNDER SimNet number 100003 Address 1 Device class 60 function 130 Instance system 0 device 0 SimNet Compatib...

Page 59: ...TUP menu Chapter 10 9 Group selection can be set to SIMRAD auto selected SimNet units from the Simrad group STAND ALONE manually selected data source and third party units Source depending on which pr...

Page 60: ...below transducer DBT OFF OFF MENU Exit Accept ENT Water Chapter 10 10 EQ44 54 SETUP menu GAIN Go to Water interface step back with GAIN Input INTERNAL ONLY indicates that no external source can be se...

Page 61: ...ccept ENT SimNet diagnostic EQ44 54 SETUP menu Chapter 10 11 GAIN Go to Compass interface step back with GAIN GAIN Go to Alarm interface step back with GAIN Stand by level can either be LOW 0 volt or...

Page 62: ...Check supply voltage to be between 10 8 15 VDC to the SimNet system 3 Systematically disconnect one unit at a time to see which one is causing the problem Start at the opposite end of the 12V power s...

Page 63: ...including offset WPL Waypoint location Description of NMEA0183 input sentences MTW Water temperature VHW Water speed and heading GLL Geographic position latitude longitude RMA Recommended minimum spec...

Page 64: ...ttings These four setups are not adjust able Palette 9 Multi is preset with multi colors Palette 5 to 8 can be customized to suit individual needs and wishes If you wish to make your own special palet...

Page 65: ...all sounder set tings or SimNet NMEA settings entered into the unit by the user and return to the default settings set up from the factory FACTORY PRESETS If the unit is still alive but has ceased to...

Page 66: ...off at the moment back to factory defaults of the Interface setup The units will restart with Automatic input source setup as described in section 2 5 Initial start up Show test display Information i...

Page 67: ...uidance is available in a QuickGuide which can be accessed either at start up display press PAGE or via the menu MENU Call up the menu bar and 7 6 activate the QuickGuide PAGE Leaf through the informa...

Page 68: ...Chapter 10 18 EQ44 54 SETUP menu...

Page 69: ...stallation notes For a number of reasons all user related decisions setups etc should be noted in these two pages as they occur This information may be helpful if your unit has been updated with new s...

Page 70: ...Chapter 11 2 EQ44 54 Installation and service Other important settings...

Page 71: ...mm 8 8 245 mm 9 6 110 mm 4 3 75 mm 3 0 EQ44 54 Installation and service Chapter 11 3 11 2 Installation of EQ44 The unit can be flat or bracket mounted overhead bulkhead or console Overhead mounting B...

Page 72: ...192 mm 7 6 202 mm 7 9 208 mm 8 2 220 mm 8 7 Chapter 11 4 EQ44 54 Installation and service Flush mounting of EQ44 Removable corner for flush mounting Minimum clearance incl cables 11 cm Refer to inclu...

Page 73: ...9 2 mm 13 4 195 mm 7 7 EQ44 54 Installation and service Chapter 11 5 11 3 Installation of EQ54 The unit can be flat or bracket mounted Overhead and bulkhead mounting is only possible if using a distan...

Page 74: ...297 9 mm 11 7 307 9 mm 12 1 318 mm 12 5 330 mm 13 Chapter 11 6 EQ44 54 Installation and service Flush mounting of EQ54 Removable corner for flush mounting Minimum clearance incl cables 13 cm Refer to...

Page 75: ...ou can see the ship s bow when you raise or lower your eyes from the dis play there is limited exposure to direct sunlight to avoid overheating see envi ronment temperature limits in 11 10 Specificati...

Page 76: ...AT44 Chapter 11 8 EQ44 54 Installation and service 11 5 Electrical connections...

Page 77: ...EQ44 54 Installation and service Chapter 11 9...

Page 78: ...or it will not protect the equipment as intended see fuse rating in section 11 10 Specifications 11 5 3 Transducer connection Most transducers are supplied with a 10 meter cable for connection to the...

Page 79: ...r 38 and 200 or 50 and 200kHz Single frequency Single frequency 50 or 200kHz 38 or 200kHz Two frequency 50 200kHz Warning Transducers containing speed log sensor e g Airmar B744V must never be connect...

Page 80: ...clockwise until it stops The unit must be turned off while connecting disconnecting the interface cable SimNet is a high speed control and data network designed to integrate SimNet products into a co...

Page 81: ...tarting with the power cable with termination in one end and termination plug or wind transducer with termination in the other end 11 5 5 Universal connection cable Transducers are recommended to be 6...

Page 82: ...meters 32 feet may be connected without a noticeable reduction of the performance The cable must be of the same type as the standard cable The EQ44 54 must be turned off while connecting disconnecting...

Page 83: ...amlined shape designed for mounting onto the hull Frequency 50 and 200 kHz 38 and 200 kHz Beamwidth longitudinal 10 7 longitudinal 13 7 transverse 16 7 transverse 21 7 Maximum pulse power input 1000 W...

Page 84: ...mended for fiberglass and metal hulls Do not use in wooden hulls Reference no 179 0401 003 B117 Housing Bronze Recommended for fiberglass and wooden hulls Airmar P66 Transom mount Frequency 50 200 kHz...

Page 85: ...modates hull thickness Min no fairing 6 mm 1 4 Max with fairing 83 mm 3 1 4 Frequency 50 200 kHz Beamwidth 45 15 Cable length 10m 32 Depth information Ref no 179 0401 004 B45 Housing Bronze Recommende...

Page 86: ...therefore must be given to selecting the mounting loca tion and on deciding the method of installation that best suits the vessel Air bubbles and turbulence caused by the vessel s movement through the...

Page 87: ...ingly to meet this requirement The more the transducer protrudes from the hull the better the results will be Particularly at lower frequency operation 38 and 50kHz interference from propeller noise c...

Page 88: ...onnections are tight and that no cables are frayed or worn Transducer periodically clean the face of the transducer with a plastic uten sil using a scrubbing action Do not use a harsh abrasive or a so...

Page 89: ...re appears normal but no target are shown or only random noise is seen Check that the correct transducer frequency is selected Change frequency from Echo quick menu press ENT 1 see section 4 5 Check t...

Page 90: ...SimNet control Maximum number of products connected in a network 50 units Maximum cable length excl 30 m wind transducer cable 120 m 400 Bit rate of the bus 250 kbit second Maximum DC current through...

Page 91: ...rad W38 200 300W wide beam high performance combi transducer 38 and 200kHz 32 beams Airmar B260 22 1kW combi transducer 50 and 200kHz 19 and 6 beams 50 200kHz medium range transducers Airmar Des A B25...

Page 92: ...ug 24005894 2 m 6 6 SimNet power incl termination 24005902 2 m 6 6 SimNet power excl termination 24005910 AT10 Universal NMEA0183 converter 24005936 SimNet cable protection cap 24005928 SimNet NMEA200...

Page 93: ...ducer Echogram background color is the color shown on the EQXX in the event no target is present There are three colors to choose from white blue or black where black is especially useful during night...

Page 94: ...sition update from GPS or external sensor the displayed position will start to flash Once normal position updated is resumed the flashing will stop TFT Thin Film Transistor Active matrix display Trans...

Page 95: ...setup 4 5 range 4 3 4 5 restart of AUTO pulse power 10 2 return to sounder presets 10 15 Echosounder features continued sampling 10 2 scroll speed 4 5 scroll synchronization 4 5 selecting displays 3...

Page 96: ...Loran C chains 9 4 Maintenance 11 20 Master reset 10 16 Measurement units A 1 setup 10 5 Menu bar 2 5 Menu layout 2 6 Miscellaneous menu 9 1 Navigation setup 8 1 Night display 10 14 NMEA 10 7 A 2 Pag...

Page 97: ...EQ44 54 Echosounder Index...

Page 98: ...tive 89 336 EEC of May 3rd 1989 Employed harmonised standard EN60945 Article 9 10 and 12 Equipment category Navigational equipment intended for world wide use aboard non SOLAS vessels Model s Simrad E...

Page 99: ...roducts claimed to be defective ON BOARD SERVICE can be arranged by authorized local service dealers or national distributors upon request Labor costs for the repair replacement of the defective modul...

Page 100: ..._____ EQUIPMENT ________________________________________________________________________ ____________________________________ ____________________________________ ______________________ ______________...

Page 101: ...______________________ ___________________________________________ TYPE __________________________________________________________ EQUIPMENT ___________________________________________________________...

Page 102: ...__________________________________ _________________________________________________________________________ _________________________________________________________________________ _________________...

Reviews: