background image

22

14

15

5

The  2nd  character  is  "B",  then  enter 
the character code "03".

Press  the  [CHANGE]  button  until  the 
correct  character  code  appears.  And 
then press the [SET] button.

SELECT

CHANGE SET

7

Follow the same procedure for further 
characters settings.

8

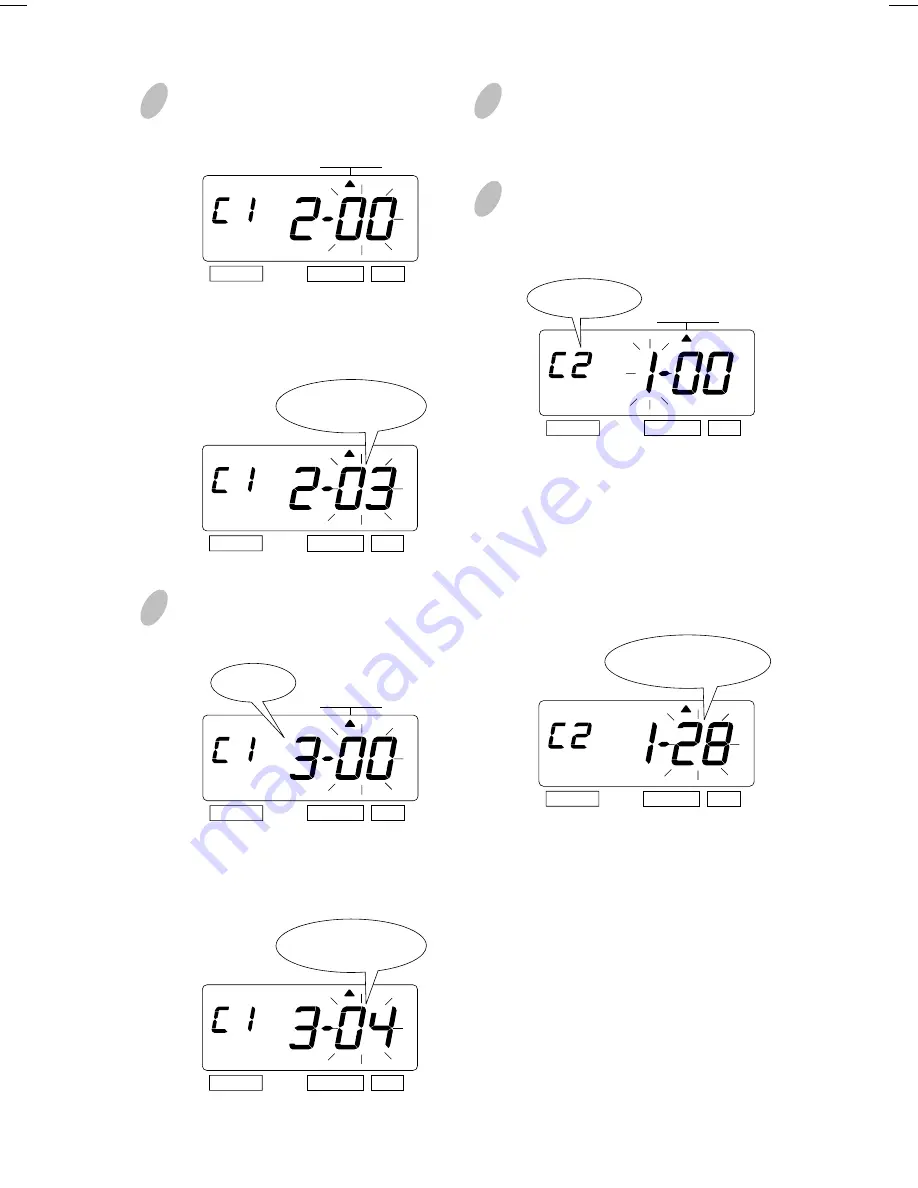
Setting the 2nd comment line
Press  the  [SET]  button  to  change  the 
comment line number to "C2".

SELECT

CHANGE SET

The character code

"03" means "B".

6

The  3rd  character  is  "C",  then  enter 
the character code "04".

Press  the  [CHANGE]  button  until  the 
correct  character  code  appears.  And 
then press the [SET] button.

SELECT

CHANGE SET

SELECT

CHANGE SET

The character code

"04" means "C".

The 3rd

character

In case of example, the 1st character is 
"DATE", then enter the character code 
"28".

Press  the  [CHANGE]  button  until  the 
correct  character  code  appears.  And 
then press the [SET] button.

SELECT

CHANGE SET

SELECT

CHANGE SET

The character code

"28" means "DATE".

COMMENT

COMMENT

COMMENT

The 2nd

comment line

23

16

15

9

The  2nd  character  is  "SPACE",  then 
enter the character code "01".

Press the [CHANGE] button until  the 
correct  character  code  appears.  And 
then press the [SET] button.

SELECT

CHANGE SET

Follow the same procedure for further 
characters settings.

12

11

10

Setting the 3rd comment line
Press  the  [SET]  button  to  change  the 
comment line number to "C3".

SELECT

CHANGE SET

The character code

"01" is "SPACE".

The  3rd  character  is  "MONTH",  then 
enter the character code "27".

Press  the  [CHANGE]  button  until  the 
correct  character  code  appears.  And 
then press the [SET] button.

SELECT

CHANGE SET

SELECT

CHANGE SET

The 3rd

character

In case of example, the 1st character is 
"B",  then  enter  the  character  code 
"03".

Press  the  [CHANGE]  button  until  the 
correct  character  code  appears.  And 
then press the [SET] button.

SELECT

CHANGE SET

SELECT

CHANGE SET

The character code

"03" means "B".

The character code"27" 

means "MONTH".

COMMENT

COMMENT

COMMENT

The 3rd

comment line

ENGLISH

Summary of Contents for EP40

Page 1: ...ENGLISH EP40 USER S MANUAL ENGLISH FRAN AIS ESPA OL...

Page 2: ...AS DE BRUITS RADIO LECTRIQUES D PASSANT LES LIMITES APPLICABLES AUX APPAREILS NUM RIQUES DE CLASSE A PRESCRITES DANS LE R GLEMENT SUR LE BROUILLAGE RADIO LECTRIQUE DICT PAR LE MINIST RE DES COMMUNICAT...

Page 3: ...MBER SETTING THE INITIAL NUMBER SETTING THE TIME TABLE PROGRAM SETTING THE EXTERNAL TIME SIGNAL BUILT IN BUZZER SETTING THE SLAVE CLOCK SETTING THE PASSWORD Registering the Password How to change sett...

Page 4: ...00 of an hour Password for program protection Digital LCD Date Hour Minute Day of the week indication Wall or desktop mount Full power reserve optional Slave clock functions optional Built in buzzer o...

Page 5: ...on of Name Front view Cover off JAN 31 12 00 JAN 31 12 00 JAN 31 12 00 15mm 30mm Print position adjuster Display Ribbon cassette Print head Control buttons User s Manual Print position from the card e...

Page 6: ...12 00 1 Unlock the key and remove the top case 3 Replace the cover and lock 2 Remove the PROTECTION PAD 4 Plug the AC cord into the AC outlet and insert a card C A U TION C A UTION Print example Prote...

Page 7: ...30 second reversal Since the 30 second signal V side is not received the difference from the master clock is 30 seconds or more and the time is not modified correctly 60 second reversal Since the odd...

Page 8: ...ME mark Function of 3 control buttons SELECT You can select the desired program setting mode by pressing this SELECT button Selected program setting mode is indicated by the on the display CHANGE When...

Page 9: ...e 2 Change the Minute Press the CHANGE button to set at 09 And then press the SET button 3 After you finish setting the time press the SET button once again Now the time setting has been completed Rep...

Page 10: ...he Date Press the CHANGE button to set at 21 And then press the SET button 4 After you finish setting the date press the SET button once again Now the date setting has been completed Replace the cover...

Page 11: ...the SET button once again Change the Hour In case of the example press the CHANGE button to set at 2 And then press the SET button Now the 12 24 hour setting has been completed Replace the cover and l...

Page 12: ...int Order Options M D H Min D M H Min M D Y H Min D M Y H Min Y M D H Min Y M D H Min S D H Min DOW D H Min Y M D M D DOW D M Y C M D Y C D M Y C Y M D M D Y C Print Example JAN 31 10 00 31 JAN 10 00...

Page 13: ...SET button At that moment the flashing changes from the Year Digit Options to Type of Minute In this setup the printing of Year digit the printing type of Minutes and change of Leading Zero can be set...

Page 14: ...tting the print pattern press the SET button once again Now the print pattern setting has been completed Replace the cover and lock Important If you do not complete Step 4 the Time Recorder will not p...

Page 15: ...will not print Change the Comment Options In case of the example press the CHANGE button to set at 2 And then press the SET button Example Change the comment to SENT SELECT CHANGE SET COMMENT COMMENT...

Page 16: ...e at maximum however number of characters depends on font size Refer to the 25 CHARACTER CODE FOR ALPHANUMERIC Example SELECT CHANGE SET PRINT ORDER SELECT CHANGE SET 2 And then press the SET button A...

Page 17: ...Character Code COMMENT COMMENT COMMENT SELECT CHANGE SET SELECT CHANGE SET 4 Set the Character Code In case of example the 1st character is A then enter the character code 02 Refer to the 25 CHARACTER...

Page 18: ...character code 03 means B 6 The 3rd character is C then enter the character code 04 Press the CHANGE button until the correct character code appears And then press the SET button SELECT CHANGE SET SE...

Page 19: ...character code 01 is SPACE The 3rd character is MONTH then enter the character code 27 Press the CHANGE button until the correct character code appears And then press the SET button SELECT CHANGE SET...

Page 20: ...nd lock Important If you do not completed Step 15 the Time Recorder will not print SELECT CHANGE SET The character code 10 means O 14 Set the last character A in the same manner as above SELECT CHANGE...

Page 21: ...sition Left Orientated Center Orientated Right Orientated Setting the Print Position of Customized Comments ABC HOTEL 21 OCT 03 BOSTON MA Left orientated ABC HOTEL 21 OCT 03 BOSTON MA Center orientate...

Page 22: ...again At that moment the display changes to the following figure SELECT CHANGE SET Confirming and Changing the Customized Comments ABC HOTEL 21 OCT 03 BOSTON MA ABC HOTEL 21 OCT 10 03 BOSTON MA Examp...

Page 23: ...T button once again 4 Confirming the 3rd comment line Confirm the 3rd comment line in the same manner as Step 1 3 SELECT CHANGE SET The character code 26 means Year SELECT CHANGE SET The character cod...

Page 24: ...hange the Language In case of the example press the CHANGE button to set at 2 And then press the SET button This setting is available if you select Month Day of the week or Comment in previous PRINT O...

Page 25: ...n Change the Print Direction In case of the example press the CHANGE button to set at 2 And then press the SET button At that moment the flashing changes from the Print Direction to the Print Activati...

Page 26: ...Automatic will allow the Time Recorder to print by simply inserting a card or piece of paper Semi automatic will allow the Time Recorder to print by pressing the push bar only when a card or piece of...

Page 27: ...ng D S T Current D S T Rules Start Second Sunday in March End First Sunday in November The unit remembers the start date as the second Sunday of March and the end date as the first Sunday of November...

Page 28: ...he moment the startingt date of the display changes from flashing to steady and the mark is displayed under SU After a few second go on to the set the ending date Please see the following page SELECT...

Page 29: ...CHANGE SET SELECT CHANGE SET SELECT CHANGE SET SELECT CHANGE SET 6 Change the Month Push the CHANGE button to set at 10 and push the SET button At the moment the flashing changes from Month to Date S...

Page 30: ...ving Time settings SU 4 After you finish deleting the daylight saving time press the SET button once again Now the deleting the daylight saving time has been completed Replace the cover and lock Impor...

Page 31: ...ment the flashing changes from the Number Digit to Repeat Times In this setup you can select digits of printed number the Repeat Times of number and type of Number Reset Example Change the Number Digi...

Page 32: ...he number press the SET button once again Now the number setting has been completed Replace the cover and lock Important If you do not complete Step 4 the Time Recorder will not print 1 2 3 Reset Opti...

Page 33: ...rect numbers in the same manner as Step 2 And then press the SET button Note Up to 8 digits can be set however the number of digits for Initial Number depends on now you set at the Number Note When th...

Page 34: ...be programmed for each day of the week and each time period Example 1 The time table program is explained using the following example SELECT CHANGE SET TIME TABLE PROGRAM Special mark OFF Monday to Fr...

Page 35: ...Minute 4 Set the Minute In case of example press the CHANGE button to set at 00 And then press the SET button MO TU WE TH FR SA SU MO TU WE TH FR SA SU BUZZ EXT SIGNAL OFF ON MO TU WE TH FR SA SU Hour...

Page 36: ...0 00 17 30 12 00 Up to 48 programs can be set Program No 1 through No 48 Program No 01 02 03 04 Day of the week Mon Sat Mon Sat Mon Sat Mon Sat Time 9 00 9 00 12 00 17 30 Monday to Saturday Ext Signal...

Page 37: ...then press the SET button The Ext Signal and the Built in Buzzer are available only when Optional Board is connected to the time recorder At that moment the display changes to the following figure SEL...

Page 38: ...No 2 in the same manner as for Program No 1 as illustrated in the following figure and press the SET button At that moment the flashing changes from the Hour to the Minute MO TU WE TH FR SA SU BUZZ E...

Page 39: ...ttings for Program No 4 in the same manner as for Program No 1 as illustrated in the following figure and press the SET button 4 MO TU WE TH FR SA SU Now the time table program setting has been comple...

Page 40: ...gram No flash and press the CHANGE button until the desired program No is displayed 2 Press the CHANGE button to set at 3 Press the SET button At that moment the display changes to the following figur...

Page 41: ...External Time Signal and Built in Buzzer For the number of seconds 1 through 30 can be selected Note For this feature to be functional the optional board must be installed in the Time Recorder Exampl...

Page 42: ...you finish setting the slave clock press the SET button once again Now the slave clock setting has been completed Replace the cover and lock Important If you do not complete Step 3 the Time Recorder...

Page 43: ...password press the SET button once again Now the password registering has been completed Replace the cover and lock Important If you do not complete Step 3 the Time Recorder will not print When the p...

Page 44: ...Set the last two digits In case of the example press the CHANGE button to set at 34 And then press the SET button At that moment the mark indicates the TIME 3 Select desired setting mode by pressing t...

Page 45: ...n press the SET button 5 After you finish canceling the password press the SET button once again Now the password canceling has been completed Replace the cover and lock Important If you do not comple...

Page 46: ...he factory defaults push the reset switch with a pointed implement NOTICE All your custom settings will be deleted and will revert to the factory defaults when the reset switch is pushed To make new s...

Page 47: ...ny other materials The Time Recorder may come off if used on other materials 1 Install the supplied wall mount screws into a wall by using the template Be sure to keep about 1 4 6mm of the screw head...

Page 48: ...nd pull straight out to remove it 3 Turn the knob of the new cassette in the direction of the arrow clockwise to tighten the ribbon 4 Place the cassette inside the Time Recorder as shown in the figure...

Page 49: ...w to tighten the ribbon 6 Replace the cover and lock NOTICE Install the cassette so that the ribbon is between the print head and the ribbon mask Printing will not come out properly if the ribbon is p...

Page 50: ...8 8 7 3 7 7 5 7 5 8 5 5 6 10 4 5 6 7 8 9 10 11 12 13 14 15 _ Exchange Line 1 to 2 Exchange Line 2 to 3 Exchange Line 3 to 1 Delete All Large BOLD Character Max Dots Max Dots Note is to indicate the f...

Page 51: ...s Note is to indicate the following meanings Code 6F 2 digits setting of YEAR Code 73 and 74 AM PM setting of HOUR Code 75 to79 Number digits depend on the setting Code Character Z 0 1 2 3 4 5 6 7 8 9...

Page 52: ...r Number Number 1 2 3 4 5 6 7 8 9 10 11 12 13 14 15 _ Small Character Max Dots Note is to indicate the following meanings Code d2 2 digits setting of YEAR Code d6 and D7 AM PM setting of HOUR Code d8...

Page 53: ...5 4 3 7 7 5 7 6 5 7 6 5 8 7 6 EURO 8 7 6 German Character Dots Bold Large Small 9 7 6 9 6 6 7 7 5 4 4 4 7 6 5 8 7 6 8 6 4 5 4 3 7 6 5 7 6 5 7 6 5 9 7 7 EURO 8 7 6 8 7 6 French Character Dots Bold Lar...

Page 54: ...26 INSTALLINGTHE Ni Cd BATTERY OPTIONAL 52 51 1 Unlock the key and remove the cover 3 Replace the cover and lock 2 Insert the battery connector into the compartment connector to install the battery...

Page 55: ...CLOCK UNIT Insert the signal cable Insert the AB signal cable Insert the signal cable Connecting the Master Clock CAUTION Be sure to pull out AC cord from AC outlet before connecting wires of the Mas...

Page 56: ...ack of the Time Recorder Connecting the External Time Signal connector CAUTION Be sure to pull out AC cord from AC outlet before connecting wires of the External Time Signal Improper connection may ca...

Page 57: ...e 1 If diameter of wires is too small to fix by the above method turn the wire clamp upside down and feed wires through the clamp Then secure it with screws See the Figure 2 Attaching the Wire Clamp C...

Page 58: ...remaining life of lithium battery for memory back up is short The card is not inserted in the Time Stamp properly Cannot print The printer motor or home position sensor is not normal Cannot print The...

Page 59: ...No voltage signal output Master Clock device 6 to 32 V signal input Temperature 5 to 45 C 23 to 113 F Humidity 20 to 80 no condensation The unit operates normally at temperatures of 5 C or below but t...

Page 60: ...ble THIS WARRANTY DOES NOT APPLY TO ANY PRODUCT THAT HAS BEEN SUBJECTED TO ABUSE MISHANDLING OR IMPROPER USE AS DETERMINED BY SIMPLEXGRINNELL AND IS IN LIEU OF ALL OTHER WARRANTIES EXPRESSED OR IMPLIE...

Reviews: