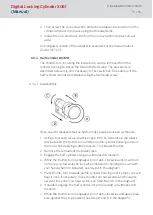
5. Battery replacement key
6. Locking disc with opening (identical on outside)
7. Outer thumb-turn
6.3.1.1 Removing the outer thumb-turn
Place the installation key on the outer thumb-turn in such a way that its
two teeth engage into the outer thumb-turn; if necessary, turn the thumb-
turn until both teeth lock into the locking disc.
NOTE
The installation tool must be placed flat on the internal front surface of the
thumb-turn to ensure that the tool can lock into the locking disc.
Hold the outer thumb-turn firmly and carefully turn the installation tool
about 30° in a clockwise direction (until you hear a click). Remove the
thumb-turn.
6.3.1.2 Fastening the digital cylinder into the locking device
Turn the cam until it is vertical and pointing downwards. Insert the digital
locking cylinder through the locking device in such a way that the inside
thumb-turn (see diagram above) is facing the inner side of the door. Fasten
the cylinder into the mortise lock with the fastening screw.
NOTE
You must not strike the thumb-turns when installing the cylinder. Do not al-
low the cylinder to come into contact with oil, grease, paint or acids.
6.3.1.3 Fastening the outer thumb-turn
Replace the thumb-turn and turn in an anti-clockwise direction while
applying slight pressure until the outer thumb-turn grips into the indents in
the flange. Possibly place the thumb-turn in this position by pressing it
towards the profile cylinder housing.
NOTE
Turning the bayonet disc when not installed may prevent the thumb-turn
from being fastened into position. In such a case, push the disc back into
the original 'bayonet disc open' position using the installation tool. (see dia-
grams)
Digital Locking Cylinder 3061
(Manual)
6. Installation instructions
26 / 54


