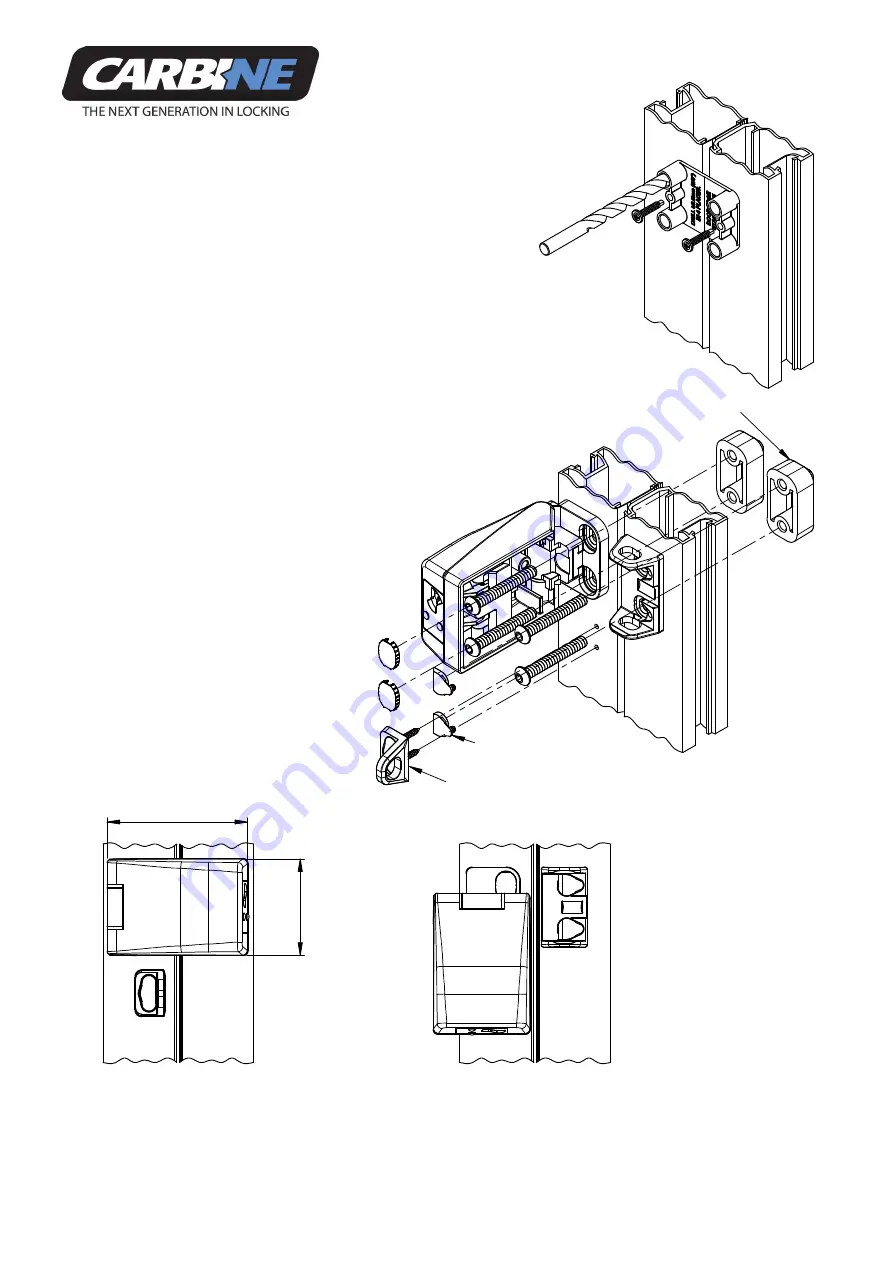
Hasp Clip (for securing the
Hasp in the unlocked position)
Screw Caps x 4
(insert after installation)
Blind Covers x 2
80
m
m
116mm
Locked Position Unlocked Position
Made in China for;
DAVCOR Pty Ltd
14 John Hines Avenue
Minchinbury NSW 2770
AUSTRALIA
www.davcor.com.au
WARRANTY & LIMITATION OF LIABILITY
This DAVCOR product is warranted to be free from defects in materials and workmanship for a period of
one (1) year from the date of the original purchase. This warranty is for replacement of product only
and DAVCOR does not accept any responsibility for any direct or consequential damage caused by this
product or its use. This warranty does not cover damage that from results from faulty installation or
usage, alteration or modification of the product or tarnishing of the finish, including colour damage,
due to weather, salt or chemicals. Should any DAVCOR product not perform satisfactorily to its intended
application then return it to its place of purchase for a replacement.
Page 1/2
!
"#$%&'(()!*"+,-./0!1!2345(%#!6)&3(!
78+9"--"97.8!78+92:/97.8+!
Preparation
Before installing the CARBINE Hasplock ensure that;
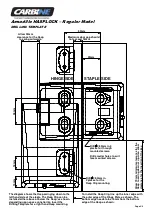
1. The maximum gap between the door frames is less than
16mm, as shown on the Drilling Template.
2. There is sufficient clearance for the hasp to swing outwards
and down or up, as shown on the Drilling Template.
Tools required
Electric or cordless drill, Ø9.50mm drill bit for the Hinge and Staple installation,
Ø3.50mm drill bit for the Hasp Clip installation, 5mm Hex Key (supplied) and a
No.2 Phillips screwdriver.
Installation
Use the supplied Drilling Jig by lining up the door frame to the line on the Drilling Jig as
shown. Use the two self drilling and tapping screws to secure the Jig to the frame before
drilling the HaspLock mounting screw holes. Alternatively you can use the Drilling Template
by taping it onto the door frame and centre punching the holes before drilling. If the Hasp
Clip is to be used, centre punch the holes and drill as shown on the Drilling Template.
Fastening
The mounting screws supplied are Buttonhead M8 x 60mm and suit a
45mm frame. For a shorter frame width, cut the screws
back to allow for 10-12mm of protrusion from the
rear of the frame. For deeper frame widths use longer
screws and ensure the same protrusion. For face
mounting, use 14G-16G Pan-Head screws with a
suitable depth that suits the mounting. For correct
operation of the HaspLock, the head thickness
of these screws should not exceed 4mm.
Lock Cylinder
The lock cylinder supplied is a standard 6-pin
key-in-knob style with a C4 keyway.
It can be replaced with another similar style
of cylinder by removing the module from the
Hasp with a 4mm Hex Key (not supplied).
Maintenance
If required, lubricate the Lock Tongues with
graphite powder, DO NOT use grease or oil.


