127
IT
ES
PT
GB
RO
RUS
rect the calibration, if required, follow the
instructions in paragraph 4.5.1.
4.4
GAS VALVE
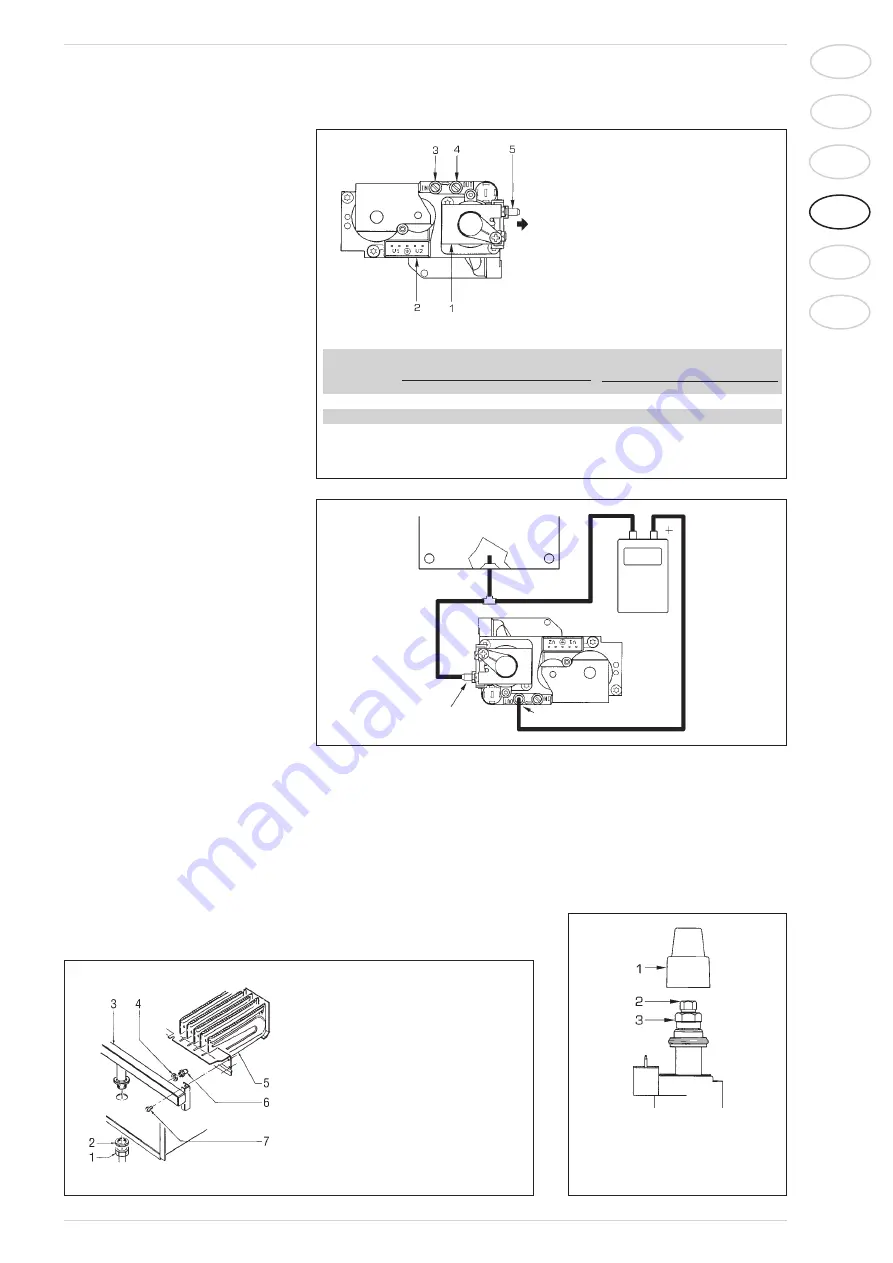
The boilers are equipped standard with the
HONEYWELL VK 8105N gas valve (fig. 29).
The gas valve is set at two pressure values:
maximum and minimum. According to the
type of gas burnt, these correspond to the
values given in
Table 5
. The gas pressures
at the maximum and minimum values, are
factory set. Consequently they must not be
altered. Only when you switch the appliance
from one type of gas supply (methane) to
another (butane or propane), it is permit-
ted to alter the operating pressure.
4.5
GAS CONVERSION
This operation must be per formed by
authorised personnel using original Sime
components.
To convert from natural gas to LPG or vice
versa, perform the following operations (fig.
30):
–Close the gas cock.
–Remove the burner assembly.
–Replace the main nozzles (6) supplied in
a kit, inserting the copper washer (4).
Use a ø 7 spanner to perform this ope-
ration.
– Remove the “METANO/GPL” connector
link on the card and set it in the posi-
tion corresponding to the gas to be
used (7 fig. 25).
–To set the values of maximum and mini-
mum gas pressure, follow the instruc-
tions given in section 4.5.1.
–After have ultimated the conversion of
the boiler, please stick onto the casing
panel the plate showing the relevant fee-
ding gas which is included into the kit.
NOTE: after assembly, all gas connections
should be tested with a sealing test using
soapy water or special products and spe-
cifically avoiding the use of free flames.
Conversion operations should be perfor-
med by skilled personnel only.
4.5.1
Adjusting valve pressure
Set maximum and minimum pressure on
gas valves as follows (fig. 31):
–Connect the column or a manometer to
the intake downstream of the gas valve.
In “25 BFT TS” models, Disconnect the
valve VENT pressure test point tube (5
fig. 29).
–Remove the cap (1) from the modulator.
–Place the hot tap water potentiometer
knob at the maximum position.
–Turn on the boiler using the four-way
switch and turn on a hot water tap all
the way.
–Remember that rotating clockwise will
increase pressure while rotating anti-
clockwise will diminish it.
–Adjust maximum pressure using the nut
Fig. 30
KEY
1
Swivel connection 1/2”
2
Locknut 1/2”
3
Burner manifold
4
Washer ø 6,1
5
Burners
6
Nozzle M6
7
Screw
WARNING: To ensure a perfect seal,
always use the washer (4) supplied in
the kit when replacing nozzles, even in
burner units for which it is not specified.
Fig. 31
KEY
1 Plastic cap
2 Minimum pressure adjusting nut
3 Maximum pressure adjusting nut
KEY
1
Modulator
2
EV1-EV2 coils
3
Pressure inlet upstream
4
Pressure inlet downstream
5
VENT plug
TABLA 5
Burner max.
Modulator
Burner min.
Modulator
Type of gas
pressure (mbar)
current
pressure (mbar)
current
25 OF C 30 OF C
25 BFT TS
mA
25 OF C 30 OF C
25 BFT TS
mA
G20
9
10.5
12
130
1.9
2
2.1
0
G30
27
27.9
28.2
165
5
5.2
4.7
0
G31
35
35.5
36.2
165
5
6.9
4.7
0
Fig. 29/a
Fig. 29
SEALED CHAMBER
MANOMETER
PRESSURE INLET UPSTREAM
VENT PLUG
Summary of Contents for PLANET 25 BFT TS
Page 1: ...IT ES PT GB RO RUS CERTIFICAZIONE DEL SISTEMA DI QUALITA AZIENDALE Planet...
Page 2: ......
Page 72: ...70 IT ES PT GB RO RUS...
Page 106: ...104 IT ES PT GB RO RUS...
Page 140: ...138 IT ES PT GB RO RUS...
Page 208: ...206 IT ES PT GB RO RUS...
Page 209: ......
Page 210: ......
Page 211: ......


