background image

4

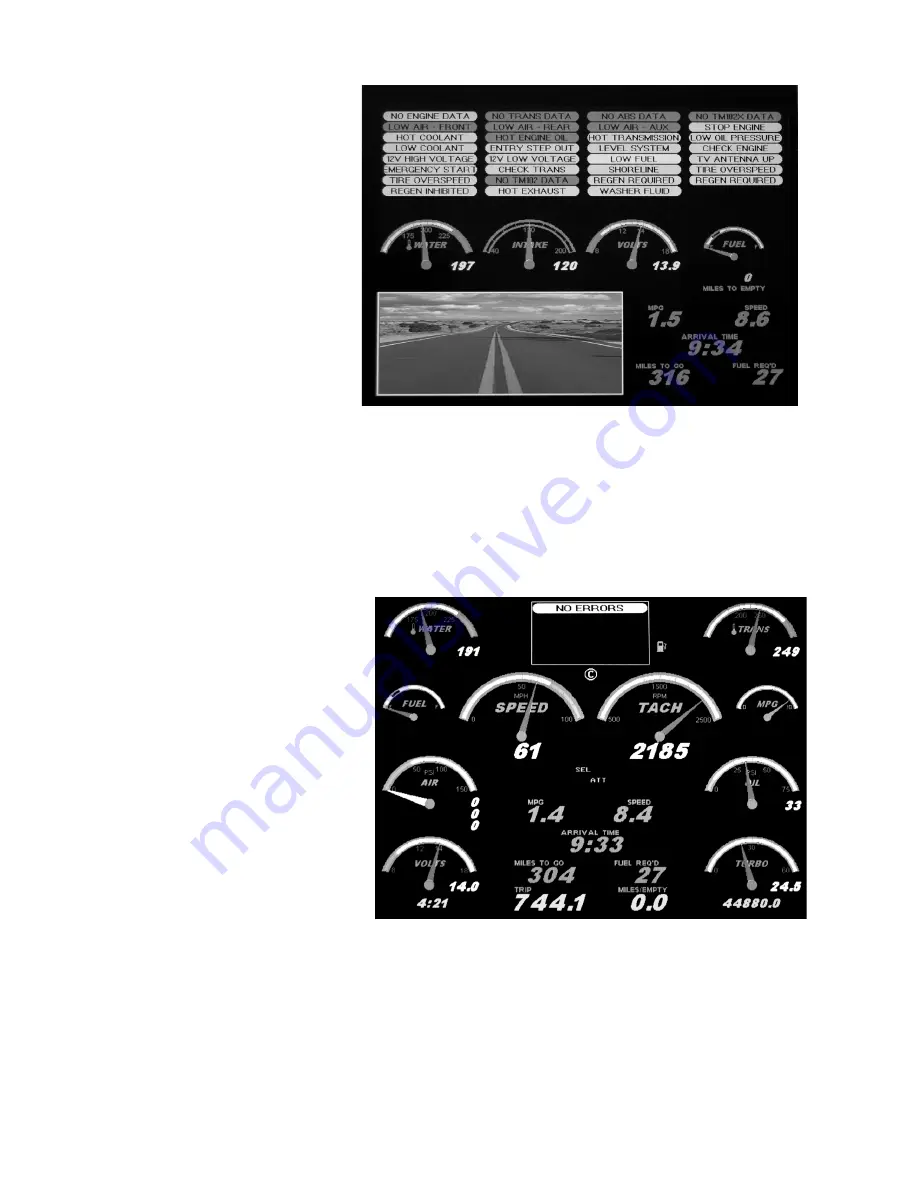
Accessory Screen

When the key is 

1st turned to the ignition 

position,  the Accessory 

Screen will appear. This 

displays applicable indicator 

lights as well as a few 

important gauges and trip 

info.  Once the engine is 

started the Default Drive 

Screen will appear. The 

default drive screen can be 

changed by pressing the 

p

rog


button and changing 

the Default Dash Layout. 

You can view each Drive 

Layout by pressing the 

D

rive


repeatedly.  The 

b

righT

 button may also be pressed on the VMS640 to adjust 

the brightness of the display.

Main Drive Screen

The Drive Screen displays engine performance and transmission status 

information.  The circled “C” icon indicates Cruise Status.  If all systems are 

good, the “No Errors” indicator will appear in green.
Transmission Status

The two large numbers 

in the middle indicate the Gear 

Selected and Gear Attained 

by the transmission (WTEC 

v8 or newer required).  This 

continuously updates as the 

transmission shifts.  The 

circle with the M indicates 

tranmission Mode. The Mode 

indicates the aggressiveness 

of the transmission; on most 

coaches Mode On (Economy) 

indicates less aggressive 

shifting for better fuel 

economy.

Estimated-Time-of-Arrival (ETA), Miles-To-Go (MTG), Miles-To-

Empty(MTE), and Trip Miles can be display on the Drive Screens.  The Trip 

data is set on the primary Trip Screen (see the Quick Start page), and will 

slowly count down as you drive.

In this example, the VMS displays most important engine indicators: 

Speed, Tach, Transmission Temperature, Coolant Temperature, Etc. As well 

as Trip Data.  

Summary of Contents for VMS 645 CL

Page 1: ... Inc 2490 Ferry St SW Albany OR 97322 888 741 0259 www silverleafelectronics com VMS 645 CL Owner s Manual RV Version 4 1 SilverLeaf Electronics Inc 2490 Ferry St SW Albany OR 97322 888 741 0259 www silverleafelectronics com ...

Page 2: ... showing the cause of the problem Press Clear to clear the top of the screen If the problem is still occurring the code will quickly reappear The dash will also show a log of past diagnostic events on the bottom half of the screen To Set the Time Press Prog once Turn the knob to select the feature you wish to change in this case Time Press the knob to select Turn the Knob to adjust the hours and p...

Page 3: ...ips MPG 6 Engine and Transmission Diagnostics History 7 Maintenance Manager Pre Drive Checklist 8 VMS 645 Programming Screens 9 10 Scan Preferences Daily Data Screens 11 Hidden Screen 12 13 House Monitoring And Control Screens 14 15 Warranty And Contact Information 16 ...

Page 4: ...se Status If all systems are good the No Errors indicator will appear in green Transmission Status The two large numbers in the middle indicate the Gear Selected and Gear Attained by the transmission WTEC v8 or newer required This continuously updates as the transmission shifts The circle with the M indicates tranmission Mode The Mode indicates the aggressiveness of the transmission on most coache...

Page 5: ...he VMS is much more reliable and ac curate than the conventional dash gauges Most gauges are self explanatory Some such as Accelerator Position are useful only in certain troubleshooting situations Some duplicate the dash gauges but are more accurate and precise than the conventional gauge Others are truly unique Engine Coolant Temperature When driving in hot weather and working the engine hard we...

Page 6: ...verage speed and the gallons of fuel used The hours and MPH values are based on en gine run time not the total elapsed time Sitting and idling the engine will affect these values but sitting with the engine off will not Trip Miles Per Gallon will be displayed on this screen Pressing Trip repeatedly will move the red selection box around the screen to enable clearing of the Trip 1 and Trip 2 sectio...

Page 7: ...engine problems Engine Diagnostic Section The top section of the screen shows any diagnostic messages received since the VMS was turned on The scan code is displayed along with a plain language interpre tation of the code The VMS does not have to be on this screen to receive and store diagnostic messages You can activate this screen at any time to see all codes that have been generated since the V...

Page 8: ...he service was performed and when the service is due to be performed again Press Clear to indicate that the displayed service group has been performed The display should update to show the current date and odometer reading Press the Knob to manually adjust the date and odometer reading You can use the Knob to adjust the month date year and odometer reading for each item Thus if you fail to press C...

Page 9: ...ill sound at the appropriate time but obviously the VMS must be on at that moment If the VMS is turned off and on again the alarm clock will remember its status and will sound at its appointed time The alarm will sound until any key is pressed on the VMS After sounding the Alarm Set value will return to OFF Daytime Nighttime Palette This allows you to select the Color Scheme for your Daytime and N...

Page 10: ...uired for the Maintenance Tracking screens If your chassis is not in the list select OTHER to get a fairly repre sentative set of maintenance intervals Trip Units This determines whether trip information is displayed in Metric or Standard units Gauge 1 2 3 4 These determine the gauges shown on the Scan Screen with the Scan Gauge Default Layout This setting allows you to select which screen will be...

Page 11: ...me Press the Knob to change the values Automatic Sensor Detection No engine supports all the gauge functions the VMS is capable of displaying The VMS is capable of querying the engine to determine its capabilities and it can automatically set the unsupported gauges to Hide To activate the sensor detector let the VMS run for at least ten seconds while this screen is activated and press Clear All fe...

Page 12: ...ded The maximum capacity is 4096 Clear Engine Diagnostic History Highlight this and press the Knob to clear all the diagnostic codes in the Engine History The current number of events in the history is pro vided The maximum capacity is 4096 Clear Current Trips Highlight this and press the Knob to reset the trip information in the Main Trip and Alternate Trip Screens Those screens will show the cur...

Page 13: ...n 12 5 VDC Video Configuration screen By pressing the BRIGHT and CLEAR simultaneously and holding them for three seconds The Video Configuration screen will appear There are several items on this screen which you can scroll through using the Knob Enabled This selection determines if the VMS will display the Video signal Orientation This selection determines if the display is Normal or Rear This pr...

Page 14: ...ctions for the onboard House systems This screen displays Tank Levels allows control of the Generator Invert er Autofill Water pump and Automatic Generator Start parameters As you turn the knob you will see the highlighter move down the list of features Just press the knob to select device you want to control and a Fly Out menu will appear to the side and you can rotate and press the knob to contr...

Page 15: ...dividual Device Control Screens Pressing HOME repeatedly will bring up various control screens for de vices on the network Tanks Display Inverter Control Display House Systems Display Auto Genstart Settings ...

Page 16: ...rty other than SilverLeaf Electronics Inc or an authorized service facility or any use violative of instructions furnished by us This one year warranty is in lieu of all other expressed warranties obligations or liabilities Any implied warranties obligations or liabilities including but not limited to the implied warranties of merchantability and fitness for a particular purpose shall be limited i...

Reviews: