


Fox-in-a-Box® Thermal Printer Installation Guide
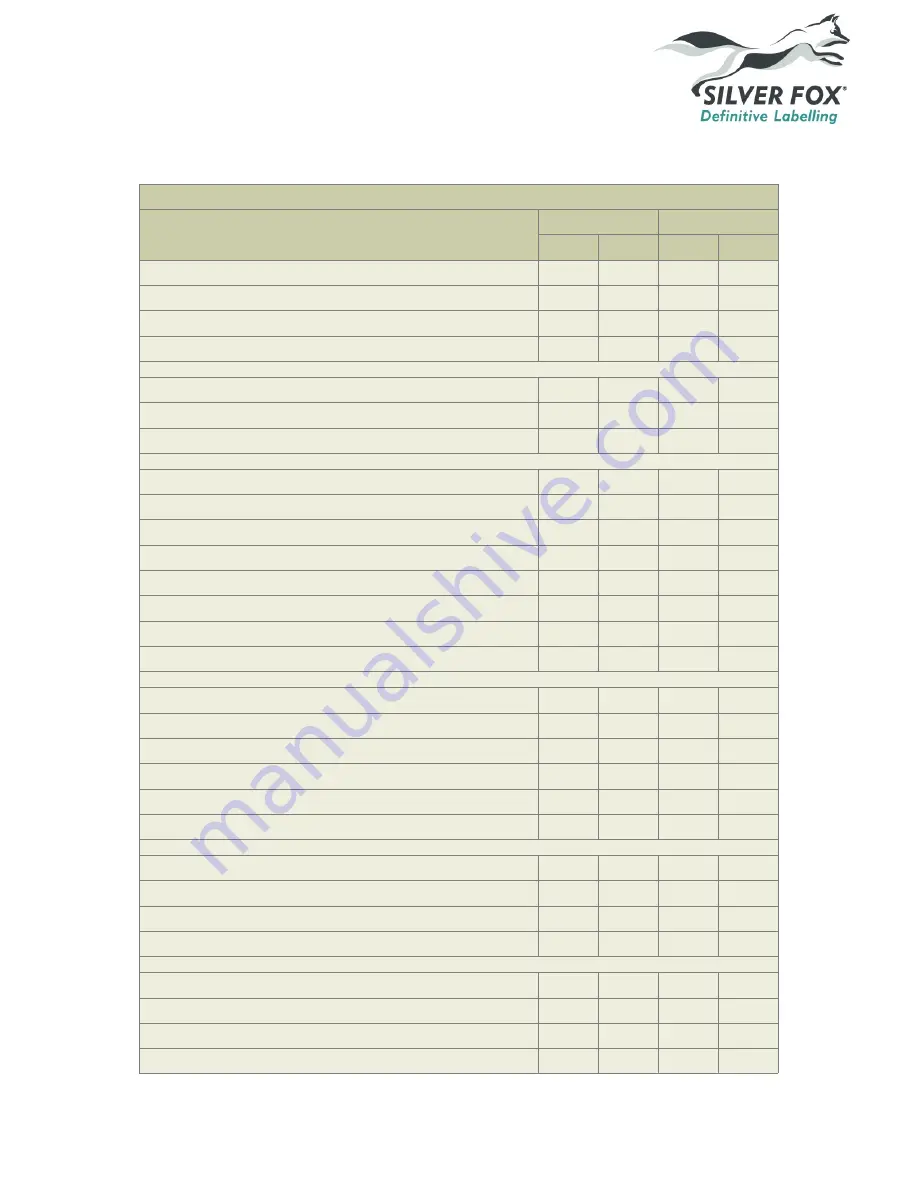
Thermal Ribbon Usage Guide
Thermal Ribbon Usage Guide
Product Type
TSR3/300/60
TSR3/300/110
1 Roll 2 Rolls 1 Roll 2 Rolls
Legend™ LM9013T
N/A
N/A
23,000
N/A
Legend™ L6/20T
N/A
N/A
100,000
N/A
Legend™ L6/30T
N/A
N/A
50,000
N/A
Legend™ L6/50T
N/A
N/A
50,000
N/A
Prolab® Wrap-around Labels PSA1/07/2512T
N/A
N/A
30,000
N/A
Prolab® Wrap-around Labels PSA1/08/2519T
N/A
N/A
27,200
N/A
Prolab® Wrap-around Labels PSA1/08/2524T
N/A
N/A
25,000
N/A
Fox-Flo® Tie-on Labels LCLZ1-7015T
4,285
N/A
4,285
N/A
Fox-Flo® Tie-on Labels LCLZ1-7025T
4,285
N/A
4,285
N/A
Fox-Flo® Tie-on Labels LCLZ1-9015T
3,330
N/A
3,330
N/A
Fox-Flo® Tie-on Labels LCLZ1-9025T
3,300
N/A
3,300
N/A
Fox-Flo® Tie-on Labels LCLZ1-11015T
2,725
N/A
2,725
N/A
Fox-Flo® Tie-on Labels LCLZ1-11025T
2,725
N/A
2,725
N/A
Fox-Flo® Tie-on Labels LCLZ2-5010T
6,000
N/A
6,000
N/A
Fox-Flo® Tie-on Labels LCLZ2-7010T
4,285
N/A
4,285
N/A
Fox Tie-on Labels LFCL1-6015T
5,000
N/A
5,000
N/A
Fox Tie-on Labels LFCL1-6025T
5,000
N/A
5,000
N/A
Fox Tie-on Labels LFCL1-8015T
3,750
N/A
3,750
N/A
Fox Tie-on Labels LFCL1-8025T
3,750
N/A
3,750
N/A
Fox Tie-on Labels LFCL1-10015T
3,000
N/A
3,000
N/A
Fox Tie-on Labels LFCL1-10025T
3,000
N/A
3,000
N/A
Legend™ Heatshrink 25mm Lengths
12,000 24,000 12,000 24,000
Legend™ Heatshrink 50mm Lengths
6,000
12,000
6,000
12,000
Legend™ Heatshrink 75mm Lengths
4,000
8,000
4,000
8,000
Legend™ Heatshrink 100mm Lengths
3,000
6,000
3,000
6,000
Legend™ Non-shrink 25mm Lengths
12,000 24,000 12,000 24,000
Legend™ Non-shrink 50mm Lengths
6,000
12,000
6,000
12,000
Legend™ Non-shrink 75mm Lengths
4,000
8,000
4,000
8,000
Legend™ Non-shrink 100mm Lengths
3,000
6,000
3,000
6,000
www.silverfox.co.uk
R4.0
Page 26 of 35
Copyright © 2015 Silver Fox Limited


