background image

37

iPod  OPERATION

Accessing  iPod  Mode


1.To  switch  to  iPod  mode,  press  the  SRC  button  on  the  front  panel  or  the  (SRC)  button  on  the 


remote  control  repeatedly  until  iPod  appears  at  the  top  left  corner  of  the  screen.


2.  Select  the  Main  menu,  then  touch  the  iPod  icon  to  select  iPod  as  your  source.

iPod  Instructions


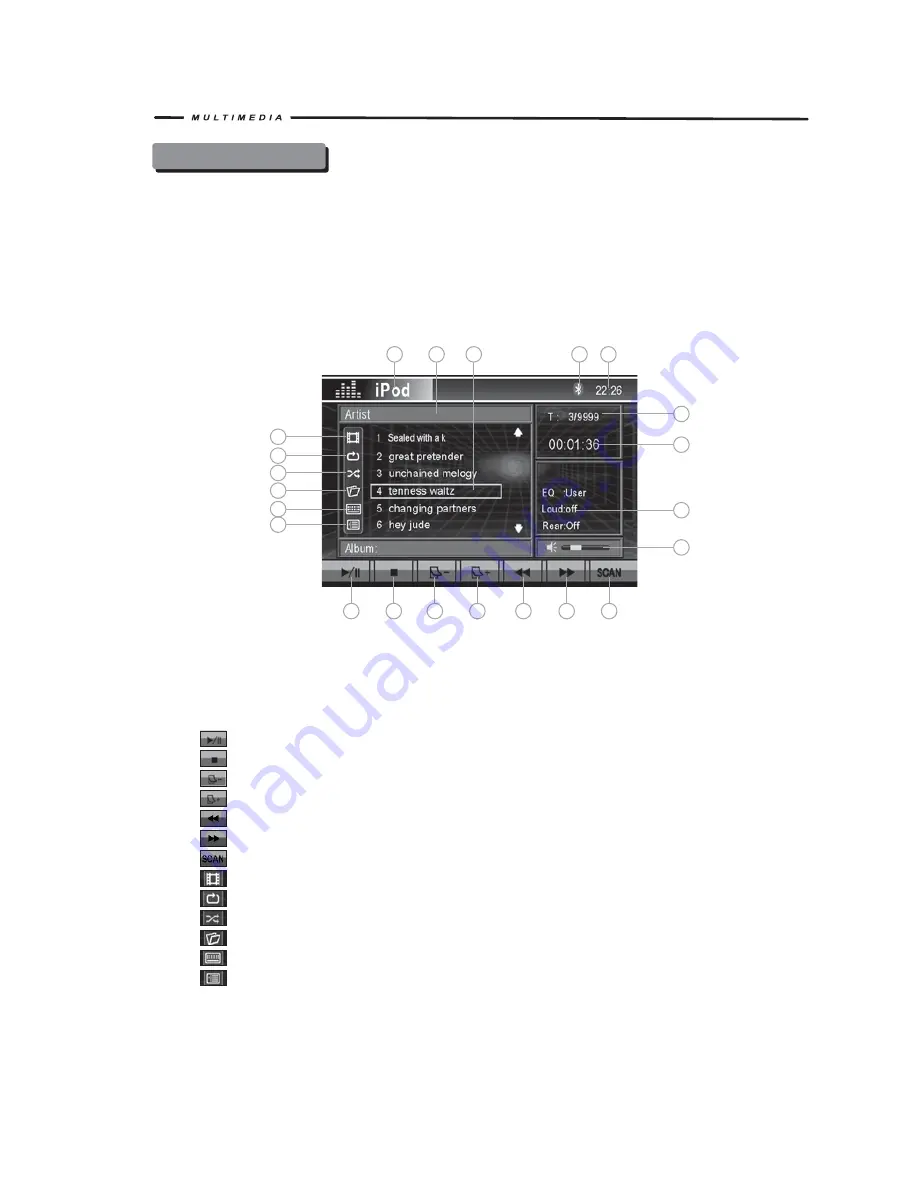
The  touch  keys  on  the  screen  for  iPod  playback  are  described  below.

1

2

6

7

15

3

4

5

20

19

21

13

14

22

12

8

9

10

11

16

17
18

1.Current  source  indicator,  touch  this  area  to  access  MAIN  menu.
2.Artist  name 
3.Track  title  /  root  directory  list
4.Bluetooth  indicator
5.Current  time
6. 


:  Touch  to  play/pause  disc  playback

7. 


:  Touch  to  stop  disc  playback

8. 


:  Touch  to  turn  to  the  previous  page

9. 


:  Touch  to  turn  to  the  next  page

10. 


:  Touch  to  fast  backward  current  track

11. 


:  Touch  to  fast  forward  current  track

12. 


:  Touch  to  activate/deactivate  Scan  Mode

13. 


:  Touch  to  wait  for  iPod  video/photo

14. 


:  Touch  to  activate/deactivate  Repeat  Single  Mode

15. 


:  Touch  to  activate/deactivate  Random  Mode

16. 


:  Touch  to  access  root  directory  list

17. 


:  Touch  to  display  a  numeric  keypad  on  the  screen  to  access  a  track  directly.

18. 


:  Touch  to  display  track  list

19.Current  track  and  total  number  of  tracks  on  disk
20.Elapsed  playing  time
21.Playback  information
22.Volume  indicator

Summary of Contents for TCR-07

Page 1: ...f NER1S MANUAL TeR O f NER1S MANUAL TeR O ...

Page 2: ...e Key Areas Of Touch Screen Remote Control Front Zone Remote Control Rear Zone Remote Control TFT Monitor Operation Disc Insertion Ejection Rear Camera Mode Image Settings Parking Brake Inhibit Operating Instructions Power On Off Playing Source Selection Volume Adjustment Audio Control Menu Six Channel Audio Control Rear Zone System Reset Mute Standby System Setup Menu MAIN Menu Screen Setting Gen...

Page 3: ...gle DVD Only Zooming Multi Language Discs DVD Only Playback Information General Disc Information DVD Setup Menu Accessing the DVD Setup Screen LANGUAGE Menu AUDIO Menu VIDEO Menu SPEAKER Menu SURROUND Menu RATING Parental Lock Menu CD MP3 WMA JPEG Operation CD Player User Interface MP3 WMA Discs JPEG Discs iPod Operation Accessing iPod Mode iPod Instructions Playback of Video on iPod Sat Radio Ope...

Page 4: ...a Call Navigation Operation Accessing Navigation Navigation Operation Listening to an Audio While Using Navigation Troubleshooting Specifications Enclosed Accessories list NOTE 1 certain description in the book may differ from the actual unit 2 Some pictures or icons in the book may differ from actual display 3 Specifications subject to change without notice 41 41 41 41 41 42 42 43 43 43 43 44 45 ...

Page 5: ...es We suggest using these tools and supplies to install the unit Torx type flat head and Philips screwdrivers Wire cutters and strippers Tools to remove existing radio screwdriver socket wrench set or other tools Electrical tape Crimping tool Multimeter Crimp connections 18 gauge wire for power connections 16 18 gauge speaker wire Heatshrink tubing Soldering iron and solder WARNINGS 1 Only connect...

Page 6: ...r swivel the monitor manually Disconnecting the Battery To prevent a short circuit turn off the ignition and remove the negative battery cable prior to starting the installation NOTE If the unit is to be installed in a car equipped with an on board drive or navigation computer do not disconnect the battery cable If the cable is disconnected the computer memory may be lost Under these conditions us...

Page 7: ... 4 FM AM Press to switch between FM1 FM2 FM3 AM 5 SRC Press to select a source Press and hold to toggle rear zone mode On 0ff 6 RESET 7 REMOTE CONTROL SIGNAL RECEIVER 8 DISC INDICATOR LIGHT It is white when there is no disc in the unit It is red when there is disc in the unit 9 EJECT 10 Bluetooth microphone 11 SMART DIAL Press the Smart Dial mode access system set up Rotate clockwise anticlockwise...

Page 8: ...d different mode displays different menu F On DVD VCD mode display the GOTO search menu on the screen directly The Key Areas of Touch Screen The touch key areas are outlined below for DVD VCD playback mode and so forth 4 14 NEXT 15 INFO PIC Press to display playing information on the screen Press and hold to access the picture settings ...

Page 9: ... power on off Eject Disc Toggle on off audio output Select playing mode Directly access certain chapter track preset station in current band Increase the volume Decrease the volume Display playing information Position search function on VCD DVD mode Enter the audio settings Exit the current menu Enter the main menu of system Adjust the parameter of TFT settings Set start point A and end point B to...

Page 10: ...able radio station by decreasing tuning frequency on tuner mode Fast reverse the disc content Fast forward the disc content Change the audio language for disc playback Zooming in out on an image Play in different angle for a scene scene if it is applicable Change to iPod audio mode from iPod video mode while in iPod mode Language selection for subtitle Change to iPod video mode from iPod audio mod...

Page 11: ...uency on tuner mode Next Select the next chapter track for playback Search an available radio station by increasing tuning frequency on tuner mode Fast Reverse Fast Forward Fast reverse the disc content Fast forward the disc content Repeat Repeat playback for current chapter Audio Change the audio language for disc playback SUB Title Language selection for subtitle Angle Play in different angle fo...

Page 12: ...HT To access SHARPNESS COLOR CONTRAST BRIGHTNESS and TINT you must be in CVBS Mode Parameter Adjustment Procedure 1 Enter Picture Quality Setting mode Press the PIC button on the remote or press and hold the PIC button on the unit 2 Select Item to Set Press the buttons on the remote or press the SMART DIAL buttons on the front panel to select an item 3 Set Parameters Press the buttons on the remot...

Page 13: ...g brake is applied 2 Parking brake function is overridden when the video source is set to CAMERA 3 When the parking brake inhibit is active the front monitor displays a caution message with a blue background preventing the driver from watching video while driving to reduce the risk of a traffic accident Rear video screens are not affected Please see INSTALLATION SECTION for installation ...

Page 14: ...cted an iPod to the unit the iPod source will not be available Volume Adjustment To increase or decrease the volume level turn the POWER VOL on the front panel or press the VOL VOL buttons on the remote control The volume ranges from 0 to 40 Audio Control Menu The Audio Control feature allows you to easily adjust your audio system to meet the acoustical characteristics of your vehicle which vary d...

Page 15: ... the front panel to exit the audio control menu or touch the return arrow on the top right of the display Press the ESC or SEL button on the remote control to exit the audio control menu Six Channel Audio Control Master Volume Front Left Channel Volume Front Right Channel Volume Rear Left Channel Volume Rear Right Channel Volume Center Channel Volume Subwoofer Volume Item 00 to 40 10 to 10 10 to 1...

Page 16: ...lowing cases occur Automatic audio output mutes when a telephone call is received by the car phone or when verbal navigation is performed When the MUTE wire is connected to a cell phone that will output a mute signal to the MUTE Wire Manual Press the MUTE button on the front panel or the MUTE button on the remote to mute the volume from the unit NOTE Press the MUTE button again to restore the volu...

Page 17: ...7 Touch to turn to the previous menu 8 Bluetooth indicator 9 Touch to access Tuner mode 10 Touch to access SAT Radio mode 11 Touch to access AUX IN mode 12 Touch to access iPod mode 13 Touch to access Navigation mode 14 Touch to access Camera mode 15 Touch to access DVD mode 16 Touch to access Bluetooth mode 17 Touch to access the Standby mode Note Remote Smart dial touch screen operations and but...

Page 18: ...to select a feature to be adjusted Adjusting a Feature General setup Menu Accessing the General Setup Menu Select the TOOLS button on the bottom of the touch screen to access the General setup Screen Setting Accessing the Screen Setup Menu Press the MENU on the front panel or press the MENU button on the remote control to access MAIN menu Select the button on the right bottom of the screen to acce...

Page 19: ...T DIAL button The new value setup is complete Adjusting the Clock 1 Access the Clock setting under the General Setup menu 2 Press the direction button on the remote to move the cursor to the Hour or Min position and press the OK button you also can touch the Hour or Min position directly 3 The numeric keypad will pop up 4 Press the numeric button on the remote control or touch the numeric keypad o...

Page 20: ...stment Accessing the ASP Configuration Menu Press the MENU on the front panel or press the MENU button on the remote control to access MAIN menu Select the SPEAKER TOOLS button on the bottom of the screen to access the ASP setup A menu appears with the option for the first item and then you can touch the button to the option on the next page press the button to return 16 ...

Page 21: ...econd row with the selected option 2 Select a new value by pressing the direction button 3 Confirm your selection by pressing OK button on the remote control or pressing the SMART DIAL on the front panel The new setup is complete Return to normal playback The system will automatically return the previous playback mode that it was in before accessing the setup menu 20 seconds after the last operati...

Page 22: ...ain 07 07 07 07 07 07 07 07 07 07 07 07 07 07 FM AM Gain DVD Gain Bluetooth Gain SAT Gain iPod Gain NAVI Gain AUX IN Gain Sub Phase 0 180 Subwoofer output IN phase Subwoofer output OUT OF phase When the Bass Center Frequency is selected adjusting the Bass Q Factor alters the sharpness of the Bass output NOTE Depending on your installation reversing the subwoofer phase may increase bass output 1 0 ...

Page 23: ... You can also use the button on the front panel or on the front remote control The AM FM tuner iPod SAT Radio graphics will change to a blue screen background when the DVD player is used for the rear zone When the multi zone feature is turned off the front display graphics will return to normal Remote Smart dial touch screen operations and buttons on front panel are all useable to control the fron...

Page 24: ...Local Signal Broadcasting Indicator Touch to active Local DX function 12 Current time Indicator 13 Bluetooth Indicator 14 Touch to change among the following bands FM 1 FM 2 FM 3 and AM 15 Touch to automatically scan and store stations in current radio band You also can press the AS PS button on the front panel 16 Touch to seek down 17 Touch to seek up 18 Touch to tune down once a step 19 Touch to...

Page 25: ...frequency one step at a time Press the button on the remote control or touch the button to decrease the tuning frequency one step at a time Using Preset Stations 12 numbered preset buttons store and recall stations for each band Front 6 stored stations P1 P6 for the current band appear on the screen touch the channel directly for use You can touch the arrow buttons on the screen to see the other 6...

Page 26: ...ations 3 Press any button to stop scanning and listen to the selected station Local Radio Stations Seeking LOC When the Local function is on only radio stations with a strong signal are tuned When the Local function is active LOC appears on the screen and an indicator is illuminated To activate the Local function in AM FM tuner mode touch the button on the screen Touch the again to Activate the DX...

Page 27: ...ust be authorized see RATING Parental Lock Menu You cannot insert a disc if there is already a disc in the unit or if the power is off NOTE CD R RW DVD R RW DVD R RWs will not play unless the recording session is closed Ejecting a Disc Press the button on the unit to eject the disc The unit automatically reverts to Tuner mode at the same time Reset the Loading Mechanism If the disc loads abnormall...

Page 28: ...peat Off NOTE For VCD play the repeat function is not available if PBC is on PBC Play back Control VCD Only For VCD with play back functionality play back control PBC provides additional controls for VCD playback Press the ROOT button on the remote control to toggle the PBC function On Off Once PBC is on playback starts from track one of the play list NOTE When PBC is activated fast forward slow p...

Page 29: ... from 2X to 4X 8X and 20X Press the button on the remote control or touch the of area E on the screen to fast reverse Keep pressing or touching and releasing the button to increase the rate from 2X to 4X 8X and 20X Selecting 2 Channel and 6 Channel Audio Playback 2 Channel Audio Down Mix Support for CD and DVD Linear pulse code modulation LPCM and pulse code modulation PCM support is available for...

Page 30: ...oose Time or Title Chapter search For VCD mode press the button to choose between Track Search Disc Search and Exit 3 Touch the area on the screen to display a numeric keypad on the touch screen 4 Enter a time Track number into the field using the numeric keypad on the remote control or on the screen 5 Press the OK button on the remote control or on the touch screen to go to the specified Location...

Page 31: ...n touch the button NOTE During VCD playback press the AUDIO button on the remote control to choose between Left Channel Right Channel and Stereo Changing Subtitle Language If you are watching a disc recorded in multiple languages with subtitles press the SUBT button on the remote control to choose the language in which you would like the subtitles to appear You also can touch area E and then touch...

Page 32: ...on The following information is displayed at the top of the screen during VCD playback 1 Indicates Current playing source 2 Indicates the forth of 16 tracks on the DVD is currently playing 3 Indicates the playback time of the current title 4 Indicates EQ Setting 5 Indicates the Loud Setting 6 Indicates the current system time 7 Indicates the current playback source of the rear zone General Disc In...

Page 33: ...29 ...

Page 34: ...d If you want To restore the factory default settings please use the Load Factory in the RATING Menu See RATING Menu Selecting a Feature for Adjustment Once inside a menu press the on the remote control or touch the item directly to select the feature to be adjusted Adjusting a Feature 1 Enter the option field for the feature you want to adjust by pressing the OK button on the remote or by pressin...

Page 35: ...12ms 9ms 6ms 3ms 0ms Off On Stop output of pink noise Left channel pink noise Right channel pink noise Employ the Dynamic Range Control for better playback for low volumes Adjust the time difference between the center and front speakers to create a time delay between 1 and 5 milliseconds producing a more accurate audio effect Adjust the time difference between the rear and front speakers to create...

Page 36: ...ar speakers do not have good bass output Use when rear speakers are not present Use when subwoofer is present Use when subwoofer is not present Use when center speaker has good bass output Use when center speaker does not have good bass output Use when center speaker is not present Speaker Selection Selecting LARGE for the multi channel speaker option will give a full range output Selecting SMALL ...

Page 37: ...r the current password Once the correct password is entered you can access the Password field and enter a new one NOTE Record the password and keep it in a safe place for future reference The rating for each disc is marked on the disc disc packing or documentation If the rating is not available on the disc the parental lock feature is unavailable Some discs restrict only portions of the disc and t...

Page 38: ...tly CD Player User Interface 1 2 6 7 15 3 4 5 17 16 18 13 14 19 12 8 9 10 11 1 Current source indicator touch this area to access MAIN menu 2 Disc title 3 Track title 4 Bluetooth indicator 5 Current time 6 Touch to play pause 7 Touch to stop disc playback 8 Touch to turn to the previous page 9 Touch to turn to the next page 10 Touch to fast backward current track 11 Touch to fast forward current t...

Page 39: ...ed on CDROM CD R CD RW DVD R RW and DVD R RW For CD RW discs please make sure they are formatted using the full method and not the quick method to prevent improper disc operation Use the following settings when compressing audio data for your MP3 disc Transfer Bit Rate 320kbps Sampling Frequency 48kHz When recording MP3 up to the maximum disc capacity disable additional writing For recording on an...

Page 40: ...t track and total number of tracks on disc 17 Elapsed playing time 18 playback information 19 Volume indicator Playing MP3 WMA Files After inserting a MP3 WMA disc files will play in the sequence of the directories folders In playing back you can press the numeric button on the remote control or touch the a track directly to play Change Directory Folder Touch the or on the screen to navigate throu...

Page 41: ...tle root directory list 4 Bluetooth indicator 5 Current time 6 Touch to play pause disc playback 7 Touch to stop disc playback 8 Touch to turn to the previous page 9 Touch to turn to the next page 10 Touch to fast backward current track 11 Touch to fast forward current track 12 Touch to activate deactivate Scan Mode 13 Touch to wait for iPod video photo 14 Touch to activate deactivate Repeat Singl...

Page 42: ...lect a song to listen to Playback of Video on iPod For playback of video on iPod press the button to enter the touch screen will display the following If there are videos on iPod and you select them on iPod they will start to play otherwise there will be nothing on the display However you can return to listen to your music by pressing the button again NOTE All video control functions are done on t...

Page 43: ...tooth indicator 5 Current time indicator 6 Current Band and channel number indicator 7 Current channel name indicator 8 Current channel category indicator 9 Playback information 10 The volume indicator 11 Touch to change among the following bands SAT SAT 1 SAT 2 and SAT 3 12 Touch to open the category folder list 13 Touch to scan the previous available channel of all categories 14 Touch to scan th...

Page 44: ...t a channel 2 Touch and hold an on screen preset channel for three seconds The storing process is complete Recalling a Channel 12 numbered preset channels store and recall channels for each band Front 6 stored channels 1 6 for the current band appear on the screen touch the channel directly or use the numeric buttons on the remote control You can touch the arrow buttons on the screen to select oth...

Page 45: ... is Off the indicator is grey When the Bluetooth function is On and no phone is connected to the unit the indicator will blink If a phone has been connected to the unit the indicator is on solid Accessing Bluetooth Mode Access the MAIN menu first and then touch the button on the screen to access Bluetooth mode Touch the button at the top of the touch screen to access Bluetooth mode directly Blueto...

Page 46: ...d by touching or on the screen to navigate through the Phone Book entries Then touch the number to initiate the phone call NOTE Not all Bluetooth enabled phones support this feature Bluetooth setup Select the button to access the Bluetooth setup LANGUAGE Menu Features Pairing Auto Answer Yes Off On Press the Yes button to start to wait for pairing with one phone Answer an incoming call manually Th...

Page 47: ... complete the pairing When asked enter this password in the phone you are pairing with this unit Auto Connect If the unit has been set to auto connect it will attempt to connect to the last used phone first If Auto Connect is not activated the unit will return to the previous operating mode When the phone connects to the unit successfully all of the cell phone s Bluetooth enabled options will be a...

Page 48: ...compatible with the Bluetooth hands free system Please check the Compatibility list if you are experiencing connectivity problems If you are experiencing Operation problems please contact your installation center for assistance You may have an Incompatible handset and your unit is functioning normally 44 ...

Page 49: ...urce The source can be the Tuner Satellite Radio iPod or the audio from the AUX input 2 Touch the NAVI button on the front panel to select Navigation The map will be shown on the TFT display and audio will continue to play while you are in the Navigation mode 3 Navigation voice prompts will mute the audio source give the instruction and then return to the audio source 4 To adjust a parameter of th...

Page 50: ...positive battery wire TFT Auto Open is turned off Incorrect connection to parking brake wire PRK SW is activated and parking brake is not engaged Install new fuse with correct rating Install new fuse with correct rating Press the RESET button located in the bottom right corner of the front panel Replace battery with new one Remove battery and install correctly Check wiring and correct Increase vol...

Page 51: ...isc is used Disc rating exceeds Parental Lock rating limit Disc region code is not compatible with unit Disc is inserted upside down Disc is illegally copied PCB is not available on the disc PCB is on Disc is dirty or scratched File is damaged bad recording Message is longer than LCD can display Check wiring and correct Use correct aspect ratio setting Press OPEN key to restart monitor movement Co...

Page 52: ...D is not compatible with region code of unit illegal mechanism operation Clean disc with soft cloth Insert disc with label side up Insert disc Clean disc with soft cloth Insert disc with label side up Press EJECT key for 5 seconds to reset loading mechanism Remote control Remote control does not function Battery is covered with insulation tape Battery depleted Battery installed incorrectly Pull ou...

Page 53: ...ve the battery if the remote control is not used for a month or longer Remove and dispose of the old battery immediately Do not store the battery with metallic materials 3 Inserting Replacing the Battery Remove the battery holder Remove the battery from the battery holder Install the battery ...

Page 54: ...cuit automatically stops playing the disc And then please wait for the unit to cool down before operating the player again 4 Never insert anything other than a 5 12 cm compact disc into the player as the mechanism can be damaged by foreign objects 5 Do not attempt to use a 3 8 cm CD Single disc in this unit either with or without an adaptor as it will damage the player and disc Such damages are no...

Page 55: ...nnel Separation 60dB 1kHz D A Converter s 6 channel high performance 24 bit 192kHz multi bit Sigma Delta modulation DAC supports sample rates from 8 192kHz Electronic Skip Protection ESP DVD 2 3 sec CD DA 10 sec MP3 100 sec WMA 200 sec ESP time is approximate Mechanical anti vibration ability 10 200Hz X Y Z direction 1 0G Video Section Format NTSC PAL auto detection Output 1Vp p 75 ohm buffered In...

Page 56: ...30mSec rise time 50mSec fall time Resolution DVD Composite Video in 336 960 sub pixels 1440 W X 234 H Viewing angle 60 degrees left or right 30degrees up 60 degrees down General Auxiliary Input impedance 10k Power Supply 10 5 to 16V DC negative ground Fuse 10 amp mini ATM type DIN chassis dimensions 7 X 7 X 2 178mm x 178mm x50mm Specifications subject to change without notice 52 ...

Page 57: ... 1 1 1 1 Remote Control Cables and Wires Manuals Others 1 2 3 4 5 6 7 8 9 10 No Item Front Remote Control Rear Remote Control Power Harness SAT Radio Cable iPod Cable Main User Manual Compatible Phones BT list Wiring Diagram Clean Cloth Steering wheel control Description 53 ...

Page 58: ...NOTE 1 This unit is manufactured under license from Dolby Laboratories 2 Dolby and the double D symbol are trademarks of Dolby Laboratories ...

Page 59: ......

Page 60: ...SUP GND ACC ...

Page 61: ...R Sandia 11 1 MULTIMEDIA ...

Page 62: ...u ll learn how to use all the features of your new NAV 2 for maximum enjoyment After you have finished reading the instructions please keep this manual in a safe place for future reference Wiring Diagram 1 Install Instruction 2 Safety Instructions and Installation 3 Enter Navigation 5 Controls on Host 6 Remote Control 8 How to use Navigation 9 Troubleshooting 10 GPS Specification 1 0 ...

Page 63: ...M CONNECTION CABLE TO DISPLAY EQUIPMENT u 0 0 J w J J 0 10 W NAVI c u 0 CARD u Z N C T U GPS ANTENNA 0 NOTE 1 Before using Pis kindly Insert the Navi Card first then power on the Navi unit 2 only remove the Nav i Card After power off the Navi unit 1 ...

Page 64: ...Power on Ignition on the Navi unit 1 Power off Ignition off the Navi unit 2 Remove the SD card Install Instruction Screw for fixing the unit to car Screw for fixing the unit to car I I I I Bracket I I I I Screw for fixing the unit to bracket 2 ...

Page 65: ...should be operated only from the type of power source indicated on the marking label If you are not sure of the type of power supply consult your navigation provider For navigation products intended to operate from battery power or other sources refer to the operating instructions 5 Attachments Do not use attachments unless recommended by the navigation product manufacturer as they may cause hazar...

Page 66: ...er store the VENTILATION unit where it is exposed to direct sunlight or near heating equipment Never stack other electronic equipment on top of the unit Do not use any attachment that is not recommended by ATTACHMENT the manufacturer it may cause a hazard or damage the equipment CONNECTING OR Connect all components before turn on the power Always REMOVING CABLES turn off the unit before you connec...

Page 67: ...the installation manual 2 Start engine or turn ignition switch to ACC 3 Power on the radio navigation system will start automatically 4 Switch to navigation source from the radio 5 After a short startup the screen will display the following picture Press press to accept to enter the main menu of navigation 5 ...

Page 68: ...turn to the main menu of the radio 2 Zoom out Zoom out the map 3 Zoom in Zoom in the map 4 Pos Press to switch to the map window and find the vehicle location on the map 5 PIC Press to select current location 6 VOL Use to adjust the navigation voice guidance volume while the voice is speaking 6 ...

Page 69: ... P F I GJ IJillJ 0 ANGLE PIC OfF t6 00 EJ IIEiJ GrJ lEJ iM 4 0 1 SRC Press to Select Navigation mode 7 ...

Page 70: ...Remote Control SRC aAJ GJGJGJ VOL 0GJ0 VOL GJC JGJ INFO CD 1 CD BAND MENU B TITLE F3 TV RADIO F4 p P ANGLE SUB T F5 F6 8 ...

Page 71: ...Return to main menu 6 F1 Show smaller map area 7 F2 Show larger map area 8 F3 Show Main Menu 9 F4 Change type of map view 10 F5 Press to display location information about the current panned location Select the highlighted entry to select the panned location Press to route from current location to the selected home address if no active route select current location 11 F6 Exit navigation How to use...

Page 72: ... one Remote control does not function Battery installed Remove battery and install incorrectly correctly No lowaudio Adjust the volume using the No low audio output Output navigation box volume knob when the voice prompt is giving guidance If cant not save the problems using the reference or find other new problems Please shut off the machine and ask local office or technology service center of he...

Page 73: ...1rlM DlA ...

Page 74: ...MULTIMEDIA d Ie G 2 Sand a 17 15 r Dvalero C R ...

Page 75: ...ied or duplicated in any form in whole or in part without the prior written permission of Horizon Navigation Inc The NavMate software including its operation and use is covered by one or more of the following patents US Patents No 5 262 775 5 283 575 5 291 412 5 291 413 5 291 414 5 297 028 5 303 159 5 311 434 5 339 246 5 343 400 5 345 382 5 359 529 5 374 933 5 377 113 5 390 123 5 394 333 5 402 120...

Page 76: ... Computer Software Restricted Rights at 48 CFR 52 227 19 as applicable HORIZON NAVIGATION INC 4701 Patrick Henry Dr Suite 1301 Santa Clara CA 95054 USA 4 Indemnity You agree to indemnify defend and hold free and harmless HORIZON NAVIGATION INC including its licensors assignees subsidiaries affiliated companies and the respective officers directors employees shareholders agents authorized dealers o...

Page 77: ...ed restrictions road slope or grade bridge height width weight or other limits road traffic or traffic facilities safety or conditions weather conditions pavement characteristics or conditions special events traffic congestion or travel time 8 Transfer This Agreement including all rights obligations and representations may be transferred to another individual or single entity provided the same tra...

Page 78: ...tersection Point of Interest POI Home Address Office Address Favorites Address Book Trail Book Latitude Longitude Previous Destination By using Map Route Calculation and Guidance Route Calculation Please Proceed Route Guidance True View Intersection Zoom Map Display Current Location Screen ArrivaI Screen Off Route and Route Interruptions Edit Favorites Menu Edit Address Book Edit Home Address Edit...

Page 79: ...ions UIF Settings Day Night Settings Point of Interest Set Distance Units Location Reset System Planned Route Detour Cancel Route Trail Book Add Trail Name Trail Delete Trail Follow Trail 5 11Jt _ 38 38 39 40 40 41 41 42 43 45 45 46 46 47 48 49 50 ...

Page 80: ...they direct you to perform an unsafe or illegal maneuver would place you in an unsafe situation or would route you into an area that you consider unsafe Glance at the screen only when necessary and safe to do so Let the navigation voice guide you If prolonged viewing is necessary pull off the road to a safe location Do not use the Valor NavMate software to locate emergency services such as police ...

Page 81: ...rs vehicle speed and heading changes together with longitude and latitude information to accurately determine vehicle heading and position on a digital map Signals from GPS satellites are used to determine the vehicle location Three good or four best satellites must be received to accurately determine location The GPS reception status is indicated by the GPS symbol on the map Map and Information D...

Page 82: ...se carefully read and follow the instructions provided in the Safety Information and Precautions section of this manual Step 1 Start up Main Menu After the Valor NavMate software starts you will see the reminder warning to use your Valor NavMate software safely and lawfully Ilwarning Screenll IIMain Map Screenlj 8 ...

Page 83: ...ovince NOTE The software remembers the last State Province so this step is not necessary every time By Category Airport Sort by Distance Select one of these and the system will calculate a route to that destination using the criteria set in the Setup menu Step 3 Map Guide along Route Proceed to the highlighted route and drive while the Valor NavMate software provides audible and visual guidance to...

Page 84: ...tep 4 Arrive at Destination That s it You ve arrived at the selected destination Refer to the rest of this manual to become more familiar with the many options available on your Valor NavMate software 10 ...

Page 85: ...w provides a brief description of the function buttons IIFunction Buttonsll Exit from Navigation Zoom in the map to show a smaller area Zoom out the map to show a larger area Center map on current vehicle location Display menu jump to main menu Display map in 3D view Display map in 20 view After panning map select current panned position Select currently highlighted item Display spell mode Page up...

Page 86: ...e to home address Office Address Route to office address List Mode Spell Mode and Most Recently Used There are five ways to select a destination Several of the methods allow you to move through a list by scrolling using the arrow keys List Mode or by searching using an on screen keyboard Spell Mode Many of the lists keep track of the last five most recently used MRU selections These are placed at ...

Page 87: ...ll MOdell Airport Blvd San Jose ca _ _ __ _ ill l I M AJ iMI M IIt5 F I i 4i 4 e flii4 i i P i j1C i f rl il t ina IS 2 J 4 5 6 8 9 0 _ _ _ _ _ Q W R T Y U 0 P fl S D r G H J K L IIMost Recently Used Portion of Listll 13 ...

Page 88: ...character layout i Spell Switch keyboard from special character layout to QWERTY layout j 0 Spell Quit Spell Mode and return to List Mode I Map Screen The table below explains the button functions available on the Map Screen 1Lt Buttonsll B U tt O p_r e _s s_ _T h i_s _B_u_t_t_O_ _to_ l Show smaller map area Show larger map area Show Main Menu Change type of map view If no active route select curr...

Page 89: ...m the Main Menu 1 111 lenu The table below explains the button functions available on the Destination Selection Menu Ioestination Selection ButtonSlI Button Press This Button to Go back one step Return to map mode Return to main menu Fl F3 L F 6 l 15 ...

Page 90: ...d the city Note The postcode search is limited to the currently selected State Province Postcode searching may not be available in all areas City Name If you know the city and street select this option You could use the Street Name option instead but it is quicker and easier to use the City Name option when you know both parts of the address Street Name If you know the street name but you are not ...

Page 91: ...ect a city first then street then address number or intersection If you selected the Street Name option follow the prompts to select a street name then a city then a street address or intersection II Select State or Province City Street List Mode B Button Press This Button to Return to map mode Page up in displayed list Return to main menu Page down in displayed list Switch to Spell Mode Go back o...

Page 92: ...s the last State Province selected so this step is not necessary every time Points of Interest may be searched by Category Postcode Phone Number or Name II POI Search Met tiQiW t W MWb l i Q _ l l __ xv ts c s L a By Category If you are interested in the closest POI of a certain type for example nearest gas station select this option By Name If you know the name of the Point of Interest for exampl...

Page 93: ...de searching may not be available in all areas By City You can select the city also By Phone Number If you know the phone number of the desired POI select this option to quickly find the POI Note The phone number search is limited to the currently selected country Phone number searching may not be available for all POls IlpOI Category II II POI Name SpeTIef 19 ...

Page 94: ...veral categories restrict the search radius as well to minimize the search time Since businesses change over time so will the accuracy of the points of interest in your navigation map To have the most accurate map database annual map database updating is recommended After selecting POI search criteria you may select to list the results sorted by distance or by name PUln of nterp t IJj LO l IlpOI S...

Page 95: ...e Address The Home Address is a convenient way to route to your saved home address directly 0 To Office Address The office Address is a convenient way to route to your saved office address directly 0 To 21 ...

Page 96: ...Favorites There are three additional ways to set your destination under Favorites uO 10 Addres Previous Point or Interse Destination or Interest Fnvorite Address LatitUde Book Trail Book longitude 22 ...

Page 97: ...ok Editing section of this manual IIAddress Book Entries II ddn Roo 10th St ludington Ml N j 1 H c f fIst Ave Port Jefferson NY n ff r 1t m m Ifil lIst St Q eenport NY I ci IIAddress Book Selection Buttonsll Button Press This Button to Return to map mode Page up in displayed list Return to main menu Page down in displayed list Display spell mode Go back one step 23 ...

Page 98: ...evious destinations entered into your Valor NavMate software are automatically saved into the memory of the Valor NavMate software This is helpful when you want to return to a recent destination such as a hotel where you may be staying The Previous Origin of the last calculated route is also stored for easy return to your start point IIPrevious Destination Selectionll Prpvio 1 De ill It iOIl 24 ...

Page 99: ...age up in displayed list Return to main menu Page down in displayed list Go back one step By using Map You may select the destination by touching the screen The system will display the cross hairs according to the location you touch IISelect Destination from Mapll r Panning crosshairs I L I 25 ...

Page 100: ... highlighted entry to select the panned location for the following options Adme Wells MhP ale CA Y tf iji iiiil i i leI POI s r l ci 1f i j 1 Use as atlon IISelect Destination from Map Buttonsll Button Press This Button to Return to map mode Return to main menu Go back one step F6 26 ...

Page 101: ... you to Please proceed to the highlighted route unless you are already on the route The highlighted route is indicated in magenta Route Guidance Once on the highlighted route gUidance information is provided on the screen Glance at the screen only when necessary and safe to do so As you continue on the route the gUidance information is continually updated to correspond with your progress to the de...

Page 102: ...True View Intersection Zoom Just before a turn point the guidance display will show a close up or true view of the roads around the turn point II True View Intersection Zoom II 28 ...

Page 103: ...may change colors indicating the strength of the signal The GPS symbol colors mean Green GPS signal is free from obstruction and is being received regularly At least four satellites are being received Yellow GPS signal is partially obstructed Three satellites are being received Red GPS signal is unavailable Two or fewer satellites are being received Click to display Function buttons Current Locati...

Page 104: ... 1 f iJt m 1IU 1 1 II Current Location Screenll Alderwood Ave Sunnyvale CA _ _ Add to Address Book r j ri i i iii i LT Jij lji r Set vehiij Iti W oj 30 ...

Page 105: ...Arrival Screen The destination is shown on the Map Display screen with a circle A voice message announces that you are approaching your destination IIArrival Screenll 31 ...

Page 106: ...ulate the route This feature may be disabled if you prefer by turning Auto Recalc Off in the Setup menu If you leave the route to make a stop the Valor NavMate software remembers your destination After you re start the navigation software will ask if you want to continue your route 32 ...

Page 107: ... lrk _ Add or modify destinations in Address Book Hom e Address Office Address and Tail Book 33 ...

Page 108: ...The Address Book option allows adding and editing address book entries Select Edit Favorites from the Main Menu then select Address Book Use Edit function to rename address book entry 34 ...

Page 109: ...Ed t Home Address The Home Address option allows adding or replacing home address Select home address from the following places 35 ...

Page 110: ...The Office Address option allows adding or replacing office address book Select office address from the following places re Destination t of Interest 36 ...

Page 111: ...The Trail Book option allows adding deleting an editing trail book entries Please see Trail Book section for detailed descriptions 37 ...

Page 112: ...y options and units km or mi settings You may also reset the vehicle position and do some basic system diagnostics through the Setup Menu Navigation Preferences fO 6p J C f i I User ll 1JUt Settings Navigation Preferences Navigation Preferences allows you to set the simulation mode on and set the route calculation and guidance options 38 ...

Page 113: ...ion software avoids or uses freeways in the route calculation Toll Yes No Determines if the navigation software uses toll roads in the calculated route Auto recalc On Off When On the navigation software will automatically recalculate the route if the current route is left Voice Guidance On Off When On the system will give audible guidance Display Options Display options allow you to set the map or...

Page 114: ...r off GPS Icon Display On Off Turn the display of the GPS reception symbol on or off Scale Icon Display On Off Determines if the map scale symbol is shown Compass Icon Display On Off Turn the Compass symbol on or off Next Maneuver On Off Set the display of the turn symbol Soft Keys Auto hide On Off Turn the function key display on or off Intersection Zoom On Off Turn the true view on or off UIF Se...

Page 115: ...t scales Point of Intpn t rrnt r i i r ii l i p I i w _ i Set Distance Units The units used when displaying and announcing the distance to turns may be set to Miles decimal miles e g zero point three miles Kilometers meters or Miles yards based on personal preference IIDistance Units Selectionll Miles _ 41 ...

Page 116: ...u rH ll IIlJl 6 IILanguage Settingsll 7 8 9 Od You can choose one of the following languages voices I olll jll l j s til 1 ENGLISH USA _ Location Reset You may reset the location ofthe vehicle symbol using the Location Reset option ...

Page 117: ...rent software and map version numbers IISystem Menull t Q _n IiGPS VP Reset _ 1 J T t iIt O i QP i 1f 1 System Information t 5 f1 r r r n j f t W O mt _ The GPS diagnostic displays the number of GPS satellites currently in view and how many are currently being used The GPS satellite time is displayed UTe and so is the latitude and longitude determined from GPS II GPS Diagnostic Test Result II 43 ...

Page 118: ...determined longitude and latitude select GPS VP reset IIGPS VP Resetll SV I PI II The version numbers for the system software and mapping can be found under System Information IISystem Informationll r dl i i L iiJ ii Y i J t Yo e i w 1 System Information _ 44 ...

Page 119: ...p Menu Planned Route To view planned route on a highlighted route click the Yellow Maneuver Icon and the system will display the entire route list r l 11 1111 I Potll Detour I h tl t Ir Ayoid C renl Road 45 ...

Page 120: ...i I W0008000u Q W E Rl f I 1 I 1 S Die 11 J I 1 liJLj l iM_ Mm h Il ffijmi1 i 1l Wj 1 I Cancel Route Select this function to cancel the current route Trail Book Select Add function and choose a name for this trail After confirming the name then start driving During trailblazing you can press Push Pin icon to create waypoint Press Menu icon when you complete the trail 46 ...

Page 121: ...Set up Menu Add Trail 1 11n If nll Address __ _ i Book lome Adckess Address Trdil Book Trail Delete Trail Press Pushpin to add a waypoint 47 ...

Page 122: ...Set u p Menu fM m _ Press Menu icon and select Stop Trail when you complete the trail 1 1111 ll n 1 Name Trail After select the saved trail use the keyboard to rename the trail 48 ...

Page 123: ...Set up Menu Delete Trail Select Delete Trail function then choose the trail name to remove it from the system 1r 111 Book Oelptp Ir 111 Trail_l 49 ...

Page 124: ... same trail you created by selecting Start Route Guidance then select Trail Book and finally select an existing trail i lLlln lenu Go To jo 10 es or Inters Edit Favorites Previous Destination Point of Interest You will see the following screen upon selecting a trail I L1vorile 50 ...

Page 125: ... _ _ You can select to go to any points in this trail as a starting point Upon your selection the system will point you with a red line to that starting location You will follow the red line to the starting point and start your trail blazing by following the dotted line a Wclypoillt I Q 51 ...

Page 126: ...Set up Menu Ji M m i f llllllll lll Press Menu Icon then select Stop Trail to cancel route 1 lain lPllli 52 ...

Page 127: ...UAlOR Mt Jl TIMEDIA 18061 Arenth Avenue Ci y of IndlJJstry CA 91748 888 588 2567 WMIWJ valolimultilil1edia com ...

Page 128: ...ng part Installation guide For Windows98SE 2000 1 Startup your computer 2 Insert the Installation Disk CD into you CD ROM drive 3 Connect card reader to the USB port of your computer 4 Operate relative Windows driver 5 The icon of the reader will show up in My Computer Cautions in use 1 If the system can t find new hardware when you plug card reader into your computer please startup the USB contro...

Page 129: ...hes the function 1 8 Hold the MOO button on the steering whaal and press the SRC button on the remote control The indicator right will frash and then die once the functIon is learned Release the function key on the steering Wh88 and the function key on thQ remote control 5 Repeat the abov S process to learn the op8ratJon Of every key on the steering wheel 6 After programminga press and hold the LE...

Page 130: ... respect to this matter shall be finaI rHE EXTENT OF VALOR MULTIMEDIA S LIABILITY UNDER THIS WARRANTY IS LI MITED TO THE REPAIR OR REPLACEMENT PROVIDED ABOVE AND IN NO EVENT SHALL THE COMPANY S LIABILITY EXCEED THE PURCHASE PRICE PAID BY PURCHASER FOR THE PRODUCT Warranty Validation Card Why did you choose a Valor Multimedia product o Appearance o Value o Features o Brand Name o Other V lLOR MULTI...

Page 131: ...VilLOR MULTIMEDIA Valor Warranty Validation Dept 18061 ArenthAve City ofIndustry CA 91748 Place Postage Here V 1LOR MULTIMEDIA ONE YEAR LIMITED WARRANTY ...

Reviews: