background image

6

7

3


Before initial use

NOTE

Fully charge the ROX GPS 11.0. 

Charge the device using the micro USB cable and the USB port on your PC.  
Alternatively, use the USB charger. The process takes approximately 3 hours.  
To charge the device, plug the USB cable into the micro USB port on the back 
of the ROX GPS 11.0 and the USB port on your PC or the USB charger (not 
included in the delivery).
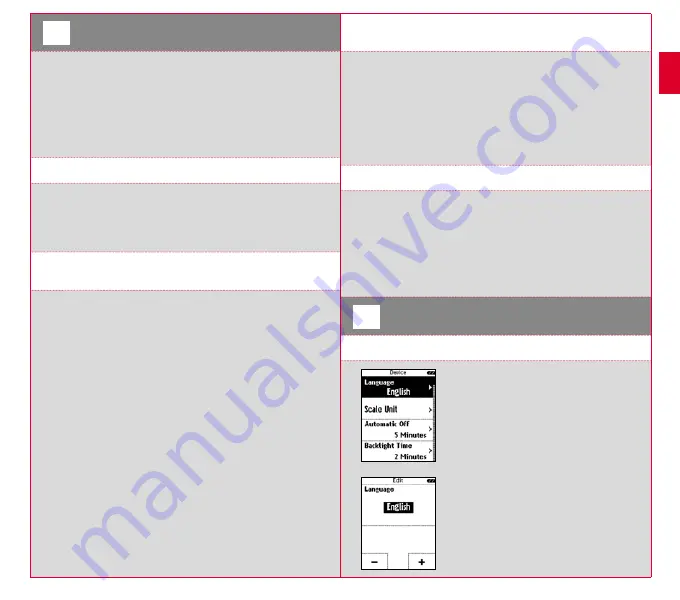
3.1 Initial use

1.  Press and hold the 

START

 button for 5 seconds (right upper button).

2. Press 

START

 to change the language.

3.  Now press the 

PLUS

 or 

MINUS

 buttons to select your desired language  

  and then press the 

START

 button.

4.  Configure the remaining settings using the same principle.

3.2  Pairing the sensors (ANT+)  
 

with the ROX GPS 11.0

To use the sensors (ANT+), these must be paired with the ROX GPS 11.0.

To carry out the pairing, select the menu item 

SETTINGS > CONNECT SENSOR

.

There are several options to pair the sensors:


− With 

SELECT SENSOR

, you can search for a certain type of sensor.


− With 

SEARCH ALL

, you can search for all the sensors in the area.


− Enter the sensor ID, if it is known.

Always make sure before you start the search that only the sensors that are to 
be paired are activated.  
 
Start the search using 

SEARCH ALL or SEARCH SENSOR

 ---> desired sensor 

type. 
 
After a few seconds, the sensor and the associated sensor ID are displayed. 
Select the desired sensor to connect.  
 
The sensors that are paired can be found under 

CONNECTED SENSORS

.

3.3 Synchronisation of the sensors

To synchronise the sensors (ANT+), the ROX GPS 11.0 must be switched on  
and in training mode. 
 
The sensor search takes place automatically. It searches for all previously  
paired sensors. The respective value for the sensor stops flashing as soon as  
the corresponding sensor has been found. 
 
If a sensor is not found, make sure that it is activated.

3.4 Connect to your smartphone

In order to transfer the training data to the SIGMA LINK app, first pair your 
smartphone with the ROX GPS 11.0. To do so, select the following menu item: 
SETTINGS ---> SMARTPHONE CONNECTION ---> CONNECT SMARTPHONE 
 
Follow the instruction of the SIGMA LINK app.

4


Operation / Button functions / 
Menu overview

4.1 Operating concept

A continually visible navigation level makes the 
ROX GPS 11.0 menu navigation far easier for 
the user. The possible functions of the 

STOP


and 

START

 buttons are displayed in this level to: 


− Go to the next level down (

START

),


− Go back to the next level up (

STOP

),


− To scroll within the menu level forward or 

backward or to increase or reduce values 
(

PLUS

 or 

MINUS

)

EN

Summary of Contents for ROX GPS 11.0

Page 1: ...1 TRACK NAVI BAROMETRIC COMPATIBLE COMPATIBLE COMPATIBLE eTap EN ROX GPS 11 0 USER GUIDE MORE INFORMATION WWW SIGMA QR COM...

Page 2: ...ORT Your new ROX GPS 11 0 will be a loyal companion for your bike trips for years to come To familiarise yourself with and learn how to use the many functions of your new bike computer please read the...

Page 3: ...4 5 2 Mounting Only included in the complete set Only included in the complete set Only included in the complete set or max 10 mm 0 4 inch max 10 mm 0 4 inch EN or CLICK...

Page 4: ...paired are activated Start the search using SEARCH ALL or SEARCH SENSOR desired sensor type After a few seconds the sensor and the associated sensor ID are displayed Select the desired sensor to conn...

Page 5: ...reduce a value to be set ONLY IN TRAINING with active workout Press and hold to move to the next phase of your defined workout PLUS button Use this button to change the training views during training...

Page 6: ...PROFILE has been selected it searches for the GPS After a successful search of the GPS the various views can be changed using the PLUS or MINUS button To start the training or the recording the START...

Page 7: ...daily newspaper or at airports 4 GPS calibration If you do not have a reference point or any indication of your current altitude you can determine this by means of GPS The accuracy of the displayed al...

Page 8: ...follow the description in the LINK app 6 Load track This function enables you to select start display and delete finished or stored tracks NOTE The track management can also be performed quickly and...

Page 9: ...pressing the START button the track starts 6 2 2 Start track reverse Use Start track reverse to reverse the direction of the selected track 6 2 3 Show track Select Show track to display the route for...

Page 10: ...you want to perform an interval training you can define the first phase as a warm up phase the second as an interval e g 5 x 1000 m with 1 00 min recovery with the final cool down phase Up to 10 phase...

Page 11: ...he personal bests Use the PLUS and MINUS buttons to select the item Reset personal best and press the START button 10 Settings All important functions can be set either directly on the ROX GPS 11 0 or...

Page 12: ...an set three different home altitudes on the ROX GPS 11 0 Home altitude 1 Home altitude 2 Home altitude 3 Altitude points list The altitude measurement points from the IAC altitude calibration are sto...

Page 13: ...better 10 5 8 Intensity zones HR The ROX GPS 11 0 has four intensity zones which make it easier to monitor your training The values are automatically calculated on the basis of your maximum heart rat...

Page 14: ...speed downhill Average rate of descent Maximum rate of descent Average slope downhill Maximum slope downhill GPS Accuracy Battery capacity in Time to destination Estimated time of arrival Dist to des...

Page 15: ...omatic lap Pedalling time in automatic lap Pedalling index in automatic lap Auto lap list Pedalling time Pedalling index Balance 3 sec Average balance 10 sec Average balance 30 sec Average balance Ave...

Page 16: ...ntracting partners for defects in line with legal provisions The warranty does not extend to batteries In the event of a warranty claim please contact the retailer from whom you purchased your bike co...

Page 17: ...set forth for an uncontrolled environment and are safe for intended operation as described in this manual The further RF exposure reduction can be achieved if the product can be kept as far as possibl...

Page 18: ...e 15 D 67433 Neustadt Weinstra e Tel 49 0 63 21 9120 0 Fax 49 0 63 21 9120 34 E mail info sigmasport com SIGMA SPORT USA North America 1860B Dean St St Charles IL 60174 U S A Tel 1 630 761 1106 Fax 1...

Reviews: