I
GB
70
5 MANUTENZIONE STRAORDINARIA
5.1 OPERAZIONI PRELIMINARI DI SICUREZZA
ATTENZIONE!
Tutte le operazione di manutenzione straordi-
naria o correttiva devono essere effettuate da
personale specializzato.
ATTENZIONE!
Prima di effettuare qualsiasi operazione di
manutenzione è necessario scollegare l’alimen-
tazione elettrica!
Per effettuare lo scollegamento della alimentazione elet-
trica si devono disinserire i due interruttori che si trovano
sul pannello di controllo (N°25 Pos.1 e 2) e l'interruttore
di linea alla presa della vetrina, dopo di che staccare la
spina elettrica di alimentazione.
5.2 SOSTITUZIONE DELLE SUPERFICI VETRATE
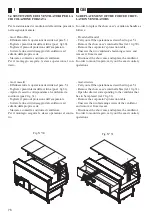
- SOSTITUZIONE VETRO FRONTALE
ATTENZIONE!
Eseguire questa operazione in due persone.
Per lo smontaggio del vetro è suffi ciente:
•Aprire il vetro.
•Sollevare il vetro dalla sua sede e appoggiarlo su un
piano.
•Allentare i grani che fi ssano la cerniera in alluminio al
vetro (Fig. 26, pos. A).
•Sfi lare il vetro e sostituirlo con il nuovo
.
ATTENZIONE!
Quando si inserisce il nuovo vetro nella cerniera,
avvitare bene tutti i grani senza forzarli
5 SPECIAL MAINTENANCE
5.1 PRELIMINARY SAFETY CHECKS
CAUTION!
All corrective and special maintenance opera-
tions must be carried out by qualifi ed person-
nel.
CAUTION!
Before carrying out any maintenance opera-
tions, fi rst disconnect the unit from the mains
power supply!
To disconnect the unit from the mains power supply, the
two switches found on the control panel (N° 25 Pos. 1
and 2) must be switched off, as must the switch fi tted to
the mains plug socket of the display unit. The unit must
then be unplugged.
5.2 REPLACING THE GLASS SURFACES
- HOW TO REPLACE THE FRONT PANEL IN GLASS
CAUTION!
This operation requires two people.
To remove the glass panel, simply:
• Open the glass cover.
• Lift the glass out of its slot and rest it on a surface.
• Loosen the dowels fi xing the aluminium hinge to the
glass (Fig. 26, pos. A).
• Slide out the glass and replace it with the new panel.
CAUTION!
After inserting the new panel into the hinge,
tighten the grub screws well without forcing
them.
��
���
(
(
(
(
(
(
1
2
Fig. N°25


