background image

10

11

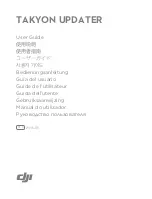
INSTALLATION - FLUSH 

Hang Case on Suspended Brackets and Raise Up

6b

FLUSH SUSPENDED

Nut

Threaded 

Rod

Nut

Washer

Washer

Supplied By 

Installer

Raise the case up and guide the threaded rods through the holes in the suspended 

ceiling brackets. Secure with nuts and washers supplied by the installer

Use the nuts connected to the threaded rods to raise the case up untill the end flanges 

touch the ceiling.

INSTALLATION - EXTERNAL 

Measure case & Mount L Brackets

EXTERNAL

1

2

F

Measure the case length and record the measurement.

Mount the L brackets either to a vertical or horizontal structural support as shown. Make 

sure brackets are all along the same level line and plumb. 

Mounting screws have been provided for mounting to wood structural supports only. If 

mounting to other substrate then installer must provide appropriate fasteners.

 Evenly Spaced 

If more than 2 brackets included

F

7”- 2”

(17.8 cm - 5 cm)

7”- 2”

(17.8 cm - 5 cm)

200 lbs 

 (90kg)

Each

OR

Each bracket must be able to hold 200lb load.

Summary of Contents for 5 Motorized

Page 1: ...n Innovations 9715 B Burnet Rd Suite 400 Austin TX 78758 512 832 6939 www screeninnovations com 5 Motorized Owner s Manual INSTALLERS PLEASE LEAVE THIS MANUAL WITH THE OWNER Control DCT with 12v IR Tr...

Page 2: ...om state to state No liability is assumed for expenses or damages resulting from interruption in operation of equipment or for incidental direct or consequential damages of any nature In the event tha...

Page 3: ...ws 4 Closure Bumpers 2 pair Gloves L Bracket Suspended Ceiling Bracket IR Remote IR Eye 2 3 5 mm Male Trigger connectors Wall Switch Cable DCT Wall switch and cover plate 12 IEC Cable if selected Idle...

Page 4: ...r 3rd party Control Systems Wall Swtich 2 If your 3rd party Control Wall Switch is more than 100ft you must used a shielded UTP Cat5e cable Installer must follow all local electrical codes when connec...

Page 5: ...t Pocket W Z W 1 3 4 1 4 1 8 4 5 cm 0 64 cm 0 32 cm F F F in cm Z 2 1 8 1 8 20 6 cm Measure the case length and record the measurement If pre constructing the pocket then refer to the screen builder f...

Page 6: ...LUSH Mounting Flush L Brackets A A 7 2 17 8 cm 5 cm 7 2 17 8 cm 5 cm 200 lbs 90kg Each Z Ceiling W 7 1 4 18 4 cm 18 7 cm TO 7 3 8 OR 5a FLUSH L Mount the L brackets either to a vertical or horizontal...

Page 7: ...readed Rod 3 8 Minimum Nut Washer WasherNut Parts to be supplied by installer Stuctural Member Ceiling 4 12 17 8 cm 5 cm 4 12 17 8 cm 5 cm Z FLUSH SUSPENDED Install minimum 3 8 threaded rod to structu...

Page 8: ...ch the ceiling INSTALLATION EXTERNAL Measure case Mount L Brackets EXTERNAL 1 2 F Measure the case length and record the measurement Mount the L brackets either to a vertical or horizontal structural...

Page 9: ...the brackets untill the case firmly presses against the the L brackets 1 TRIM INSTALLATION FLUSH Flush Trim Install FLUSH SUSPENDED FLUSH L 2 Hook the larger front closure into the case opposite the...

Page 10: ...sure the bumpers are secured to the endplates Do this at both ends of the screen SNAP 3 FLUSH SUSPENDED FLUSH L TRIM INSTALLATION EXTERNAL Fascia Install Fascia Lock EXTERNAL 2 1 Hook the front trim i...

Page 11: ...been provided which all operate the same An additional 1 8 3mm mono low voltage trigger is also provided CONTROLS Inputs Contact Closures RJ45 Inputs 3X Low Voltage Trigger Input 1 8 3 5mm mono RJ45 I...

Page 12: ...e shielded RJ45 RJ9 Wall Switch Send Motor to Upper Limit Stop Motor Send Motor to Lower Limit Wall Switch buttons Back of the switch UP DN CMN 5vDC RJ9 TO DCT MOTOR SWITCH CONTROLS SETTING THE LOWER...

Page 13: ...ng mode WALL SWITCH GENERAL OPERATION NORMAL OPERATION SET UPPER LIMIT SET LOWER LIMIT Setting the upper limit incorrectly could damage your screen Contact screen innovations if you are having problem...

Page 14: ...direction 1 Slide the switch to the down position 2 Hold the STOP button for 3 seconds 3 Press the down button to make sure the screen direction is correct 4 Slide the switch to the center position to...

Page 15: ...at a time untill there is tension on the string The strings should have minimal tension on them only DO NOT OVERTIGHTEN TAB TENSION STRINGS Tab tension strings will NOT flatten out major wrinkles in...

Page 16: ...an electrician TROUBLESHOOTING It is 100 programmed and tested at the factory In case of a malfunction please use the troubleshooting guide table Problem Description Probably Cause Action to Take Dir...

Page 17: ...1 2 3 4 5 6 7 8 9 10 11 12 13 14 15 16 17 18 NOTES...

Reviews: