Chapter 2. Installing and Set Up
2-4
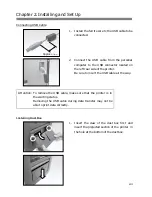
Connecting USB Cable
1. Install the ferrite core to the USB cable to be
connected.
2. Connect the USB cable from the personal
computer to the USB connector located on
the left rear side of the printer.
Be sure to insert the USB cable all the way.
Installing Dust Box
1. Insert the claw of the dust box first and
insert the projected section of the printer in
the hole at the bottom of the dust box.
Attention: To remove the USB cable, make sure that the printer is in
the waiting status.
Removing the USB cable during data transfer may not be
able to print data correctly.
Approx.
30mm
Summary of Contents for CHC-S2145
Page 2: ......
Page 11: ...Chapter 1 Important Safety Instruction 1 6 MEMO ...
Page 21: ...Chapter 2 Installing and Set Up 2 10 MEMO ...
Page 29: ...Chapter 4 Routine Maintenance 4 4 MEMO ...
Page 35: ......


