


FO-DC635U
2 – 10
2.2.12 Rapid key 12: Life clear mode
The mode is used to respectively clear the life counter of the printer
and the counter of the auto feeder. For setting, proceed with the follow-
ing procedure.
1. When the life counter clearing mode is selected, the following will
be is displayed.
Seven counters can be selected with the "#" and "
" keys.
2. In the state 1, input the DEL key, and the counter will be respec-
tively cleared.
3. “CLEARED” is displayed and clearing is complete. After ending one
clear, move to another counter to clear with the "#" key, "
" key,
if necessary. After clearing the necessary counter press down the
“STOP” key.
NOTE: The counter shows the operational state of the printer (how
many sheets have been printed since start of use?). The ordinary
memory does not reset the counter. Accordingly, it is necessary to
reset this counter in addition to the ordinary memory clear if the con-
tent in the memory on the control PWB is broken because of PWB
repair, etc. (In the production stage, it is necessary to execute this in
the last process.)
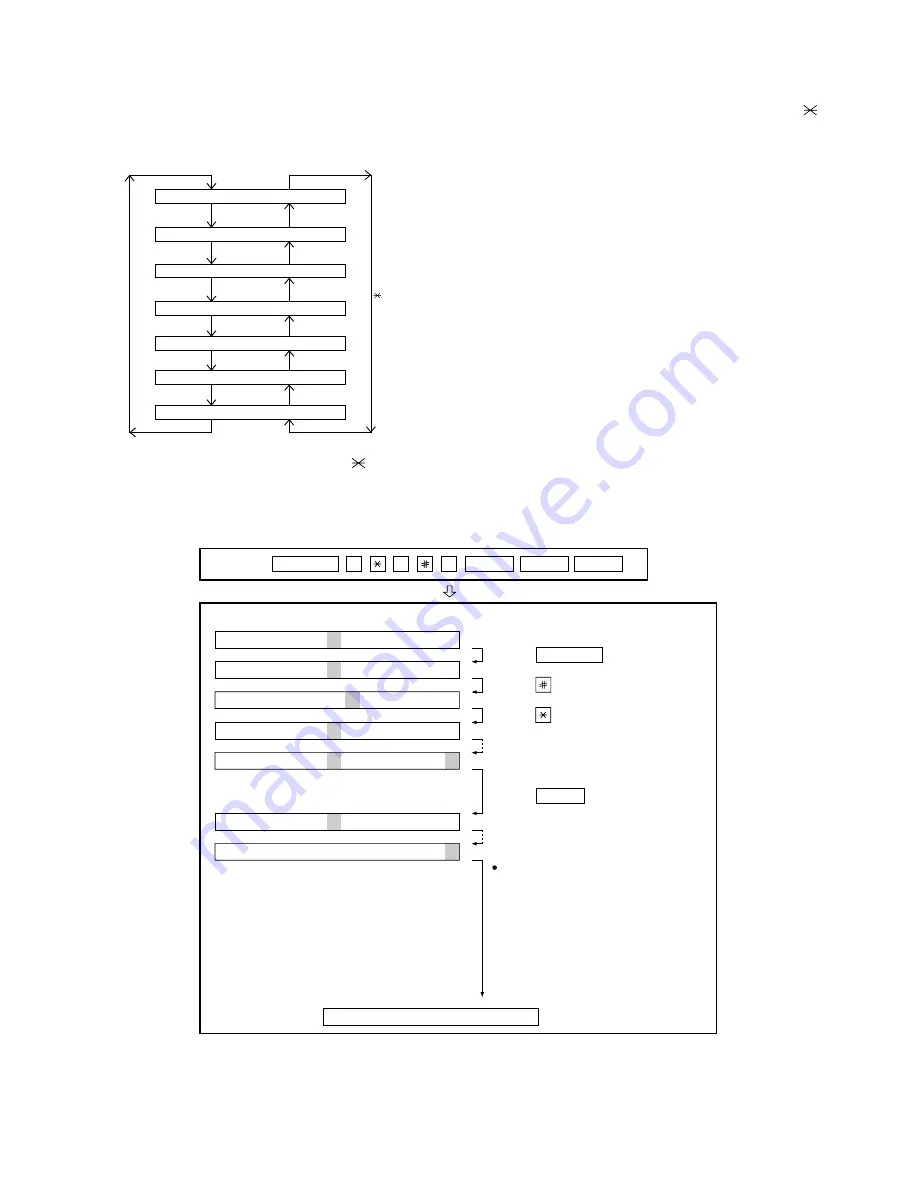
3. How to make soft switch setting
To enter the soft switch mode, make the following key entries in sequence.
•
SW1 to SW22: For Line-1
•
SW23 to SW44: For Line-2
M A C H I N E
D R U M
L
L I F E
L I F E
I F E 1
L E A R
F E E D E R
L I F E
L E A R
T O N E R
L I F E
L E A R
L E A R
L E A R
L I F E 2
L E A R
L I F E 3
L E A R
C
C
C
C
C
C
C
key
# key
Press
MENU
9
8
7
START
A
START
Press
MENU
key.
Press
key.
Press
key.
Bit1 - 8 are set.
Soft SW2 - 99 are set.
S F T S W 1 = 1 0 0 0 0 0 0 0
S F T S W 1 = 1 0 0 0 0 0 0 0
S F T S W 1 = 1 0 0 0 0 0 0 0
S F T S W 1 = 1 0 0 0 0 0 0 0
S F T S W 2 = 0 0 0 0 0 0 0 0
S F T S W 99 = 0 0 0 0 0 0 0 0
Press
key during setting.
To finish the settings halfway between
SW1 and SW99, press the STOP key.
In this case, the setting being done to
the SW No. on display will be nullified
while settings done to the preceding
SW No. remain in effect.
The soft switch mode is terminated.
S F T S W 1 = 0 0 0 0 0 0 0 0
START
Summary of Contents for FO-DC635U
Page 3: ... ii MEMO FO DC635U ...
Page 87: ...FO DC635U 5 21 MEMO ...
Page 110: ...FO DC635U 6 23 3 Printer PWB parts layout Top side ...
Page 111: ...FO DC635U 6 24 4 Printer PWB parts layout Bottom side ...
Page 124: ...FO DC635U 8 2 MEMO ...
Page 165: ...FO DC635U 41 ...


